> ## Documentation Index
> Fetch the complete documentation index at: https://hub.stackone.com/llms.txt
> Use this file to discover all available pages before exploring further.
# Workday Assessments
> To successfully manage candidate assessments in Workday and ensure seamless integration, follow this guide to configure your Workday account and perform the necessary actions.
## Applying for a Job on Behalf of a Candidate
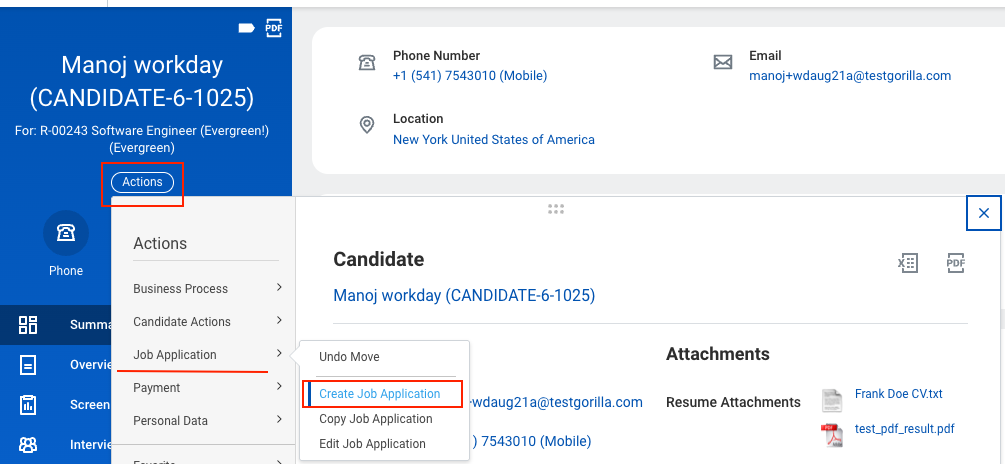
Navigate to the Find Candidates page, select a candidate's profile, and under `Actions`, click on `Job Application` to apply for a job on their behalf.
 From the dropdown menu, select the relevant job.
These steps assume you have a Supervisory Organisation in your Workday account.
If not, please contact your administrator to create one. You will also need the necessary permissions to access the *Supervisory Organisation* in Workday.
Navigate to your Supervisory Organisation page and go to the `Staffing` tab.
Ensure the Supervisory Organization's Staffing Model is `Position Management`
From the dropdown menu, select the relevant job.
These steps assume you have a Supervisory Organisation in your Workday account.
If not, please contact your administrator to create one. You will also need the necessary permissions to access the *Supervisory Organisation* in Workday.
Navigate to your Supervisory Organisation page and go to the `Staffing` tab.
Ensure the Supervisory Organization's Staffing Model is `Position Management`
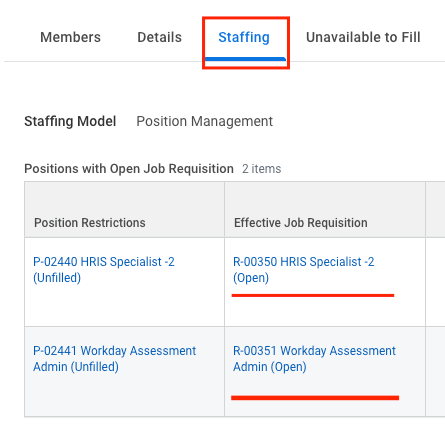 Under the `Positions with Open Job Requisition` section, you will find a list of job requisitions that are configured to send notifications for the assessment stage.
If no jobs are listed under `Positions with Open Job Requisition`, find `Create Position` under the `Staffing` tab in the three-dot menu.
Under the `Positions with Open Job Requisition` section, you will find a list of job requisitions that are configured to send notifications for the assessment stage.
If no jobs are listed under `Positions with Open Job Requisition`, find `Create Position` under the `Staffing` tab in the three-dot menu.
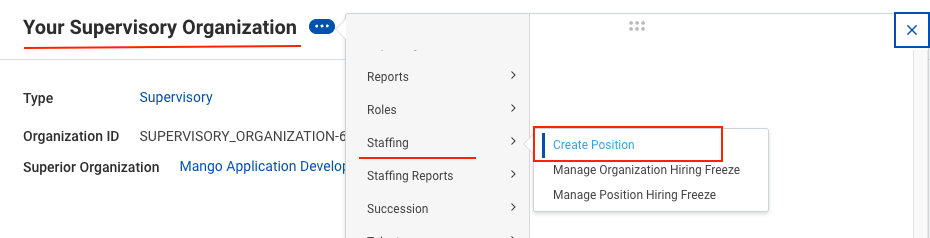 Fill in the required details to create a position. It will then appear in the `Positions without Job Requisition` section.
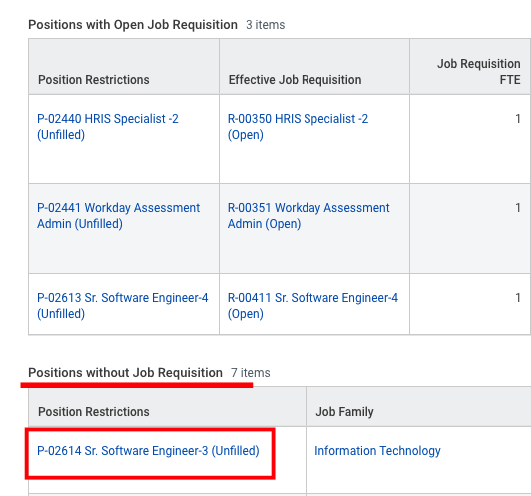 Navigate to `Create Job Requisition`, select your supervisory organisation and position, click `OK`, complete the Job Requisition form, and then `Submit` it.
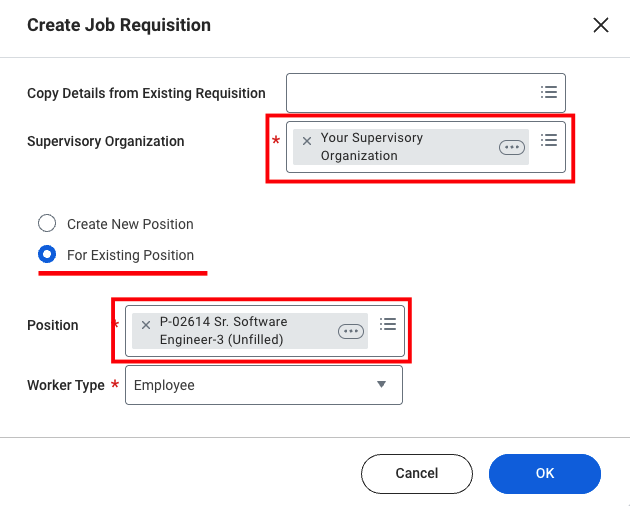 The position will now appear in the `In Progress Requisition Actions` section.
 Once the job requisition is approved, it will appear in the `Positions with Open Job Requisition` section and will be enabled for notifications.

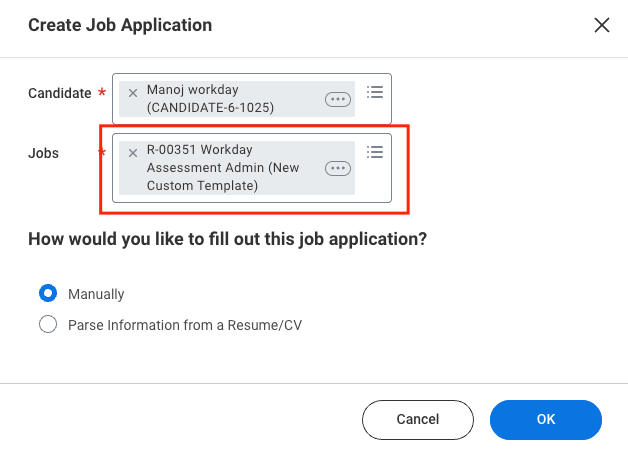 Enter the required details and click `OK` to submit the job application.
## Moving a Candidate to the Assessment Stage
Navigate to the Job Requisitions page and select the job requisition for which the candidate has applied.
Enter the required details and click `OK` to submit the job application.
## Moving a Candidate to the Assessment Stage
Navigate to the Job Requisitions page and select the job requisition for which the candidate has applied.
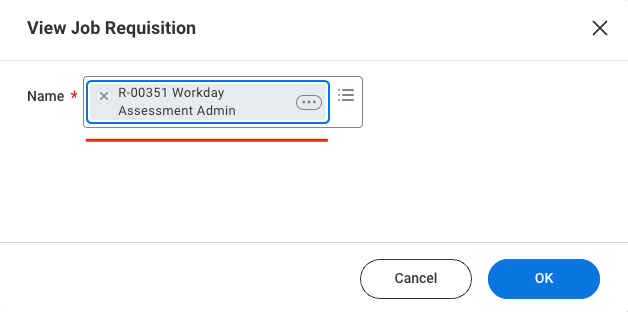 Go to the `Candidates` tab and select the `Review` sub-tab, where the candidate will be displayed.
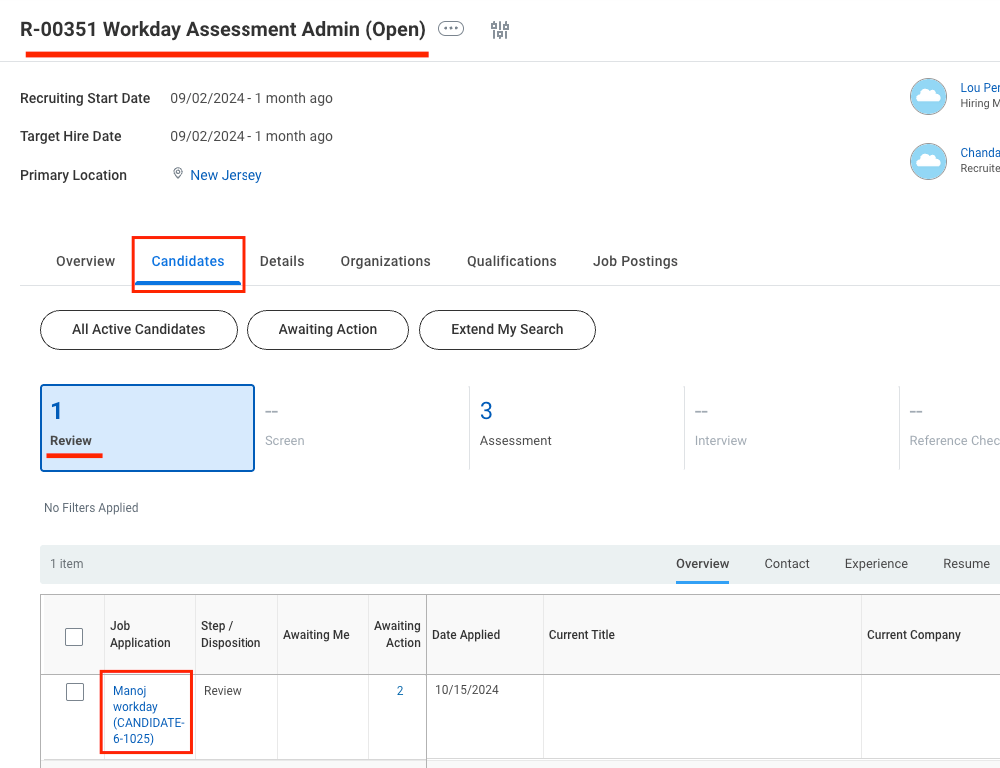 Select the candidate in the grid and click `Move Forward`.
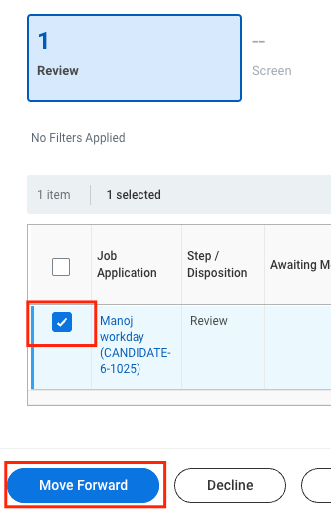 In the pop-up window, select `Assessment` as the next stage from both dropdown menus.
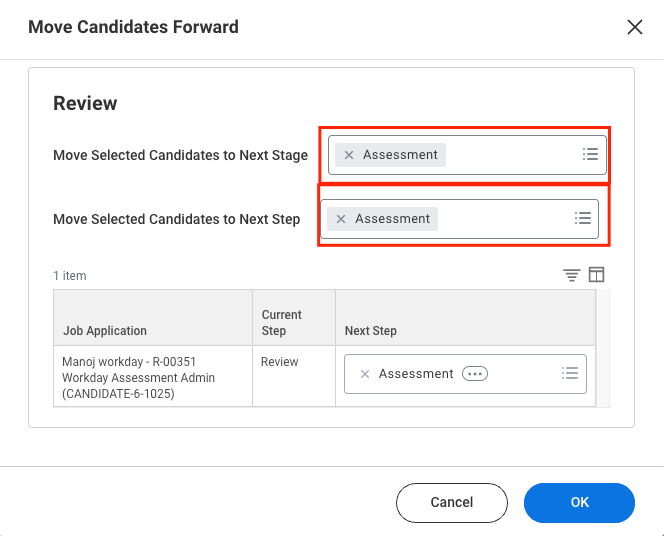 Click `OK` to confirm.
Navigate to the `Assessment` tab to see the candidate in the assessment stage.
Click `OK` to confirm.
Navigate to the `Assessment` tab to see the candidate in the assessment stage.
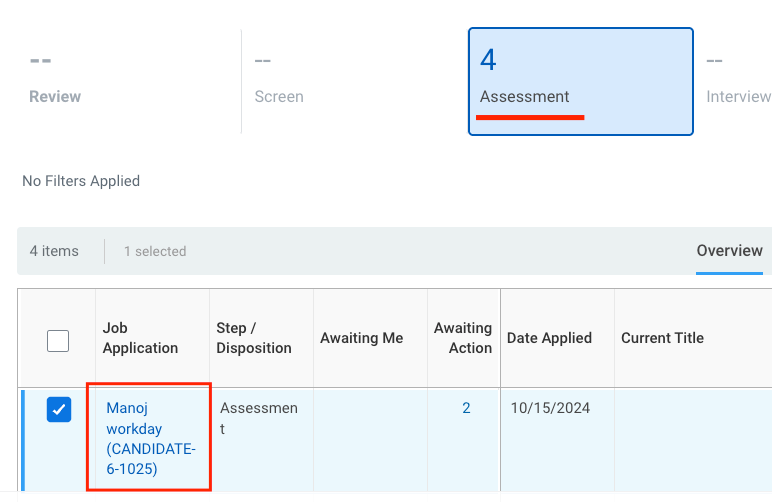 If you are unable to move the candidate directly to the assessment stage, you may need to advance them through each stage one by one.
## Sending the Assessment Invitation (via Start Proxy)
If you are not the recruiter, go to the recruiter’s account via `Start Proxy`. Click on the `Awaiting Action` link, and a pop-up will appear showing the recruiter’s name.
If you are unable to move the candidate directly to the assessment stage, you may need to advance them through each stage one by one.
## Sending the Assessment Invitation (via Start Proxy)
If you are not the recruiter, go to the recruiter’s account via `Start Proxy`. Click on the `Awaiting Action` link, and a pop-up will appear showing the recruiter’s name.
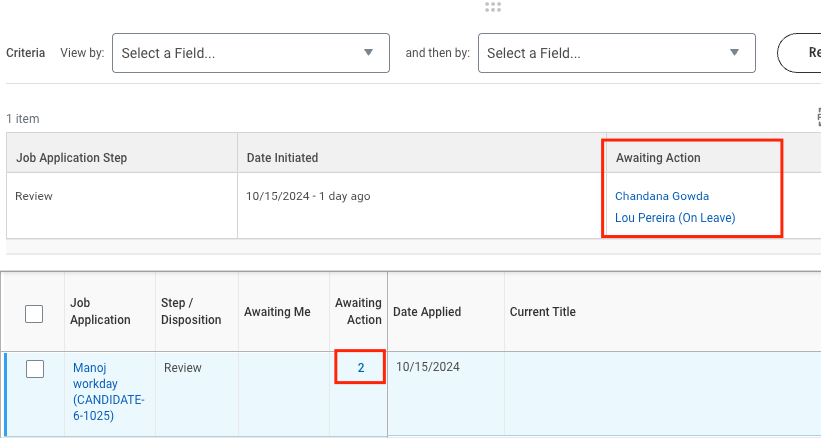 Navigate to the Start Proxy page and select the recruiter from the dropdown menu.
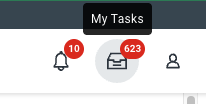
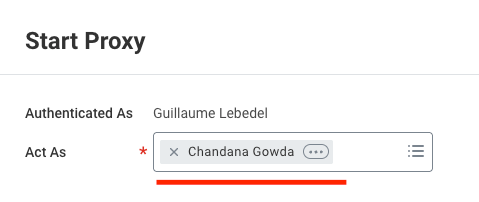 You will be redirected to the recruiter's homepage. Navigate to the `My Tasks` page in the top-right corner.
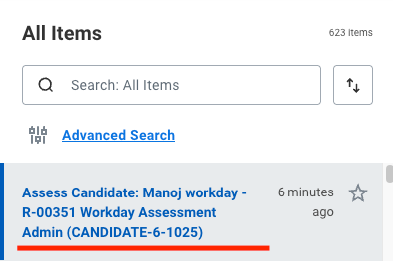
 You will find the assessment task at the top of the sidebar, labelled with the job requisition and candidate name.
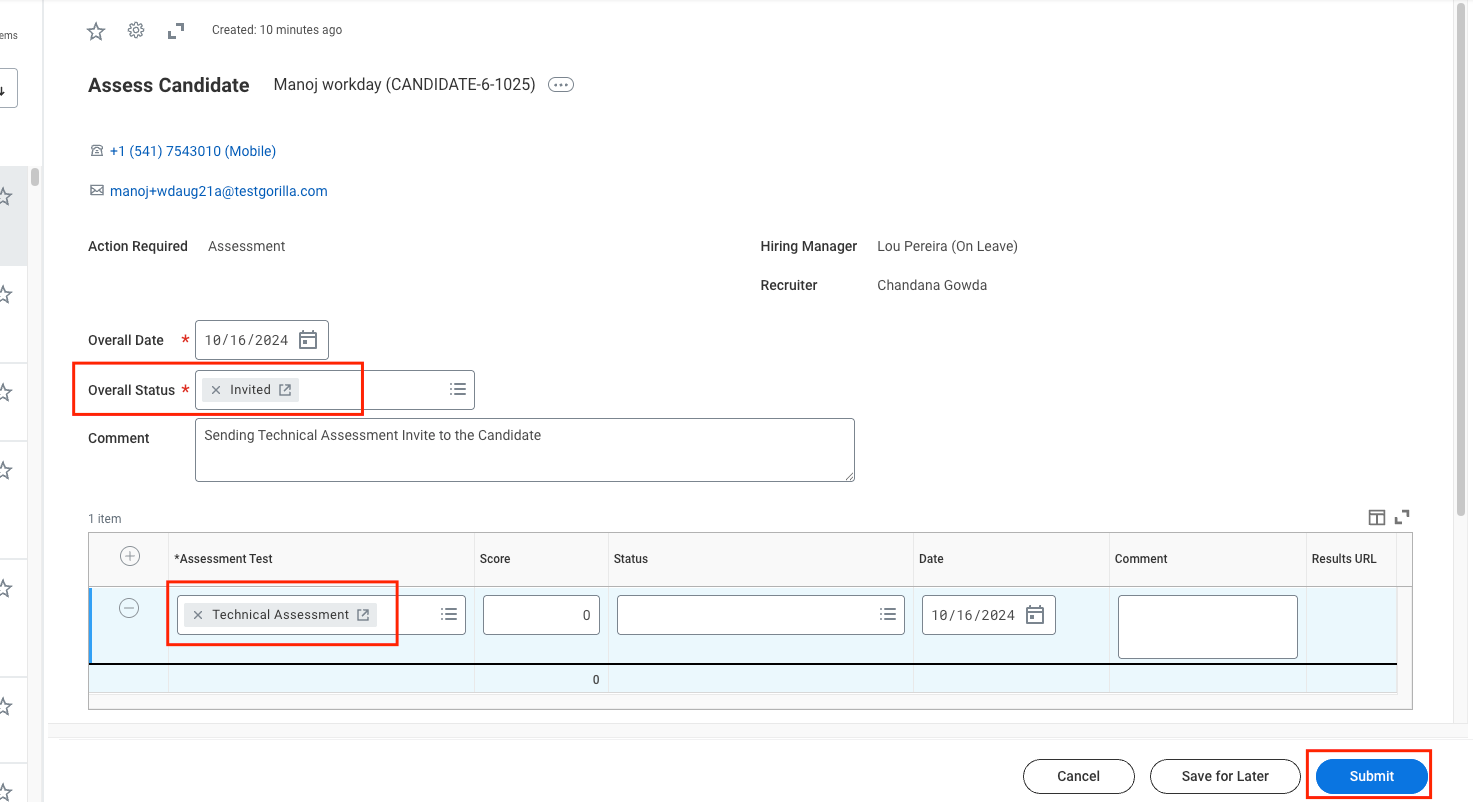
 Clicking on the task will display the candidate's assessment details on the right.
Set the **Overall Status** to `Invited` and select the appropriate assessment (e.g., `Technical Assessment`) from the dropdown menu. After that, click `Submit`.
Clicking on the task will display the candidate's assessment details on the right.
Set the **Overall Status** to `Invited` and select the appropriate assessment (e.g., `Technical Assessment`) from the dropdown menu. After that, click `Submit`.
 ## Sending the Assessment Invitation (as a Recruiter)
If you are the recruiter, you can send the assessment invitation directly.
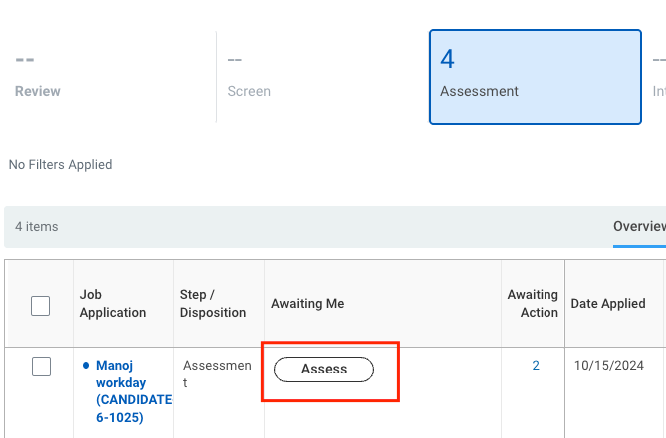
You should see an `Assess` button next to the candidate's name. Click it to open the assessment form.
## Sending the Assessment Invitation (as a Recruiter)
If you are the recruiter, you can send the assessment invitation directly.
You should see an `Assess` button next to the candidate's name. Click it to open the assessment form.
 Set the **Overall Status** to `Invited` and select the appropriate assessment (e.g., `Technical Assessment`) from the dropdown menu.
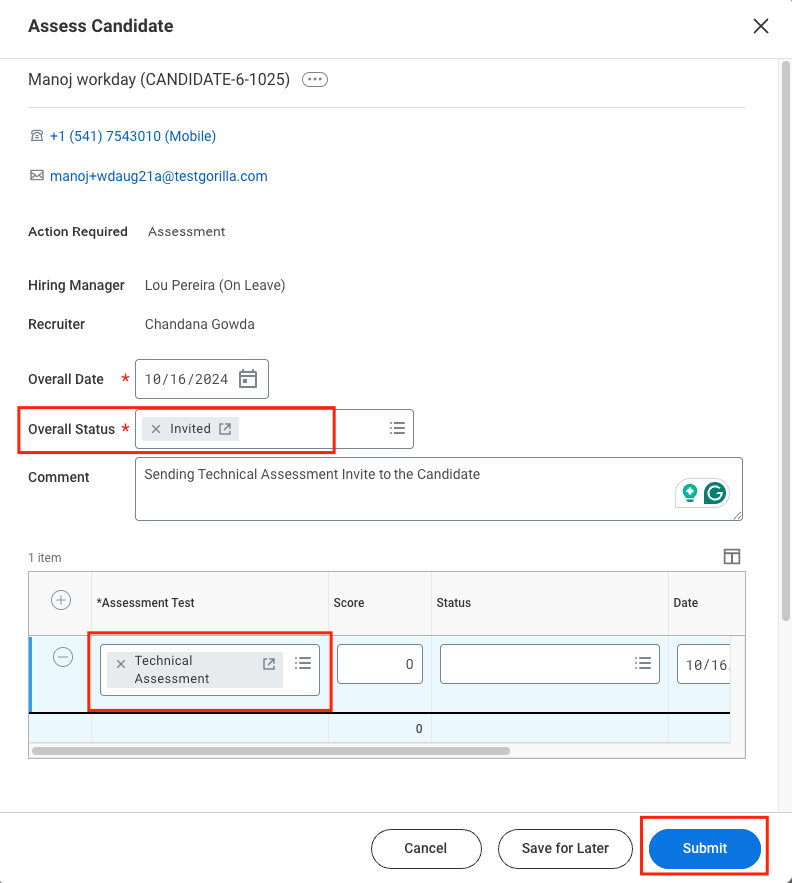 Click `Submit` to send the invitation and trigger the webhook notification from Workday.
## To verify the sent assessment invitation for the candidate
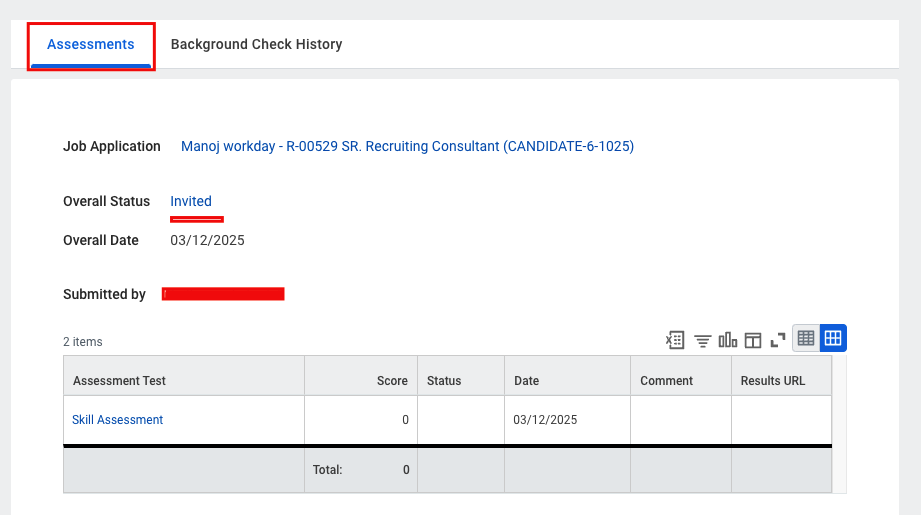
To access the *Job Application*, click on the candidate's profile. Go to the *Screening* > Assessments tab
Click `Submit` to send the invitation and trigger the webhook notification from Workday.
## To verify the sent assessment invitation for the candidate
To access the *Job Application*, click on the candidate's profile. Go to the *Screening* > Assessments tab
 ## To check the updated result of the candidate's assessment
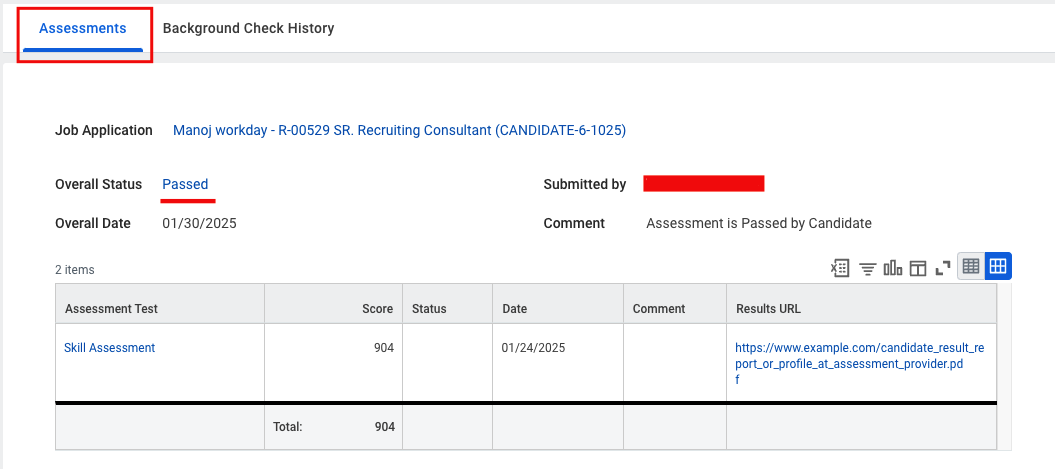
To check the results of a completed assessment, go to the candidate's profile and navigate to the *Job Application* > *Screening* > *Assessments* tab.
## To check the updated result of the candidate's assessment
To check the results of a completed assessment, go to the candidate's profile and navigate to the *Job Application* > *Screening* > *Assessments* tab.
 ## Useful Links
[https://doc.workday.com/](https://doc.workday.com/)
## Useful Links
[https://doc.workday.com/](https://doc.workday.com/)