> ## Documentation Index
> Fetch the complete documentation index at: https://hub.stackone.com/llms.txt
> Use this file to discover all available pages before exploring further.

# SAP SuccessFactors Job Custom Field

> To create and view job custom field in SAP SuccessFactors, follow these steps

<Warning>
  This guidance assumes that you have admin privileges for your SAP SuccessFactors account.
</Warning>

## Create SAP SuccessFactors Job Custom Field

<Steps>
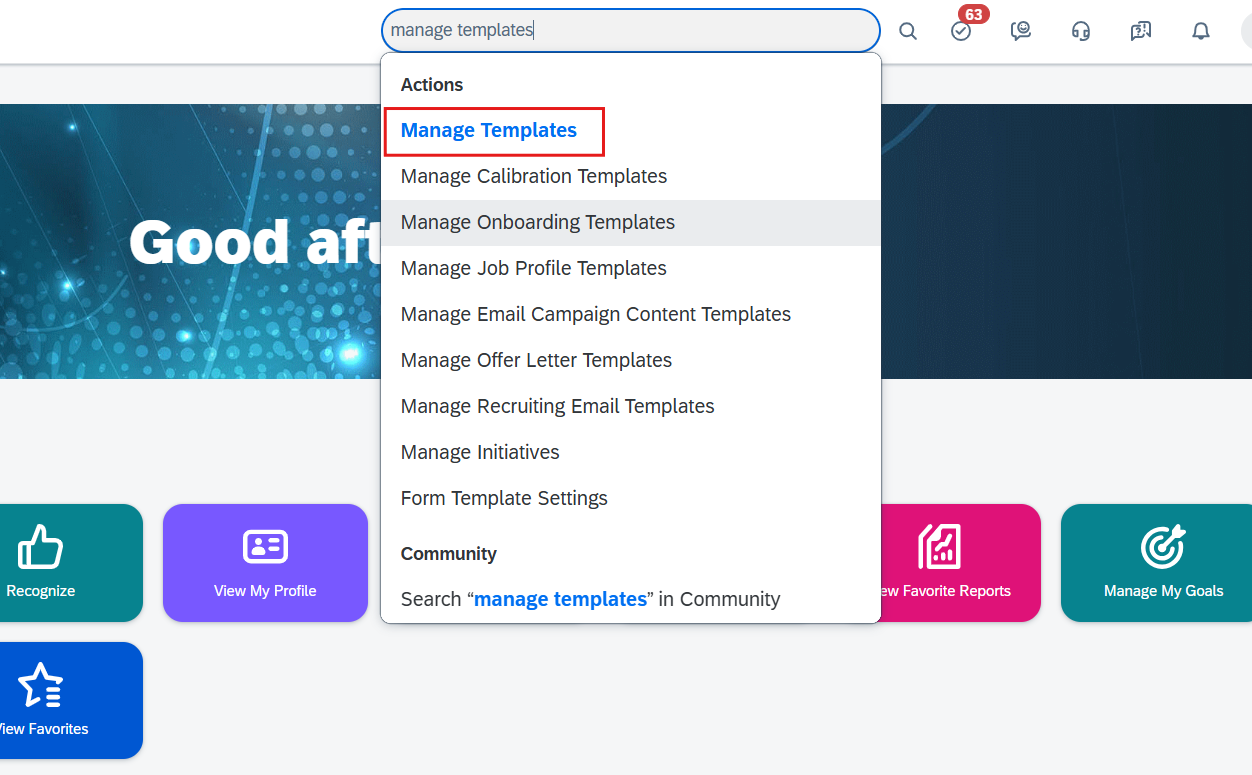
  <Step title="Search for 'Manage Templates'">
    Search for <b>Manage Templates</b> in the search bar and select it.

    <Frame>
      <img className="rounded-md" style={{ margin: '0 auto', border: '1px solid #efefef' }} alt="Search Manage Templates" src="https://mintcdn.com/stackone-hub/DSTDvdfXE5cXWfs9/images/sapsuccessfactors/job-custom-field/job-custom-field-01.png?fit=max&auto=format&n=DSTDvdfXE5cXWfs9&q=85&s=fcb37c133230822ae21ede6cab70e471" width="1252" height="775" data-path="images/sapsuccessfactors/job-custom-field/job-custom-field-01.png" />
    </Frame>
  </Step>

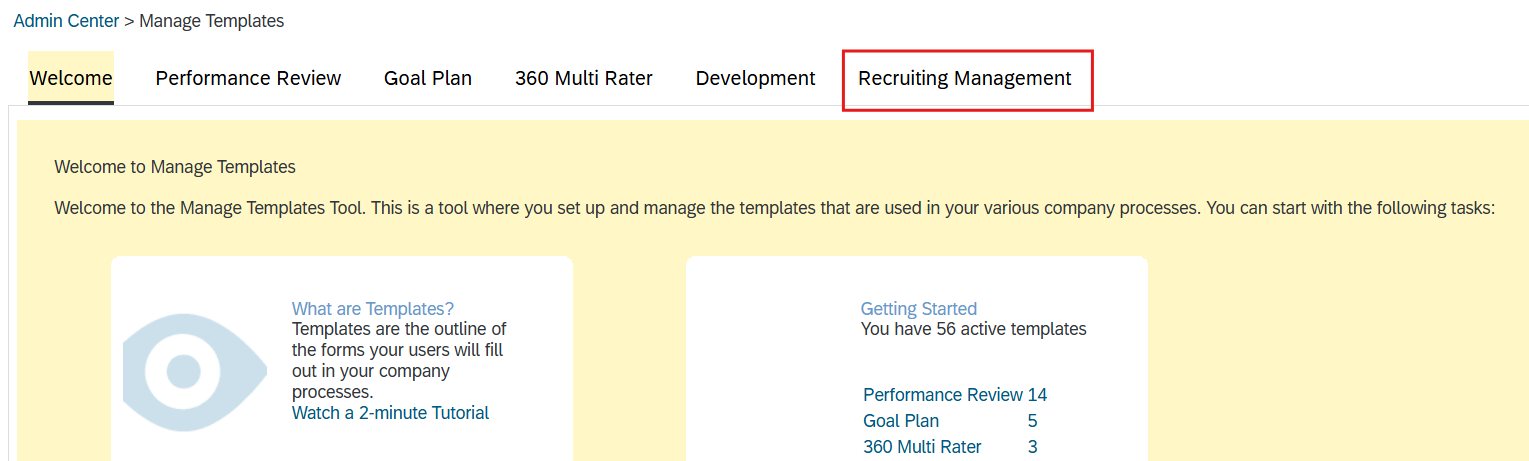
  <Step title="Select the 'Recruiting Management' tab">
    Select the <b>Recruiting Management</b> tab on the Manage Templates screen.

    <Frame>
      <img className="rounded-md" style={{ margin: '0 auto', border: '1px solid #efefef' }} alt="Select Recruiting Management" src="https://mintcdn.com/stackone-hub/DSTDvdfXE5cXWfs9/images/sapsuccessfactors/job-custom-field/job-custom-field-02.png?fit=max&auto=format&n=DSTDvdfXE5cXWfs9&q=85&s=0cd442d58147268360585e51797dadae" width="1529" height="461" data-path="images/sapsuccessfactors/job-custom-field/job-custom-field-02.png" />
    </Frame>
  </Step>

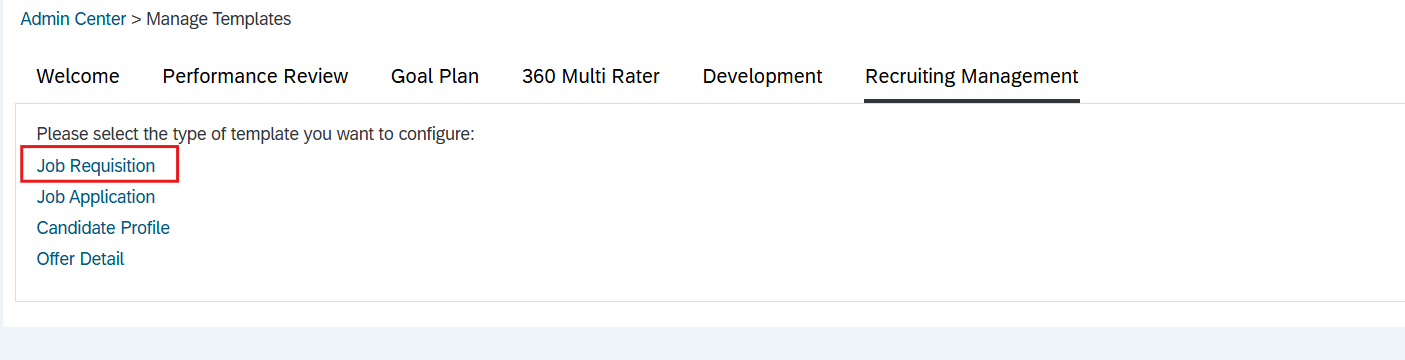
  <Step title="Select the Job Requisition">
    Select the Job Requisition template type
    <Frame>
      <img className="rounded-md" style={{ margin: '0 auto', border: '1px solid #efefef' }} alt="Select Job Requisition Template Type" src="https://mintcdn.com/stackone-hub/DSTDvdfXE5cXWfs9/images/sapsuccessfactors/job-custom-field/job-custom-field-03.png?fit=max&auto=format&n=DSTDvdfXE5cXWfs9&q=85&s=ee73a1c38ecf4bbd1af30e0e3d40d35e" width="1405" height="360" data-path="images/sapsuccessfactors/job-custom-field/job-custom-field-03.png" />
    </Frame>
  </Step>

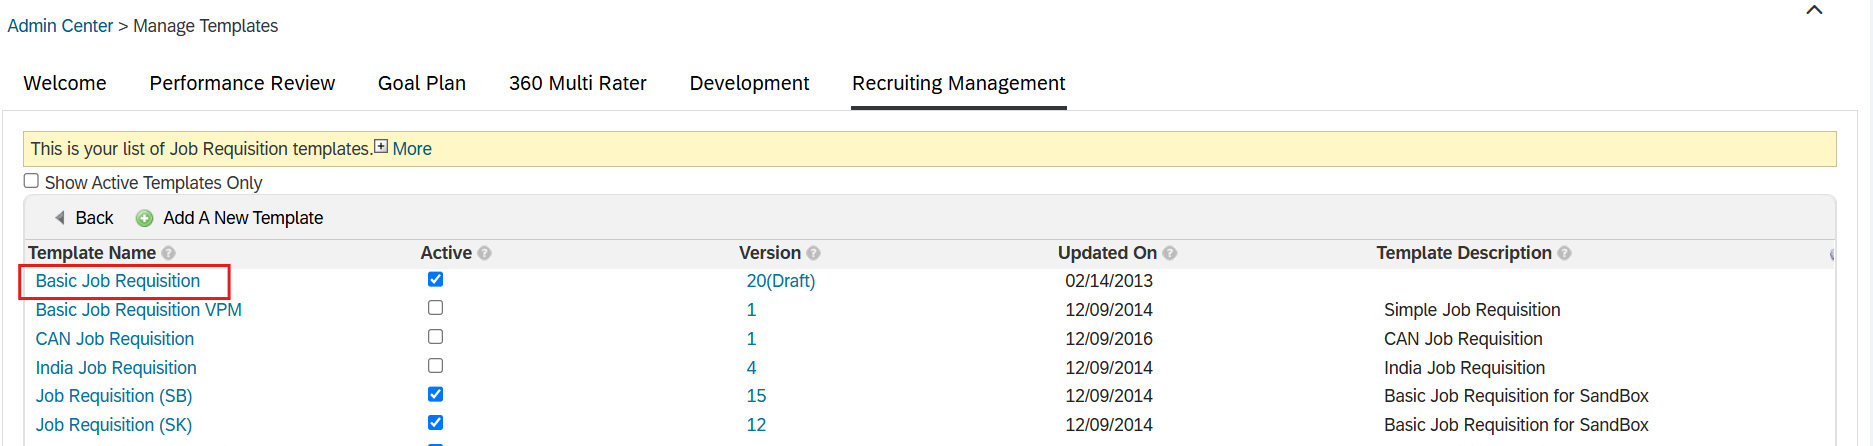
  <Step title="Select template">
    Select any template in which you want to add a custom field.
    <Frame>
      <img className="rounded-md" style={{ margin: '0 auto', border: '1px solid #efefef' }} alt="Select Template" src="https://mintcdn.com/stackone-hub/DSTDvdfXE5cXWfs9/images/sapsuccessfactors/job-custom-field/job-custom-field-04.png?fit=max&auto=format&n=DSTDvdfXE5cXWfs9&q=85&s=d09003e47731f4a9ae32e3ae8cba1c09" width="1873" height="446" data-path="images/sapsuccessfactors/job-custom-field/job-custom-field-04.png" />
    </Frame>
  </Step>

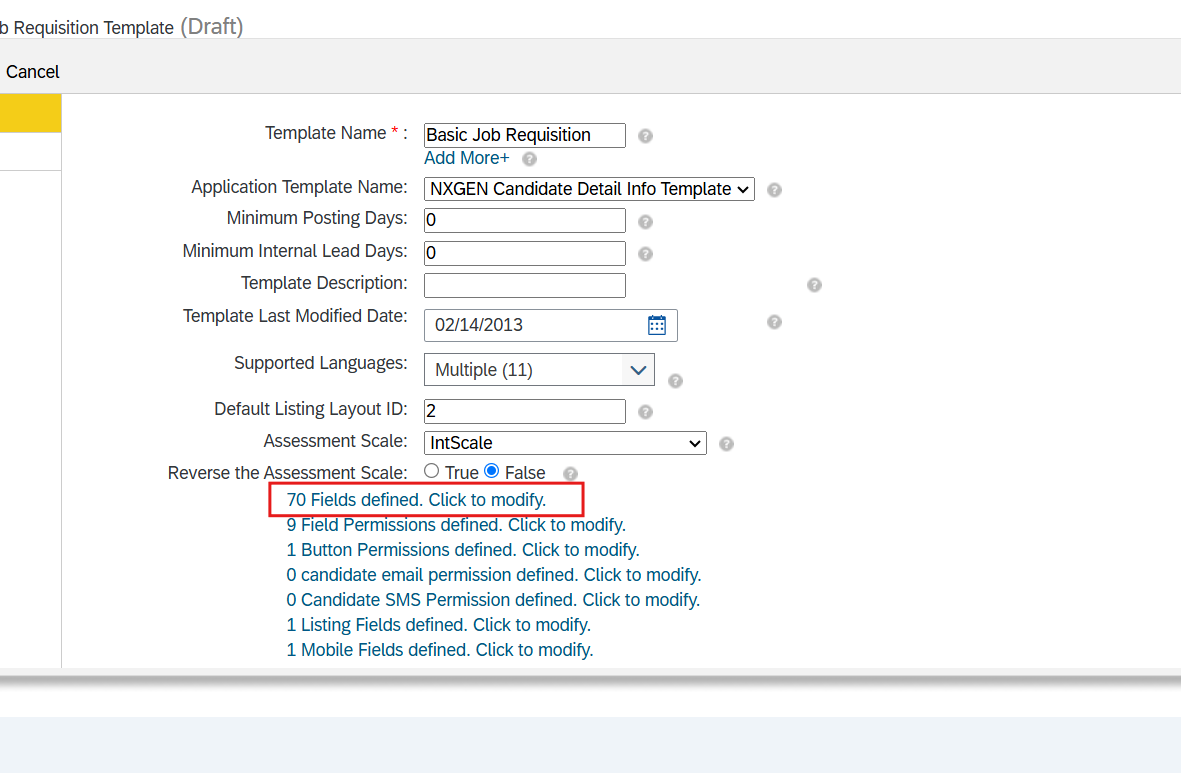
  <Step title="Select 'Click to Modify Defined Fields'">
    <Frame>
      <img className="rounded-md" style={{ margin: '0 auto', border: '1px solid #efefef' }} alt="Click to Modify Fields" src="https://mintcdn.com/stackone-hub/DSTDvdfXE5cXWfs9/images/sapsuccessfactors/job-custom-field/job-custom-field-05.png?fit=max&auto=format&n=DSTDvdfXE5cXWfs9&q=85&s=62cc4230a18001aeb8aa3a00c1a14fe5" width="1181" height="773" data-path="images/sapsuccessfactors/job-custom-field/job-custom-field-05.png" />
    </Frame>
  </Step>

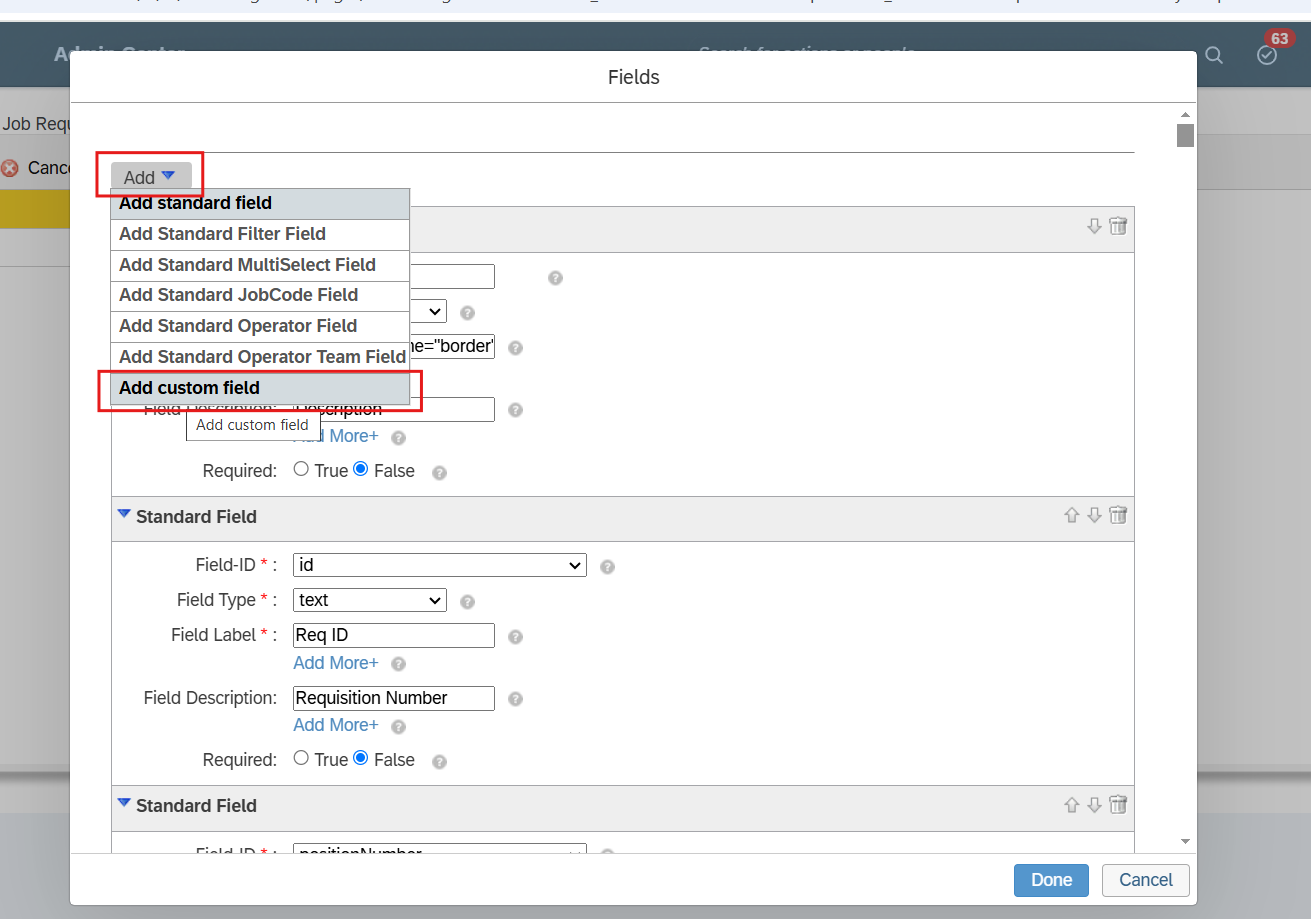
  <Step title="Add a Custom Field">
    Click <b>Add</b>, then select <b>Add Custom Field</b>

    <Frame>
      <img className="rounded-md" style={{ margin: '0 auto', border: '1px solid #efefef' }} alt="Add Custom Field" src="https://mintcdn.com/stackone-hub/DSTDvdfXE5cXWfs9/images/sapsuccessfactors/job-custom-field/job-custom-field-06.png?fit=max&auto=format&n=DSTDvdfXE5cXWfs9&q=85&s=1cd4d9164fd52b536b5e455fec442599" width="1311" height="919" data-path="images/sapsuccessfactors/job-custom-field/job-custom-field-06.png" />
    </Frame>
  </Step>

  <Step title="Enter Field Details">
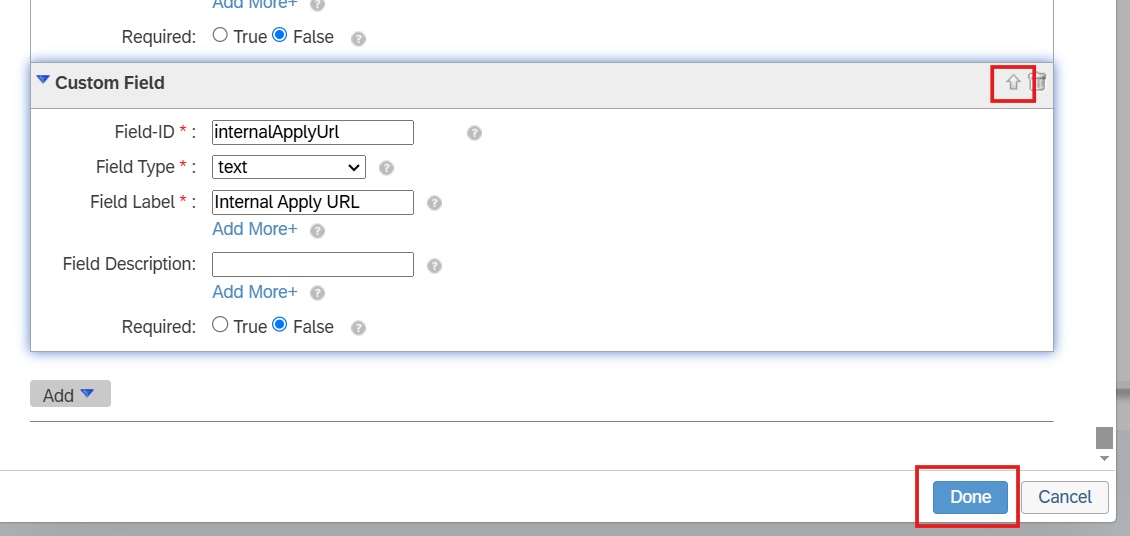
    Enter the Field ID, select the Field Type, and add the Field Label as required, and click Done.

    <Note>
      Note: You can configure the tab where the custom field should appear using the top and bottom arrows.
    </Note>

    <Frame>
      <img className="rounded-md" style={{ margin: '0 auto', border: '1px solid #efefef' }} alt="Enter Field Details" src="https://mintcdn.com/stackone-hub/DSTDvdfXE5cXWfs9/images/sapsuccessfactors/job-custom-field/job-custom-field-07.png?fit=max&auto=format&n=DSTDvdfXE5cXWfs9&q=85&s=21e31055279add4f8583fe0d36a21935" width="1130" height="536" data-path="images/sapsuccessfactors/job-custom-field/job-custom-field-07.png" />
    </Frame>
  </Step>

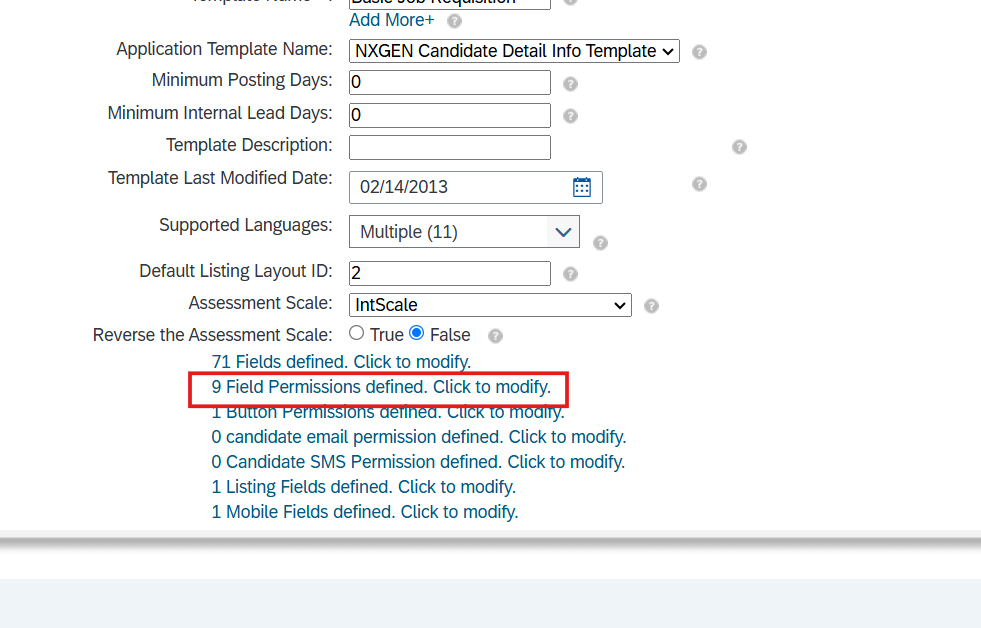
  <Step title="Select Click to Modify Field Permissions">
    <Frame>
      <img className="rounded-md" style={{ margin: '0 auto', border: '1px solid #efefef' }} alt="Modify Permissions" src="https://mintcdn.com/stackone-hub/DSTDvdfXE5cXWfs9/images/sapsuccessfactors/job-custom-field/job-custom-field-08.png?fit=max&auto=format&n=DSTDvdfXE5cXWfs9&q=85&s=f35725bd5d11302ca3ebb0b1bfda8ad1" width="981" height="628" data-path="images/sapsuccessfactors/job-custom-field/job-custom-field-08.png" />
    </Frame>
  </Step>

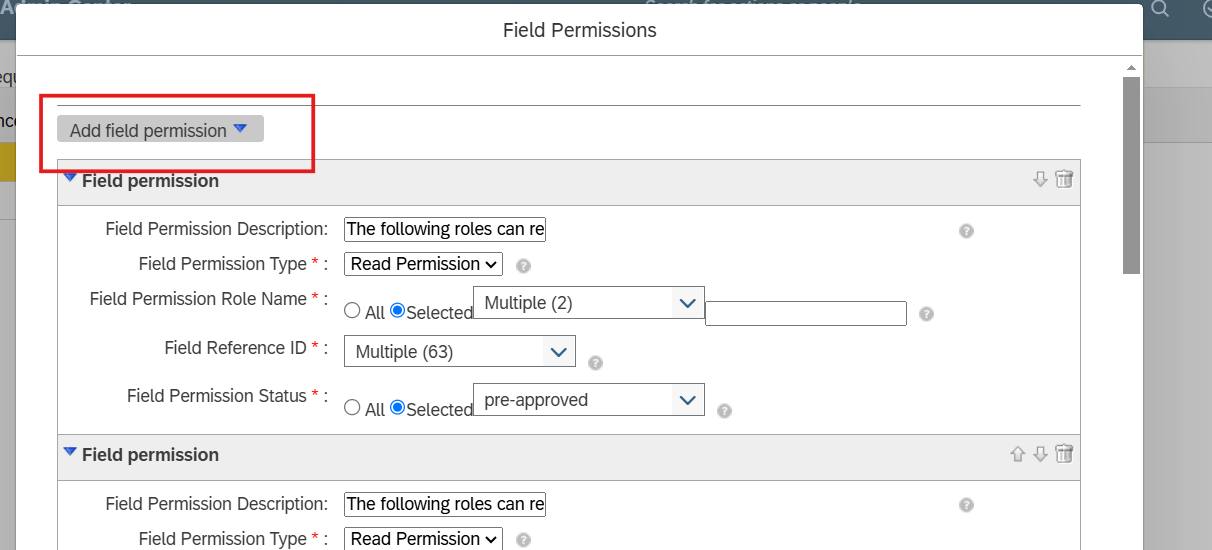
  <Step title="Click 'Add field permissions'">
    <Frame>
      <img className="rounded-md" style={{ margin: '0 auto', border: '1px solid #efefef' }} alt="Add Field Permissions" src="https://mintcdn.com/stackone-hub/DSTDvdfXE5cXWfs9/images/sapsuccessfactors/job-custom-field/job-custom-field-09.png?fit=max&auto=format&n=DSTDvdfXE5cXWfs9&q=85&s=1c78a39a2ee16a57cc59269295d3bdde" width="1212" height="550" data-path="images/sapsuccessfactors/job-custom-field/job-custom-field-09.png" />
    </Frame>
  </Step>

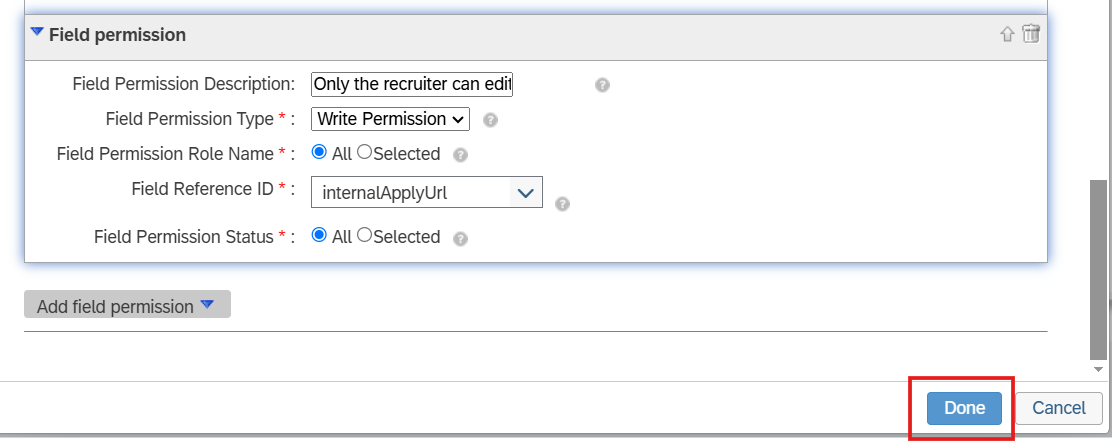
  <Step title="Configure Field Permissions">
    Enter the Permission Description, select the Field Type Permission, choose the Appropriate Role Name, select the newly created Custom Field in the Field Reference ID, set the Field Permission Status, and click Done.
    <Frame>
      <img className="rounded-md" style={{ margin: '0 auto', border: '1px solid #efefef' }} alt="Configure Field Permissions" src="https://mintcdn.com/stackone-hub/DSTDvdfXE5cXWfs9/images/sapsuccessfactors/job-custom-field/job-custom-field-10.png?fit=max&auto=format&n=DSTDvdfXE5cXWfs9&q=85&s=898d17079463b3e1a35829ab4aaec428" width="1112" height="441" data-path="images/sapsuccessfactors/job-custom-field/job-custom-field-10.png" />
    </Frame>
  </Step>

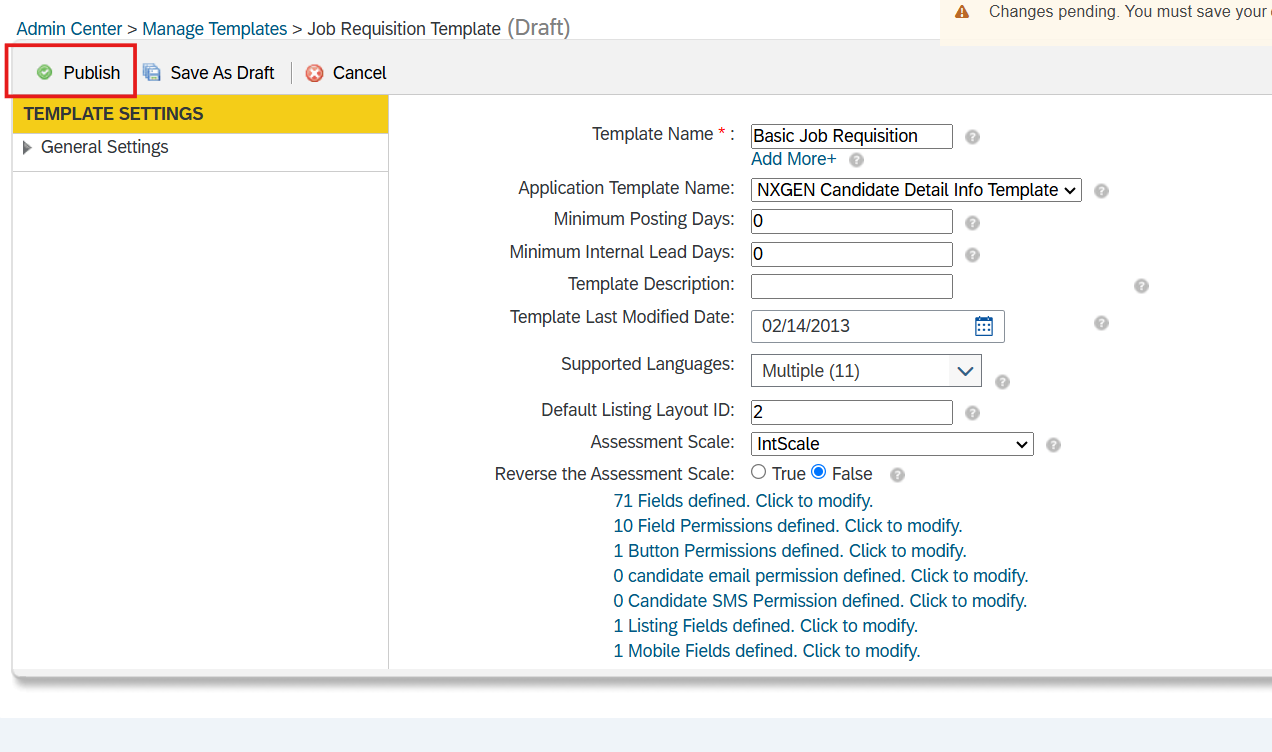
  <Step title="Now Click 'Publish'">
    <Frame>
      <img className="rounded-md" style={{ margin: '0 auto', border: '1px solid #efefef' }} alt="Click Publish" src="https://mintcdn.com/stackone-hub/DSTDvdfXE5cXWfs9/images/sapsuccessfactors/job-custom-field/job-custom-field-11.png?fit=max&auto=format&n=DSTDvdfXE5cXWfs9&q=85&s=4c2a1a2aef12d7e2f438b9ebd4e39ebf" width="1272" height="752" data-path="images/sapsuccessfactors/job-custom-field/job-custom-field-11.png" />
    </Frame>
  </Step>

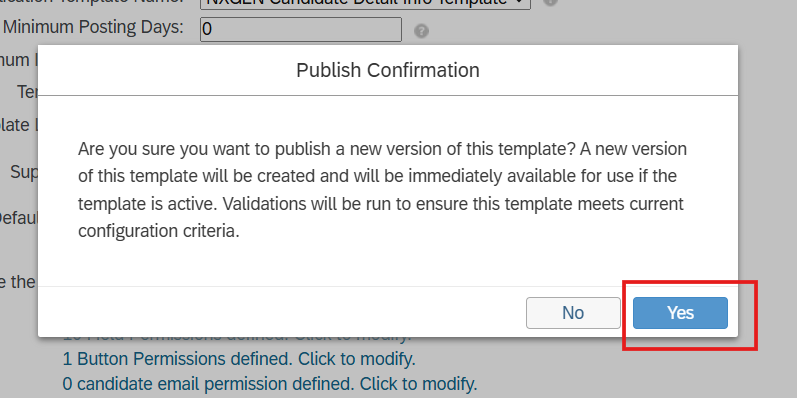
  <Step title="Click 'Yes'">
    Click <b>Yes</b> to proceed.

    <Frame>
      <img className="rounded-md" style={{ margin: '0 auto', border: '1px solid #efefef' }} alt="Click Yes" src="https://mintcdn.com/stackone-hub/DSTDvdfXE5cXWfs9/images/sapsuccessfactors/job-custom-field/job-custom-field-12.png?fit=max&auto=format&n=DSTDvdfXE5cXWfs9&q=85&s=66b4f3e0efde903207b53980ae4f81be" width="797" height="398" data-path="images/sapsuccessfactors/job-custom-field/job-custom-field-12.png" />
    </Frame>
  </Step>
</Steps>

## View SAP SuccessFactors Job Custom Field

<Steps>
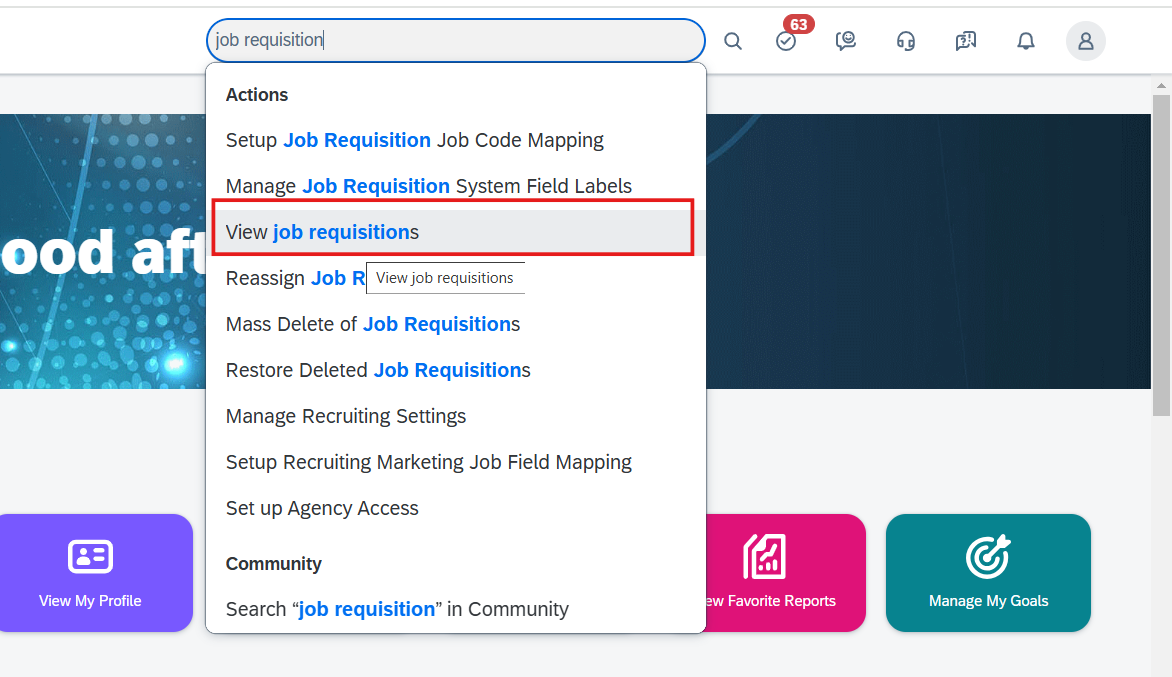
  <Step title="Search for 'View job requisitions'">
    Search for <b>View job requisitions</b> in the search bar and select it.

    <Frame>
      <img className="rounded-md" style={{ margin: '0 auto', border: '1px solid #efefef' }} alt="Search View job requisitions" src="https://mintcdn.com/stackone-hub/DSTDvdfXE5cXWfs9/images/sapsuccessfactors/job-custom-field/job-custom-field-view-01.png?fit=max&auto=format&n=DSTDvdfXE5cXWfs9&q=85&s=7e45d0ffad1528a1484ff97e70732b81" width="1172" height="677" data-path="images/sapsuccessfactors/job-custom-field/job-custom-field-view-01.png" />
    </Frame>
  </Step>

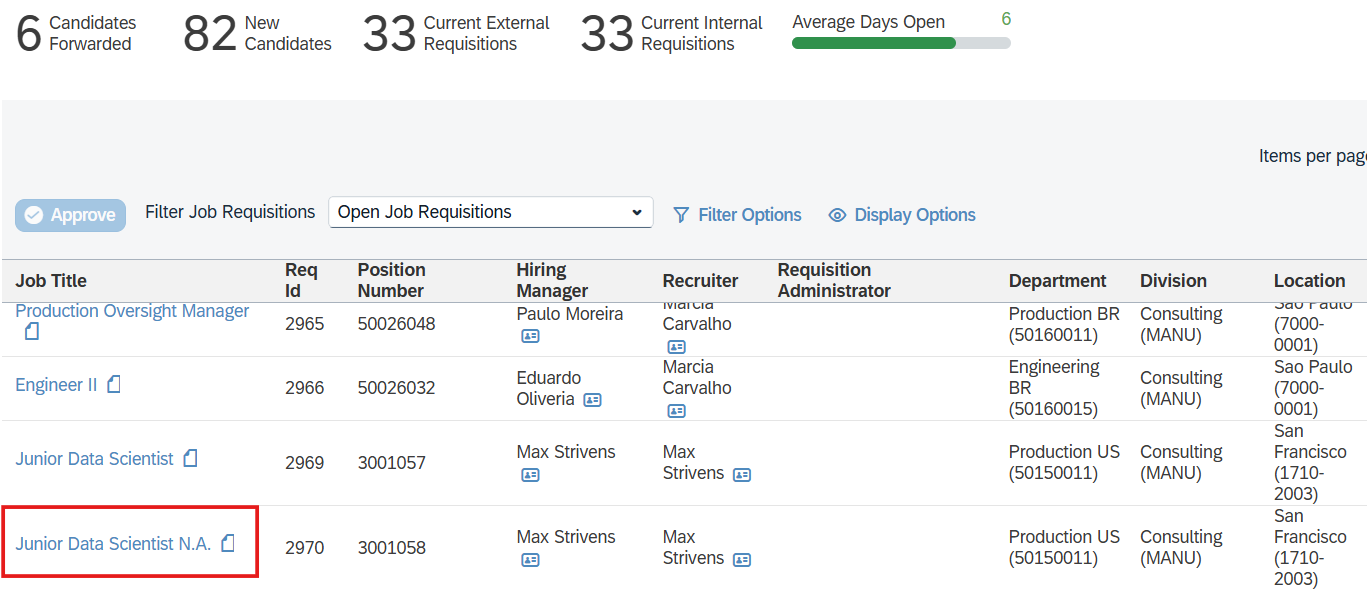
  <Step title="Select Job Requisition">
    Select any Job Requisition that was created using the specific template where the custom field was added.
    <Frame>
      <img className="rounded-md" style={{ margin: '0 auto', border: '1px solid #efefef' }} alt="Select Job Requisition" src="https://mintcdn.com/stackone-hub/DSTDvdfXE5cXWfs9/images/sapsuccessfactors/job-custom-field/job-custom-field-view-02.png?fit=max&auto=format&n=DSTDvdfXE5cXWfs9&q=85&s=10f2b8b681c4a38e15106b5935e8222a" width="1367" height="592" data-path="images/sapsuccessfactors/job-custom-field/job-custom-field-view-02.png" />
    </Frame>
  </Step>

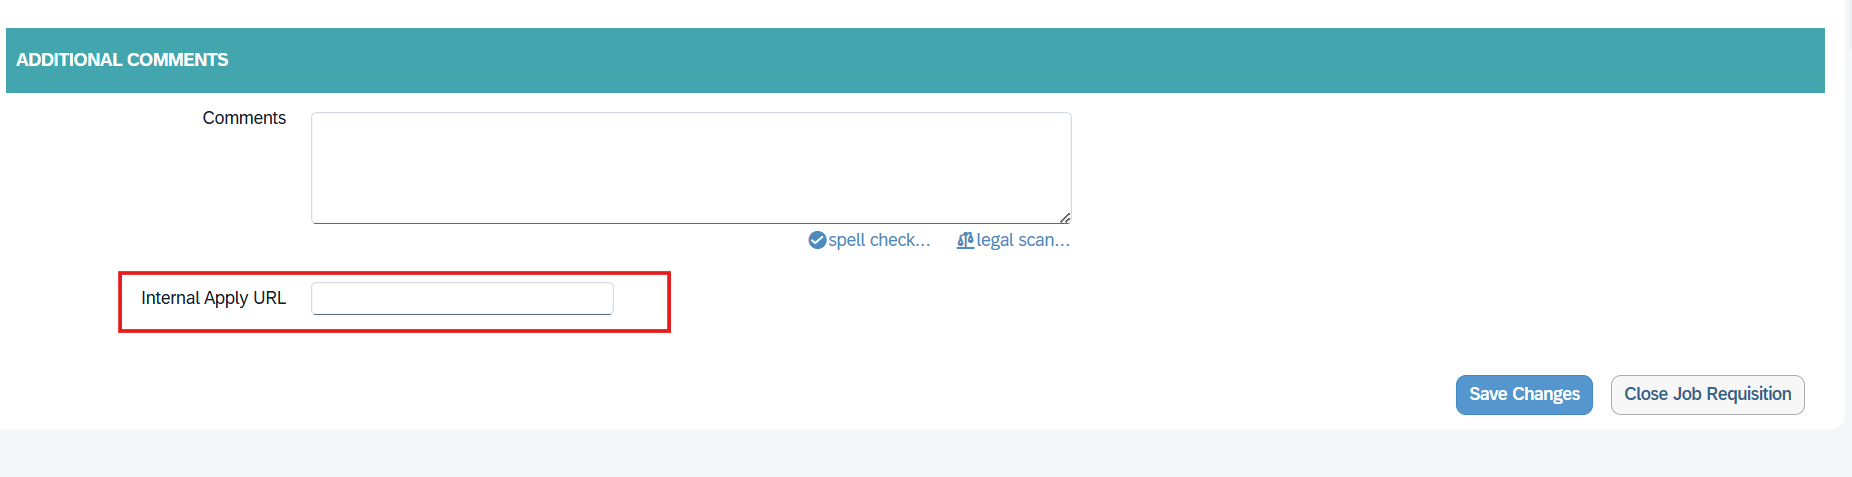
  <Step title="View Custom Field">
    The newly created Custom Field will be displayed on this screen.

    <Note>
      Note: The custom field is currently displayed under the "Additional Comments" tab. To modify its placement, follow Step 7 of the "Create SAP SuccessFactors Job Custom Field" process.
    </Note>

    <Frame>
      <img className="rounded-md" style={{ margin: '0 auto', border: '1px solid #efefef' }} alt="View Custom Field" src="https://mintcdn.com/stackone-hub/DSTDvdfXE5cXWfs9/images/sapsuccessfactors/job-custom-field/job-custom-field-view-03.png?fit=max&auto=format&n=DSTDvdfXE5cXWfs9&q=85&s=0fe58616edfe81804df1db9c56917a63" width="1852" height="477" data-path="images/sapsuccessfactors/job-custom-field/job-custom-field-view-03.png" />
    </Frame>
  </Step>
</Steps>