SAP SuccessFactors Assessment
To send webhook notifications successfully from SAP SuccessFactors, follow these steps in your SAP SuccessFactors account and complete the required actions.
This guidance is intended for users who have administrative privileges for their SAP SuccessFactors account.
Grant permissions to begin assessments with third-party vendors
Permissions Required for Vendor Assessment in SAP SuccessFactors
In the Provisioning Account, you can create an Integration User and assign the necessary permissions to facilitate effective collaboration with third-party vendor assessments and SAP SuccessFactors.
Set the API login exceptions
Please add the integration user to the SAP SF API login exceptions list
Navigate to Admin Tools > Password & Login Policy Settings > Set API Login Exceptions > Add the following information:
- Username: Select the SFAPI integration user.
- Maximum Password Age (days): Set this option to -1.
- IP Address Restrictions: Specify the designated IP addresses or address range for use with the integration.
Add your vendor and upload the assessment vendor packages
Add a Vendor for Assessment
Go to Manage Assessment Vendors, Click “Export” to download the CSV file. Add your vendor with a unique clientId
and mark it as active by entering Y
in the active column.
Please select a updated file to import the Assessment Vendor List into SAP SuccessFactors.
Upload the assessment vendor packages
You can upload Assessment Vendor Packages from Provisioning > Managing Recruiting > Import/Export Assessment Vendor Packages. Prepare a CSV file with the required columns and values, as illustrated in the image.
- vendorId: Identifies the assessment vendor (
vendorId
has to be the same asclientId
) - packageCode: Identifies an assessment package to use for the order.
- shortName: Shortened name of the package for use on the candidate summary page.
- Label: Language in which the assessment is displayed
Choose file to import the Assessment Vendor List in SAP SF.
Create a subscriber and set up an external event
Create a subscriber
Go to the Event Notification Subscription page. Under the Subscriber tab, add a subscriber using your Subscriber Id
and Client Id
. Note that your clientId
should match the one uploaded with your vendor’s name in the previous step.
Set up an external event to get notification
Navigate to the External Event tab and click the + Add New
button to create a new external event.
Select the values for the specified field:
- Event Type: Select
rcm_assessment_alert_v2
- Subscriber: Select the subscriber you created in the previous step.
- Protocol: Select
SOAP_OVER_HTTP_HTTPS
- Endpoint URL: Enter the endpoint URL provided by StackOne, which will be used to receive assessment order requests.
- Authentication: Select
NO
The Endpoint URL must contain the query parameter externalTriggerToken
, which you will receive from the StackOne Connection Hub. This token verifies requests from SAP SF for the specific vendor.
To save the configuration for the External Event, click the Save
button.
Manage fields for the Job Requisition template
Go to Manage Templates
Navigate to Admin Center and search for Manage Templates
Navigate to the Recruiting Management tab, select Job Requisition, and choose the template that is in use for the specific job requisition, such as Standard Job Requisition
.
Add assessment field in template
Please add the following field that will be visible within the Job Requisition and allow you to select an assessment.
- assessment: This field enables the recruiter to select a specific assessment to associate with the job requisition.
Manage the permissions for the assessment feature
Go to Manage Templates
To add or update feature permissions, navigate to the specific Job Requisition Template > Application Status Configuration, select Feature Permissions Defined, and then click on Add Feature Permission
from the modal.
- Feature Permission Description: [Operators with below roles can see Assessment detail report for the applicant when the application is in Phone Screen Status]
- Feature Permission Type: Select
assessmentIntegration
- Feature Permission Role Name: Select
All
- Feature Permission Status: Select the talent pipeline stage from dropdown on which you want to initiate the assessment.
You can add multiple feature permissions for assessmentIntegration
for the specific talent pipeline stage.
After adding the feature permissions, click on Publish
to save your changes.
When an assessment is configured in Default
or New Applicant
, the assessment is triggered when the candidate applies for the job. Immediately after applying and passing the prescreening questions, the candidate will be redirected to an assessment vendor site. After completing the assessment, the candidate will be redirected back to the career site.
Edit Job Requisition to select Assessment
Go to Job Requisition
Navigate to specific Job Requisition, hover over the specific requisition title to open the Actions menu and then select
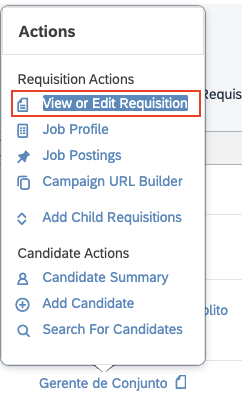
 View or Edit Requisition
.
Click on the link labeled as Add More Assessments
to add an assessment association row where you can select below details
- Status: Select
Stage
where you have setup the assessment integration feature, as described in the prior step. - Vendor: Select your vendor.
- Assessment: Select the assessment package that the recruiter wants to send to the candidate.
- Email Template: Select the email template that will be sent to the candidate once the assessment is triggered.
To send the assessment to the candidate
If the message This candidate has been forwarded to this job but has not yet applied for it
appears on the candidate’s job application, then the assessment order cannot be generated. The candidate must apply for the specific job requisition.
Send assessment to the candidate
Navigate to the specific Job Requisition and click on Candidates. Select the candidate, then choose the 
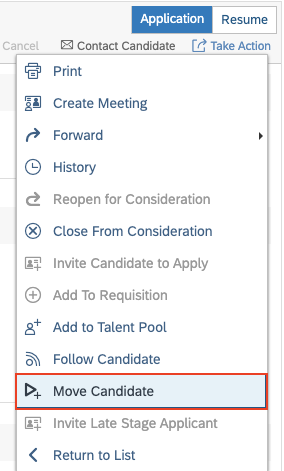
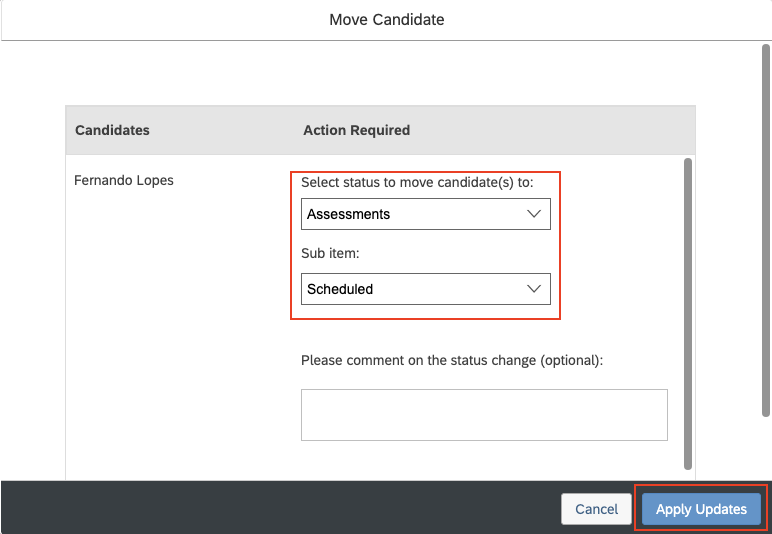
Move Candidate
option from the Take Action menu.
Choose Assessment
or particular stage on that you want to trigger the assessment from the dropdown menu, then click Apply Updates
to move the candidate forward.
Assessment will be automatically triggered when a candidate moves successfully. You will see an ‘Initiated’ message in the Assessment portlet for that candidate’s application.
If you see an ‘Initiation Failed’ message, you can re-trigger the assessment from the Take Action menu
To access the assessment you requested
The assessment request will be displayed in the candidate’s application within the Assessment portlet
To check the results of the assessment
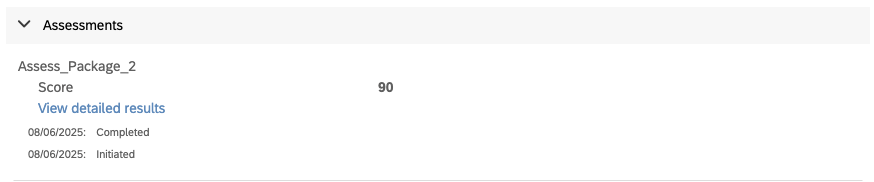
To access the result of an assessment
Navigate to the stage where the assessment was triggered. The results will be available in the Assessment portlet within the candidate’s application.
Congratulations, you’re all set! If you face any issues with the steps mentioned above, please contact us by emailing integrations@stackone.com. We’re always here to assist you!