> ## Documentation Index
> Fetch the complete documentation index at: https://hub.stackone.com/llms.txt
> Use this file to discover all available pages before exploring further.

# SAP SuccessFactors Application Custom Fields

> To create and view application custom fields in SAP SuccessFactors, follow these steps

<Warning>
  This guidance assumes that you have admin privileges for your SAP SuccessFactors account.
</Warning>

## Configure Application Custom Fields

<Steps>
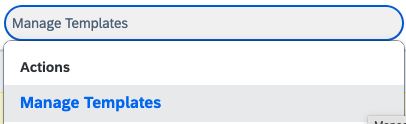
  <Step title="Search for Manage Templates">
    Type *Manage Templates* into the search bar and select it from the results
    <Frame>
      <img className="rounded-md" style={{ margin: '0 auto', border: '1px solid #efefef' }} alt="Search Manage Templates" src="https://mintcdn.com/stackone-hub/Acg_fdHvYVJMnKOj/images/sapsuccessfactors/application-custom-field/sapsf_application_cf_manage_template_search_1.png?fit=max&auto=format&n=Acg_fdHvYVJMnKOj&q=85&s=199f86f3123e5d0b41b31f9d991f9d43" width="406" height="124" data-path="images/sapsuccessfactors/application-custom-field/sapsf_application_cf_manage_template_search_1.png" />
    </Frame>
  </Step>

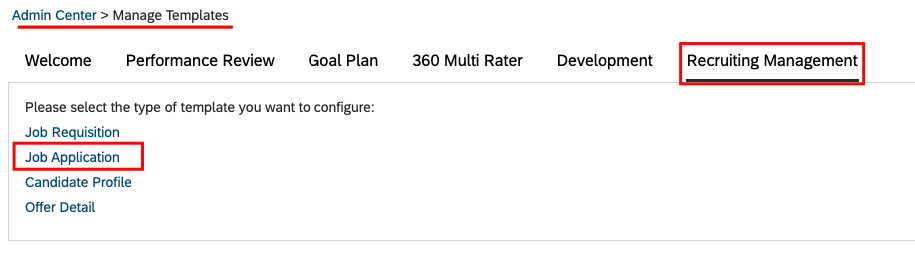
  <Step title="Select Job Application template">
    Go to the *Recruiting Management* tab, select *Job Application*, and choose the default active template to which you want to add a custom fields
    <Frame>
      <img className="rounded-md" style={{ margin: '0 auto', border: '1px solid #efefef' }} alt="Search Manage Templates" src="https://mintcdn.com/stackone-hub/Acg_fdHvYVJMnKOj/images/sapsuccessfactors/application-custom-field/sapsf_application_cf_mt_Recrut_manage_job_application_option_2.png?fit=max&auto=format&n=Acg_fdHvYVJMnKOj&q=85&s=68c6f130fd040212fc0d169e51c52616" width="915" height="256" data-path="images/sapsuccessfactors/application-custom-field/sapsf_application_cf_mt_Recrut_manage_job_application_option_2.png" />
    </Frame>
  </Step>

  <Step title="Add application custom fields in template">
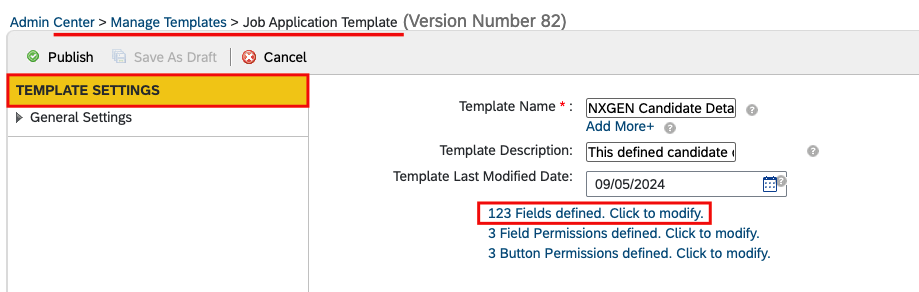
    Click on `Fields defined`

    <Frame>
      <img className="rounded-md" style={{ margin: '0 auto', border: '1px solid #efefef' }} alt="Search Manage Templates" src="https://mintcdn.com/stackone-hub/Acg_fdHvYVJMnKOj/images/sapsuccessfactors/application-custom-field/sapsf_appliation_cf_mt_Temaplate_settingS_Field_defined_3.png?fit=max&auto=format&n=Acg_fdHvYVJMnKOj&q=85&s=25ced3c1f52255d04491f96a27c82b54" width="919" height="292" data-path="images/sapsuccessfactors/application-custom-field/sapsf_appliation_cf_mt_Temaplate_settingS_Field_defined_3.png" />
    </Frame>

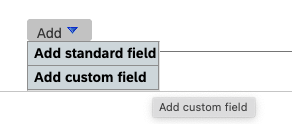
    Click the `Add` button and select `Add Custom Field` to add a new custom field block
    <Frame>
      <img className="rounded-md" style={{ margin: '0 auto', border: '1px solid #efefef' }} alt="Search Manage Templates" src="https://mintcdn.com/stackone-hub/Acg_fdHvYVJMnKOj/images/sapsuccessfactors/application-custom-field/sapsf_aaplication_cf_add_custom_field_button_9.png?fit=max&auto=format&n=Acg_fdHvYVJMnKOj&q=85&s=bf858221d751712960686726153faf7e" width="292" height="124" data-path="images/sapsuccessfactors/application-custom-field/sapsf_aaplication_cf_add_custom_field_button_9.png" />
    </Frame>

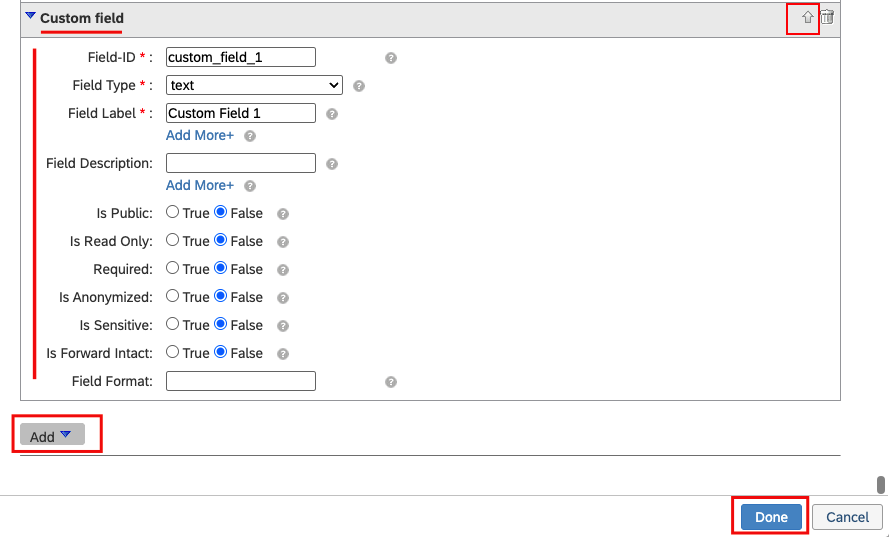
    Enter the following field values:

    * **Field ID:** Enter the ID of the field.
    * **Field Type:** Select the type of field (e.g., text).
    * **Field Label:** Enter a label for the field.
    * **Field Description:** Provide a description for the field.

    <Info>
      You can select other field's values either as shown in the image or according to your preferences.
    </Info>

    <Frame>
      <img className="rounded-md" style={{ margin: '0 auto', border: '1px solid #efefef' }} alt="Search Manage Templates" src="https://mintcdn.com/stackone-hub/Acg_fdHvYVJMnKOj/images/sapsuccessfactors/application-custom-field/sapsf_application_cf_add_custom_field_and_enter_details_and_done_4.png?fit=max&auto=format&n=Acg_fdHvYVJMnKOj&q=85&s=68455a4113d751f4912d317209af4068" width="889" height="537" data-path="images/sapsuccessfactors/application-custom-field/sapsf_application_cf_add_custom_field_and_enter_details_and_done_4.png" />
    </Frame>

    Click on `Done` to save your changes.

    <Note>
      You can set the position of the custom fields using the top and bottom arrows.
    </Note>
  </Step>

  <Step title="Add application custom fields permissions">
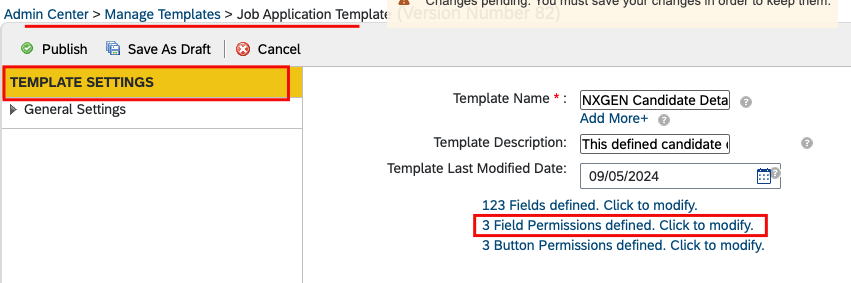
    Click on `Fields Permissions defined`

    <Frame>
      <img className="rounded-md" style={{ margin: '0 auto', border: '1px solid #efefef' }} alt="Search Manage Templates" src="https://mintcdn.com/stackone-hub/Acg_fdHvYVJMnKOj/images/sapsuccessfactors/application-custom-field/sapsf_application_cf_field_permisssion_5.png?fit=max&auto=format&n=Acg_fdHvYVJMnKOj&q=85&s=00e7bcf9a7104dac1a66e6d1115330bd" width="851" height="283" data-path="images/sapsuccessfactors/application-custom-field/sapsf_application_cf_field_permisssion_5.png" />
    </Frame>

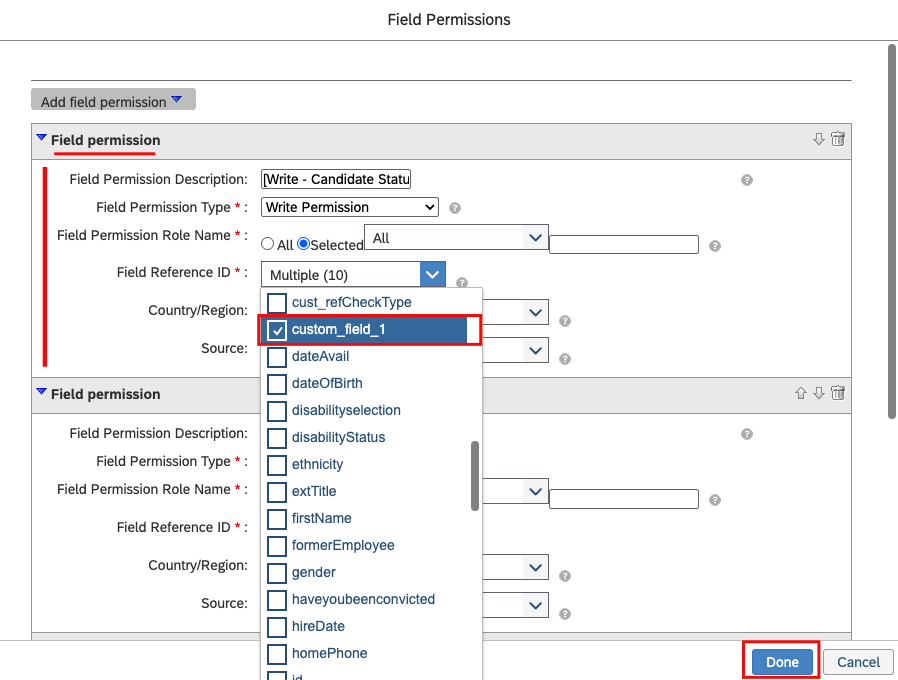
    Enter the following field values:

    * **Field Permission Description:** You can enter any description as this field allows free text.
    * **Field Permission Type:** Select `Write Permission`.
    * **Field Permission Role Name:** Choose the role for which you want to make this custom field visible.
    * **Field Reference ID:** Select the custom field ID that you added in the step above.

    <Info>
      You can choose other field's values based on your preferences.
    </Info>

    <Frame>
      <img className="rounded-md" style={{ margin: '0 auto', border: '1px solid #efefef' }} alt="Search Manage Templates" src="https://mintcdn.com/stackone-hub/Acg_fdHvYVJMnKOj/images/sapsuccessfactors/application-custom-field/sapsf_application_cf_add_or_edit_permission_and_save_6.png?fit=max&auto=format&n=Acg_fdHvYVJMnKOj&q=85&s=e3b9c1c74712f82ab658f60833c1eeb3" width="898" height="680" data-path="images/sapsuccessfactors/application-custom-field/sapsf_application_cf_add_or_edit_permission_and_save_6.png" />
    </Frame>

    Click on `Done` to save your changes.
  </Step>

  <Step title="Ensure that you save all of your changes">
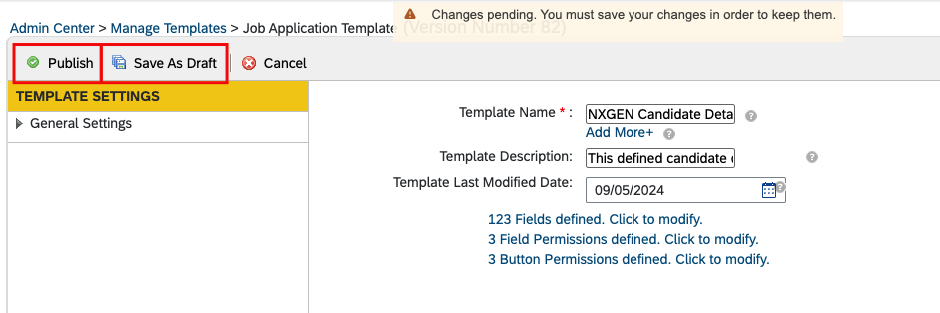
    To save your changes, click on `Save & Draft` and then select `Publish`.

    <Warning>
      Changes will only be published if they do not contain any validation errors.
    </Warning>

    <Frame>
      <img className="rounded-md" style={{ margin: '0 auto', border: '1px solid #efefef' }} alt="Search Manage Templates" src="https://mintcdn.com/stackone-hub/Acg_fdHvYVJMnKOj/images/sapsuccessfactors/application-custom-field/sapsf_application_cf_save_as_draft_and_publish_7.png?fit=max&auto=format&n=Acg_fdHvYVJMnKOj&q=85&s=19c48851d4a7cee0960c4dc4acf108c0" width="940" height="313" data-path="images/sapsuccessfactors/application-custom-field/sapsf_application_cf_save_as_draft_and_publish_7.png" />
    </Frame>
  </Step>
</Steps>

## Configure Job Requisition Template to Add Custom Fields

<Steps>
  <Step title="Search for Manage Templates">
    Type *Manage Templates* into the search bar and select it from the results

    <Frame>
      <img className="rounded-md" style={{ margin: '0 auto', border: '1px solid #efefef' }} alt="Search Manage Templates" src="https://mintcdn.com/stackone-hub/Acg_fdHvYVJMnKOj/images/sapsuccessfactors/application-custom-field/sapsf_application_cf_manage_template_search_1.png?fit=max&auto=format&n=Acg_fdHvYVJMnKOj&q=85&s=199f86f3123e5d0b41b31f9d991f9d43" width="406" height="124" data-path="images/sapsuccessfactors/application-custom-field/sapsf_application_cf_manage_template_search_1.png" />
    </Frame>
  </Step>

  <Step title="Select Job Requisition template">
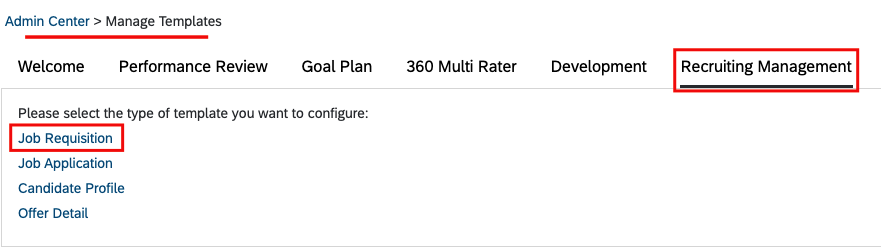
    Navigate to *Recruiting Management* tab > *Job Requisition*,
    <Frame>
      <img className="rounded-md" style={{ margin: '0 auto', border: '1px solid #efefef' }} alt="Search Manage Templates" src="https://mintcdn.com/stackone-hub/Acg_fdHvYVJMnKOj/images/sapsuccessfactors/application-custom-field/sapsf_application_cf_in_job_req_to_show_8.png?fit=max&auto=format&n=Acg_fdHvYVJMnKOj&q=85&s=22b280ed0453b916cc48b8398c480d72" width="881" height="247" data-path="images/sapsuccessfactors/application-custom-field/sapsf_application_cf_in_job_req_to_show_8.png" />
    </Frame>

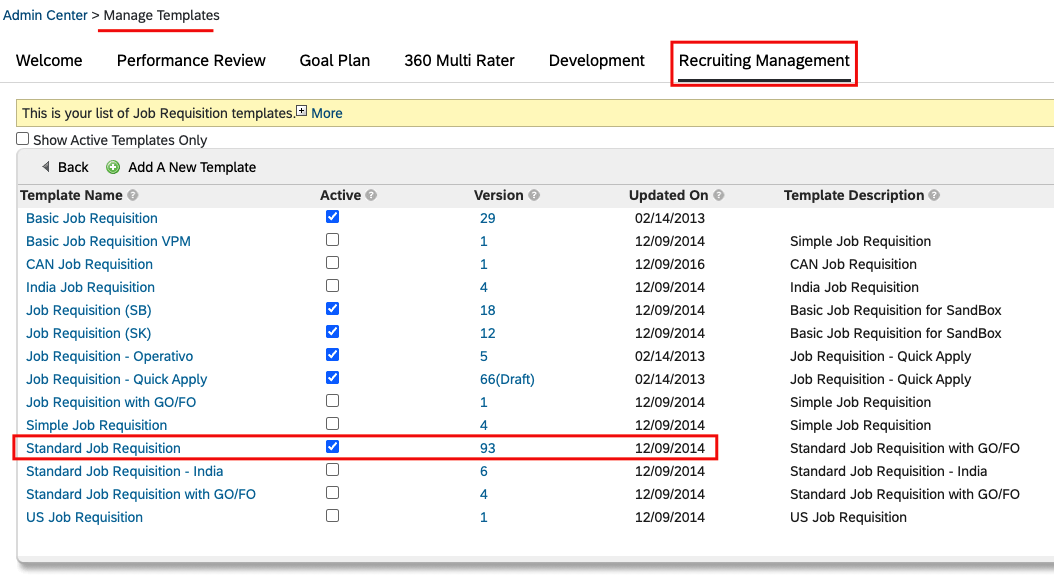
    Select the Job Requisition template to display the application custom fields, such as `Standard Job Requisition`
    <Frame>
      <img className="rounded-md" style={{ margin: '0 auto', border: '1px solid #efefef' }} alt="Search Manage Templates" src="https://mintcdn.com/stackone-hub/Acg_fdHvYVJMnKOj/images/sapsuccessfactors/application-custom-field/sapsf_application_cf_mt_jr_standard_9.png?fit=max&auto=format&n=Acg_fdHvYVJMnKOj&q=85&s=050803290f717f765fd595193a4d3aee" width="1054" height="577" data-path="images/sapsuccessfactors/application-custom-field/sapsf_application_cf_mt_jr_standard_9.png" />
    </Frame>
  </Step>

  <Step title="Add permissions for application custom fields into the Job Requisition template">
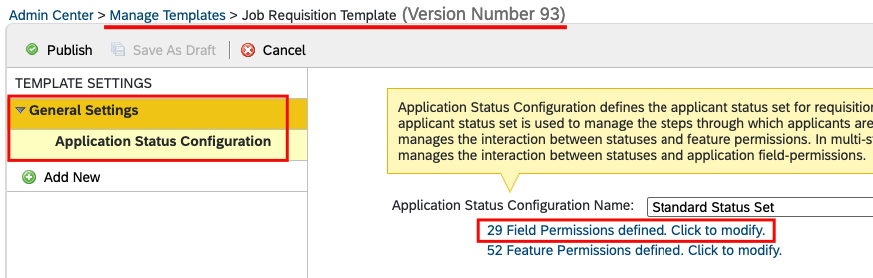
    Click on `General Settings` > `Application Status Configuration` > `Field Permissions defined`
    <Frame>
      <img className="rounded-md" style={{ margin: '0 auto', border: '1px solid #efefef' }} alt="Search Manage Templates" src="https://mintcdn.com/stackone-hub/Acg_fdHvYVJMnKOj/images/sapsuccessfactors/application-custom-field/sapsf_application_cf_mt_jr_standard_field_permission_10.png?fit=max&auto=format&n=Acg_fdHvYVJMnKOj&q=85&s=db971f05777aa26faf9d3f46c92f8f5c" width="873" height="278" data-path="images/sapsuccessfactors/application-custom-field/sapsf_application_cf_mt_jr_standard_field_permission_10.png" />
    </Frame>

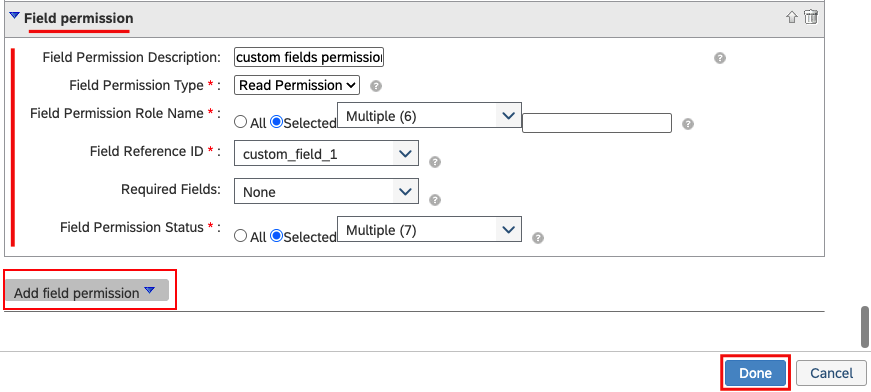
    Click on the `Add` button to add a new field permission block, then Enter the following field values:

    * **Field Permission Description:** You can enter any description as this field allows free text.
    * **Field Permission Type:** Select `Read Permission`.
    * **Field Permission Role Name:** Choose the permission role for which the fields will be displayed.
    * **Field Reference ID:** Select the custom field ID you added in the previous <a href="#configure-application-custom-fields">step 3</a> under "Configure Application Custom Fields" process that needs to be displayed on the UI.
    * **Required Fields:** Choose the fields that you want to make mandatory.
    * **Field Permission Status:** Select the application status indicating when the fields should be displayed.
    <Frame>
      <img className="rounded-md" style={{ margin: '0 auto', border: '1px solid #efefef' }} alt="Search Manage Templates" src="https://mintcdn.com/stackone-hub/Acg_fdHvYVJMnKOj/images/sapsuccessfactors/application-custom-field/sapsf_application_cf_mt_jr_standard_fp_add_for_custom_11.png?fit=max&auto=format&n=Acg_fdHvYVJMnKOj&q=85&s=8826bf1994ac43c755822c59ebed0685" width="871" height="392" data-path="images/sapsuccessfactors/application-custom-field/sapsf_application_cf_mt_jr_standard_fp_add_for_custom_11.png" />
    </Frame>

    Click on `Done` to save your changes.
  </Step>

  <Step title="Ensure that you save all of your changes">
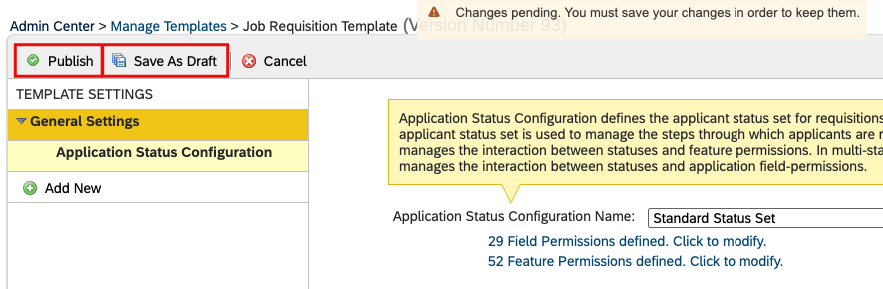
    Click on `Save & Draft`, and then click `Publish` to save your changes.

    <Warning>
      Changes will only be published if they do not contain any validation errors.
    </Warning>

    <Frame>
      <img className="rounded-md" style={{ margin: '0 auto', border: '1px solid #efefef' }} alt="Search Manage Templates" src="https://mintcdn.com/stackone-hub/Acg_fdHvYVJMnKOj/images/sapsuccessfactors/application-custom-field/sapsf_application_cf_save_field_permissions_12.png?fit=max&auto=format&n=Acg_fdHvYVJMnKOj&q=85&s=2e28607f1f3f71da121bd4fba6eef92a" width="883" height="289" data-path="images/sapsuccessfactors/application-custom-field/sapsf_application_cf_save_field_permissions_12.png" />
    </Frame>
  </Step>
</Steps>

## View Application Custom Fields in the Job Application

<Steps>
  <Step title="Go to Job Requisition">
    <Info>
      The custom fields will be displayed for applications associated with job requisition templates for which custom fields are configured.
    </Info>

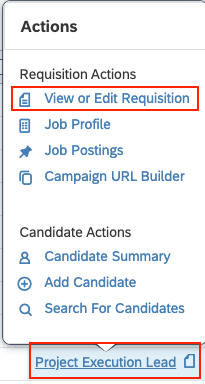
    Navigate to *Job Requisition*, hover over the specific requisition title to open the Actions menu and then select `View or Edit Requisition`.

    <Accordion title="How to check the Job Requisition Template Name">
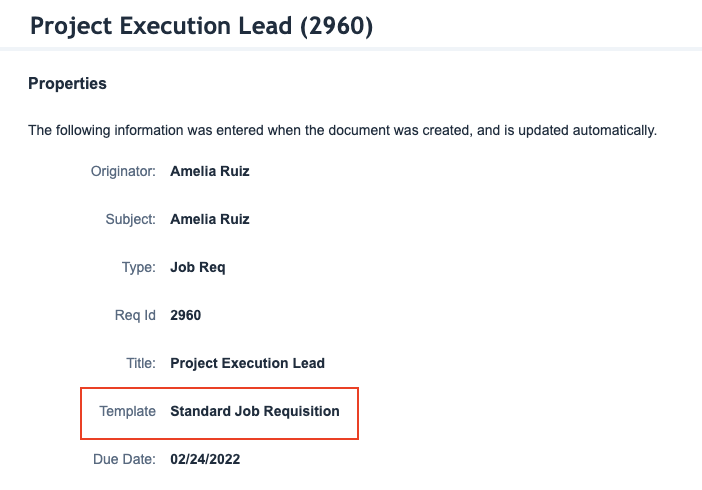
      Go to the *Recruiting* and select any specific job requisition.

      <Frame>
        <img className="rounded-md" style={{ margin: '0 auto', border: '1px solid #efefef' }} alt="Specific Job Requistion" src="https://mintcdn.com/stackone-hub/Acg_fdHvYVJMnKOj/images/sapsuccessfactors/application-custom-field/sap_sf_bc_recruiting_info_26.png?fit=max&auto=format&n=Acg_fdHvYVJMnKOj&q=85&s=9322168e9044b90b81c2fb7abfbfa002" width="1271" height="122" data-path="images/sapsuccessfactors/application-custom-field/sap_sf_bc_recruiting_info_26.png" />
      </Frame>

      Click on the `i` icon to view the Job Requisition Template.
      <Frame>
        <img className="rounded-md" style={{ margin: '0 auto', border: '1px solid #efefef' }} alt="JR Info" src="https://mintcdn.com/stackone-hub/Acg_fdHvYVJMnKOj/images/sapsuccessfactors/application-custom-field/sap_sf_bc_recruiting_JR_info_27.png?fit=max&auto=format&n=Acg_fdHvYVJMnKOj&q=85&s=bcc1acd2e78825a976a6b422c2bf4dda" width="702" height="490" data-path="images/sapsuccessfactors/application-custom-field/sap_sf_bc_recruiting_JR_info_27.png" />
      </Frame>
    </Accordion>

    <Frame>
      <img className="rounded-md" style={{ margin: '0 auto', border: '1px solid #efefef' }} alt="Search Manage Templates" src="https://mintcdn.com/stackone-hub/Acg_fdHvYVJMnKOj/images/sapsuccessfactors/application-custom-field/sap_sf_bc_recruiting_JR_hove_actions_32.png?fit=max&auto=format&n=Acg_fdHvYVJMnKOj&q=85&s=eb56da3b8bc64e4f42445c6b1cbed746" width="205" height="384" data-path="images/sapsuccessfactors/application-custom-field/sap_sf_bc_recruiting_JR_hove_actions_32.png" />
    </Frame>

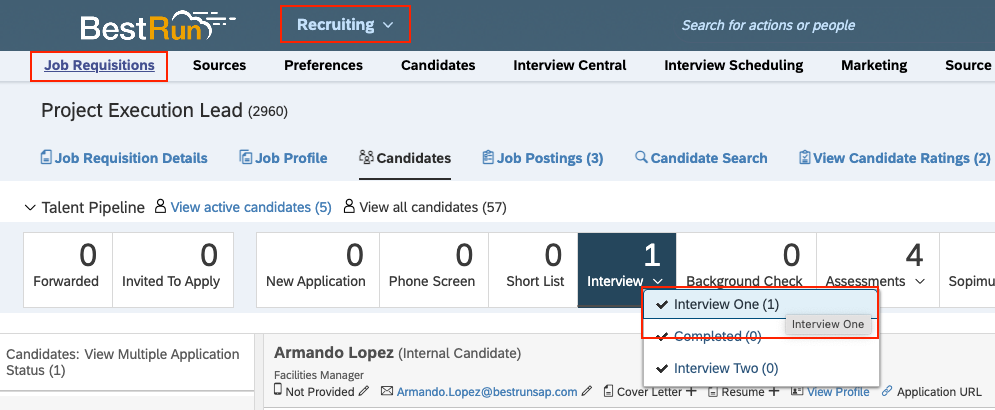
    Access the candidate's job application and update their application status as you have configured in the <a href="#configure-job-requisition-template-to-add-custom-fields">step 3</a> in the "Configure Job Requisition Template to Add Custom Fields" process.
    <Frame>
      <img className="rounded-md" style={{ margin: '0 auto', border: '1px solid #efefef' }} alt="Search Manage Templates" src="https://mintcdn.com/stackone-hub/Acg_fdHvYVJMnKOj/images/sapsuccessfactors/application-custom-field/sapsf_applicationcf_goto_job_req_and_goto_stage_13.png?fit=max&auto=format&n=Acg_fdHvYVJMnKOj&q=85&s=449e2fae6efd5a6221c33bcfef117a7c" width="995" height="410" data-path="images/sapsuccessfactors/application-custom-field/sapsf_applicationcf_goto_job_req_and_goto_stage_13.png" />
    </Frame>

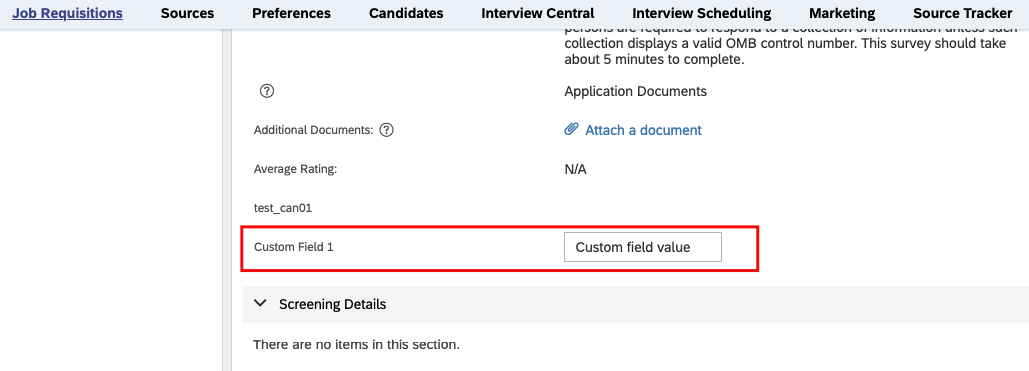
    The newly created custom fields will be visible in the job application

    <Accordion title="If fields are not visible after adding fields & permissions in above steps">
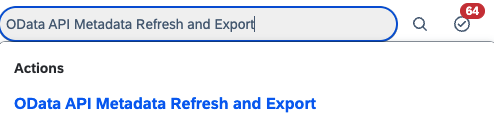
      Navigate to *Admin Center* and search for `OData API Metadata Refresh and Export`
      <Frame>
        <img className="rounded-md" style={{ margin: '0 auto', border: '1px solid #efefef' }} alt="OData API Metadata Refresh and Export" src="https://mintcdn.com/stackone-hub/Acg_fdHvYVJMnKOj/images/sapsuccessfactors/application-custom-field/sap_sf_bc_odata_api_search_38.png?fit=max&auto=format&n=Acg_fdHvYVJMnKOj&q=85&s=9603c0ff4cf813906c2b19ff93646f0b" width="494" height="128" data-path="images/sapsuccessfactors/application-custom-field/sap_sf_bc_odata_api_search_38.png" />
      </Frame>

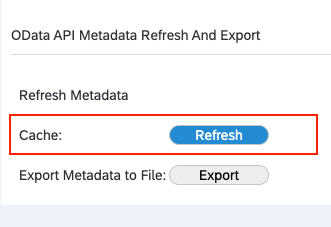
      Click on the `Refresh` button next to Cache.
      <Frame>
        <img className="rounded-md" style={{ margin: '0 auto', border: '1px solid #efefef' }} alt="Refresh button" src="https://mintcdn.com/stackone-hub/Acg_fdHvYVJMnKOj/images/sapsuccessfactors/application-custom-field/sap_sf_bc_odata_api_cache_refresh_39.png?fit=max&auto=format&n=Acg_fdHvYVJMnKOj&q=85&s=cca462c54e04d54b44a5a509e341b656" width="331" height="227" data-path="images/sapsuccessfactors/application-custom-field/sap_sf_bc_odata_api_cache_refresh_39.png" />
      </Frame>
    </Accordion>

    <Frame>
      <img className="rounded-md" style={{ margin: '0 auto', border: '1px solid #efefef' }} alt="Search Manage Templates" src="https://mintcdn.com/stackone-hub/Acg_fdHvYVJMnKOj/images/sapsuccessfactors/application-custom-field/sapsf_application_cf_added_cf_on_job_application_visible_14.png?fit=max&auto=format&n=Acg_fdHvYVJMnKOj&q=85&s=78bc478d306dbcb138fb8fa3fec7bbae" width="1029" height="371" data-path="images/sapsuccessfactors/application-custom-field/sapsf_application_cf_added_cf_on_job_application_visible_14.png" />
    </Frame>

    <Note>
      To adjust the placement of custom fields, refer to <a href="#configure-application-custom-fields">step 3</a> in the "Configure Application Custom Fields" process.
    </Note>
  </Step>
</Steps>