> ## Documentation Index
> Fetch the complete documentation index at: https://hub.stackone.com/llms.txt
> Use this file to discover all available pages before exploring further.
# Workday Learning
> If you've been directed to StackOne to integrate with Workday, the following steps will help you understand the process and any necessary actions to configure successful integration.
This guidance assumes you have Admin privileges for your Workday account.
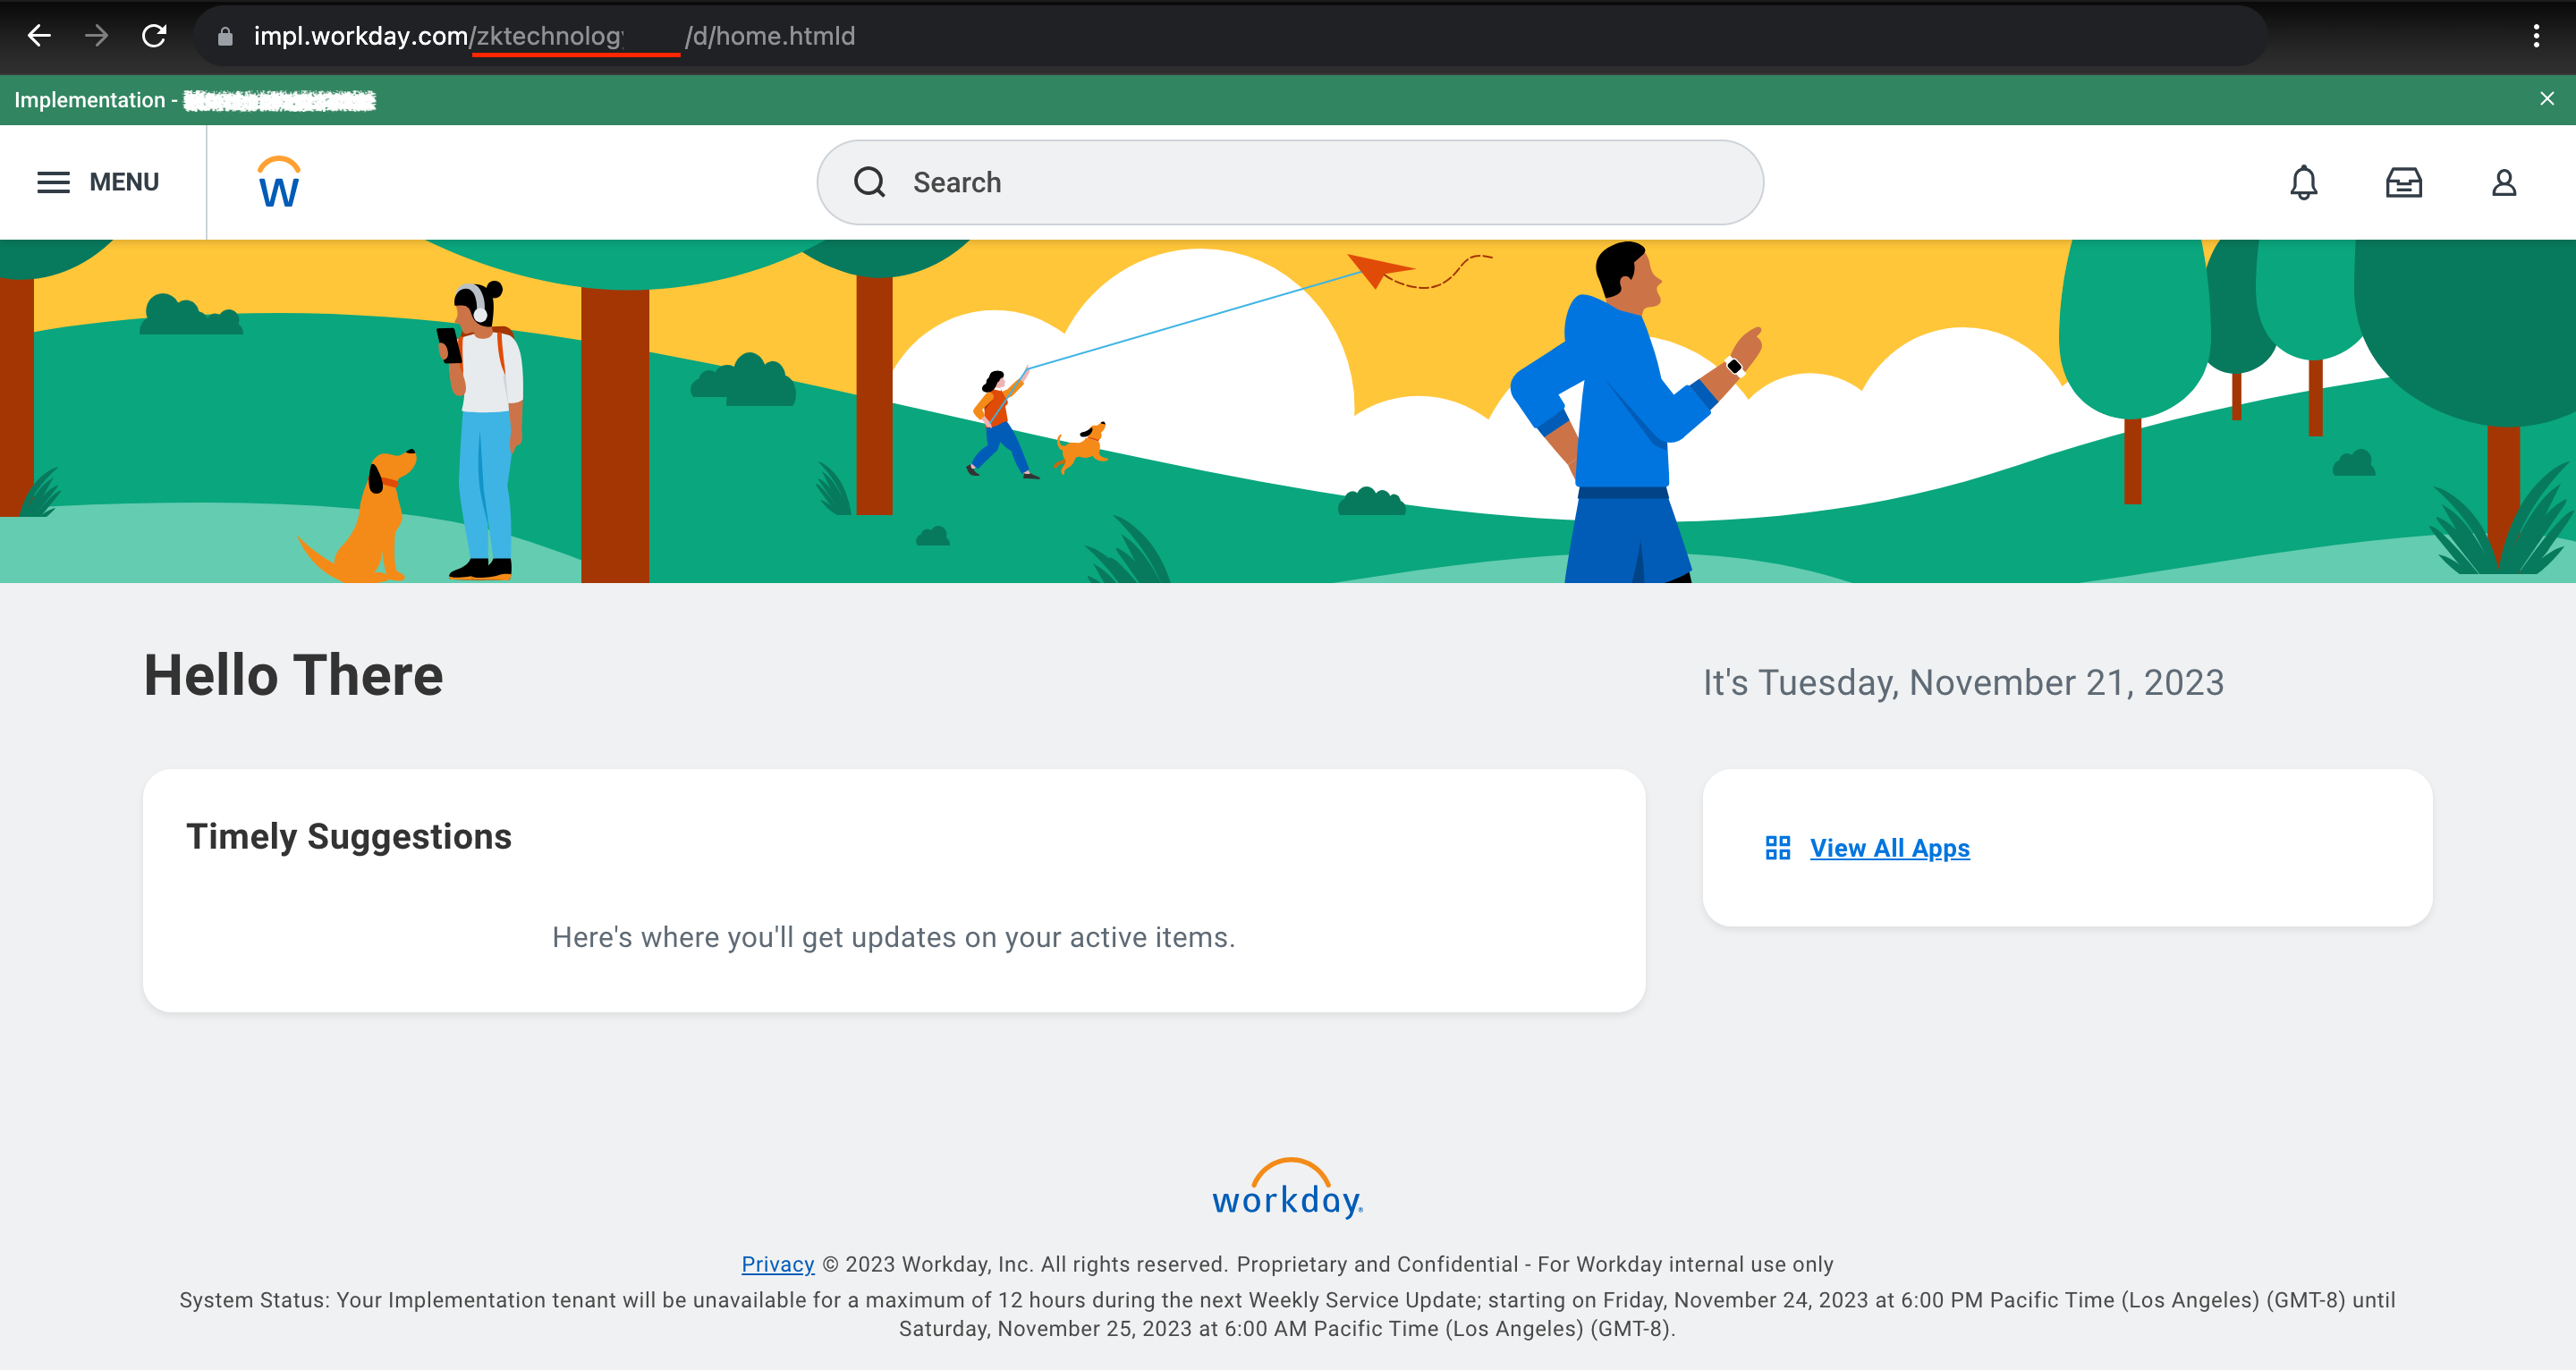
## Finding your Workday Tenant
Log into your Workday account. Look at the address bar at the top of the browser window where the URL is displayed. Find your tenant immediately after `workday.com/`.
 ## Finding the Web Services Endpoint
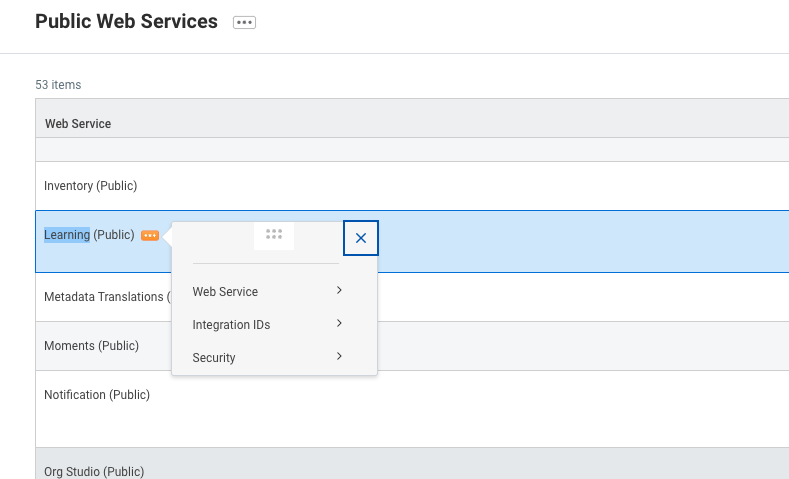
Go to the `Public Web Services` report.
## Finding the Web Services Endpoint
Go to the `Public Web Services` report.
 Find Learning and hover over it to be able to interact with the menu. Via the three-dots menu, go to `Web Service` and click on `View WSDL` (note that the page may take a minute to fully load).
 Search for `wsdl:service` in the file OR navigate directly to the very bottom of the page. You should see something like this:
 Copy everything before `service` in the location attribute. Do not include the `https://` prefix. In the example tenant above, this would be `wd2-impl-services1.workday.com/ccx` but it may be different for your tenant (e.g., `wd5-services1.myworkday.com/ccx`).
## Set up an Integration System User
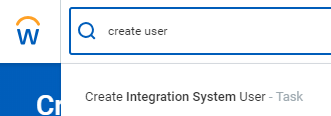
Log in to your Workday tenant in the Workday portal. In the Search field, search for "Create Integration System User".
Copy everything before `service` in the location attribute. Do not include the `https://` prefix. In the example tenant above, this would be `wd2-impl-services1.workday.com/ccx` but it may be different for your tenant (e.g., `wd5-services1.myworkday.com/ccx`).
## Set up an Integration System User
Log in to your Workday tenant in the Workday portal. In the Search field, search for "Create Integration System User".
 Choose the "Create Integration System User" task.
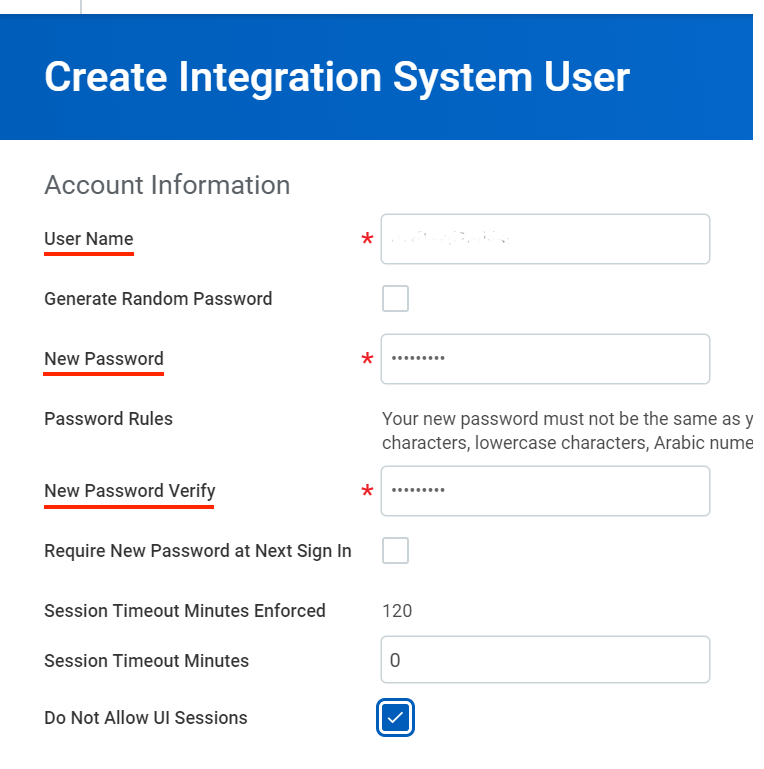
Enter a username and password in the Account Information section on the "Create Integration System User" page.
Choose the "Create Integration System User" task.
Enter a username and password in the Account Information section on the "Create Integration System User" page.
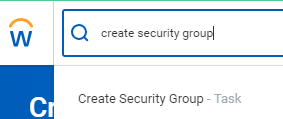
 ## Add the Integration System User to a Security Group
In the Search field, search for "Create Security Group". Select the "Create Security Group" task.
## Add the Integration System User to a Security Group
In the Search field, search for "Create Security Group". Select the "Create Security Group" task.
 On the "Create Security Group" page, select "Integration System Security Group" from the Type of Tenanted Security Group pull-down menu. Enter a name in the Name field.
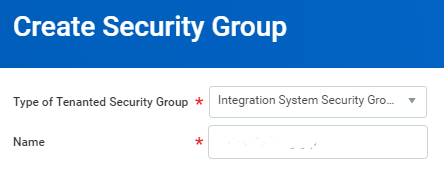 Click OK.
On the "Edit Integration System Security Group (Unconstrained)" page, enter the same name you used when creating the ISU in the first section. Click OK.
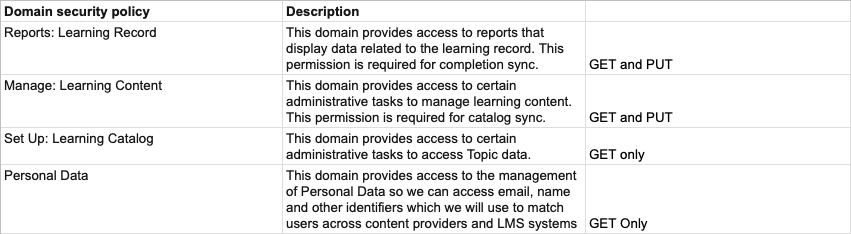
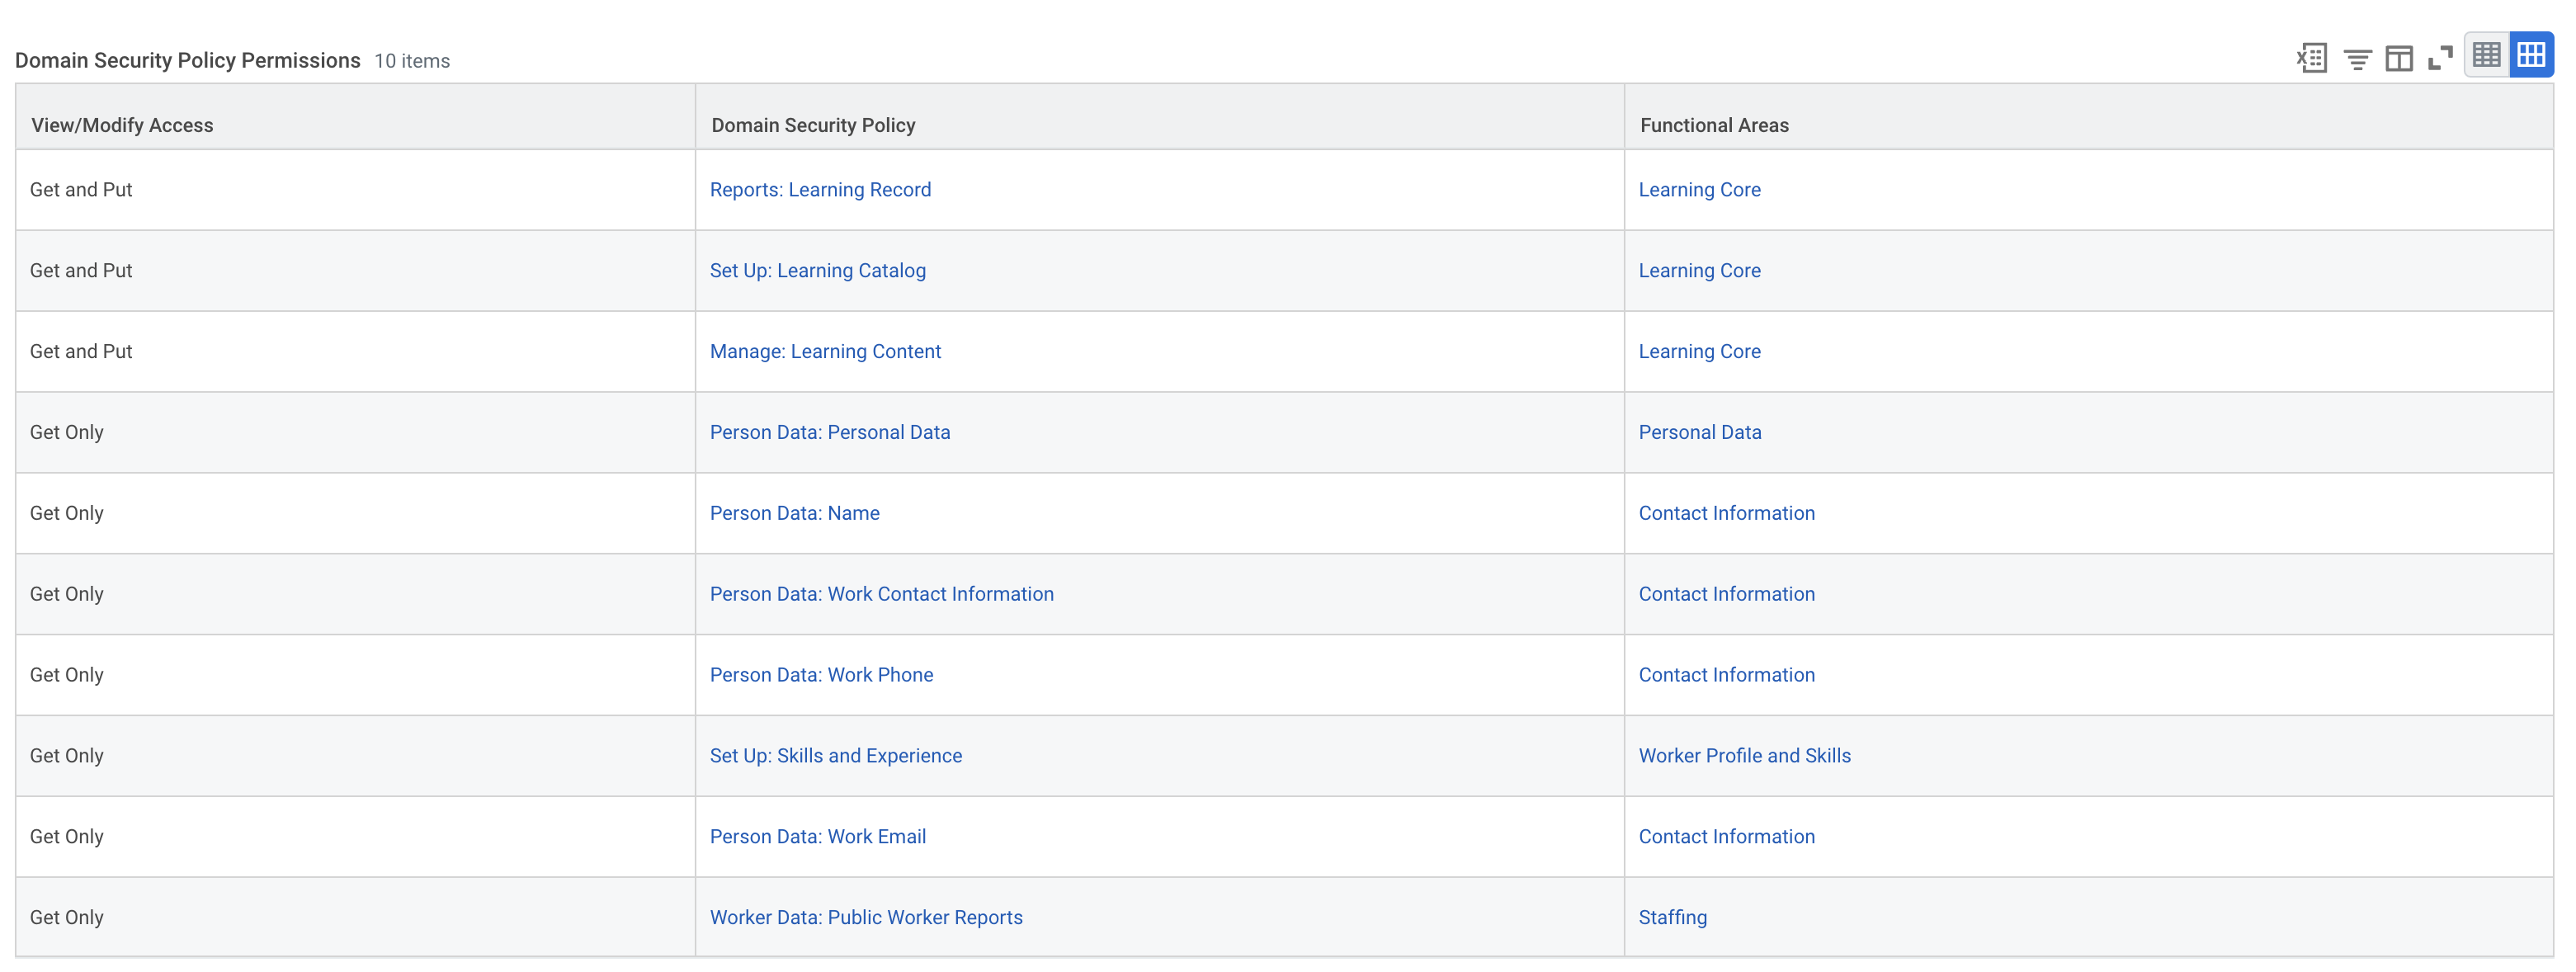
## Configure Domain Security Policy Permissions
Edit the Domain Security Policy Permissions in the Security Group. Add the **GET and PUT/Get Only** operations for the following required permissions for the Learning Core as per the table below:
For integrating with the Learning Core of Workday
* Set Up: Learning Catalog
* Reports: Learning Record
* Manage: Learning Content
* **Person Data**
* Personal Data (Get only)
* Name (Get only)
* Public Work Phone Integration (Get only)
* Work Contact Information (Get only)
* **Worker Data**
* Work Email (Get only)
* Work Phone (Get only)
* Public Worker Reports (Get only)
#### Optional Permissions (if using either extended enterprise learners or skills)
* Set Up: Skills and Experience (Get only)
* View: External Learning User (Get only)
#### Optional Permissions (if using media file blocker to prevent automatic course completion)
* View Only: Drive
* Get Only: Drive
Click OK.
On the "Edit Integration System Security Group (Unconstrained)" page, enter the same name you used when creating the ISU in the first section. Click OK.
## Configure Domain Security Policy Permissions
Edit the Domain Security Policy Permissions in the Security Group. Add the **GET and PUT/Get Only** operations for the following required permissions for the Learning Core as per the table below:
For integrating with the Learning Core of Workday
* Set Up: Learning Catalog
* Reports: Learning Record
* Manage: Learning Content
* **Person Data**
* Personal Data (Get only)
* Name (Get only)
* Public Work Phone Integration (Get only)
* Work Contact Information (Get only)
* **Worker Data**
* Work Email (Get only)
* Work Phone (Get only)
* Public Worker Reports (Get only)
#### Optional Permissions (if using either extended enterprise learners or skills)
* Set Up: Skills and Experience (Get only)
* View: External Learning User (Get only)
#### Optional Permissions (if using media file blocker to prevent automatic course completion)
* View Only: Drive
* Get Only: Drive
 ## Approve the Security Policy Changes
In the Search bar, search for "Activate Pending Security Policy Changes". Review the policies that need approval in the summary of the changes in the security policy. Approve the pending security policy changes to activate them.
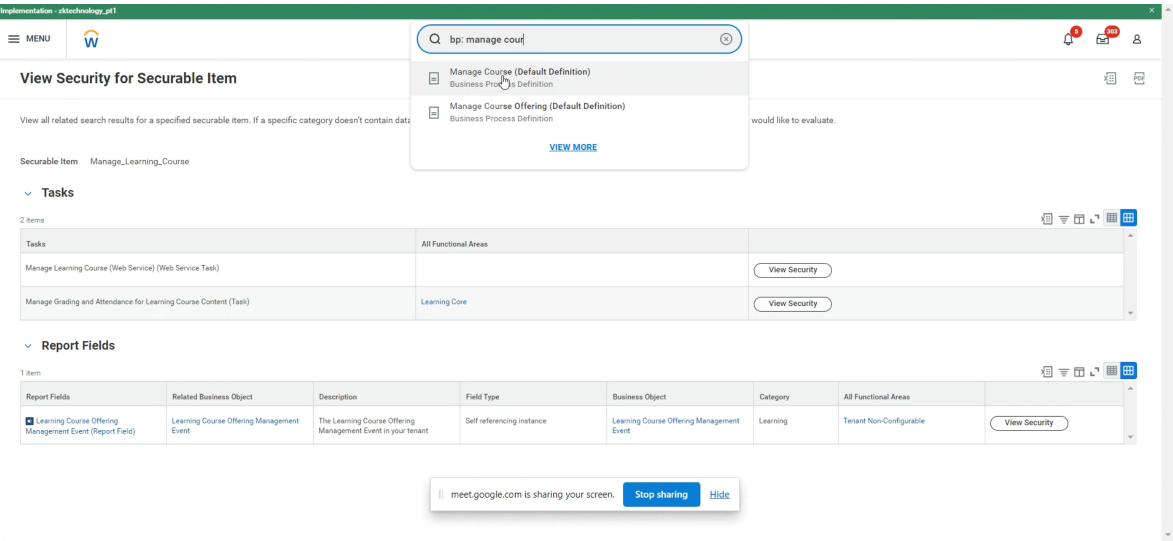
## Configure Business Processes
In the Search bar, search for "bp: Manage Course". Click on the matching search result.
## Approve the Security Policy Changes
In the Search bar, search for "Activate Pending Security Policy Changes". Review the policies that need approval in the summary of the changes in the security policy. Approve the pending security policy changes to activate them.
## Configure Business Processes
In the Search bar, search for "bp: Manage Course". Click on the matching search result.
 Next to the Business Process Definition `Manage Course` click the kebab menu and select Business Process Policy > Edit.
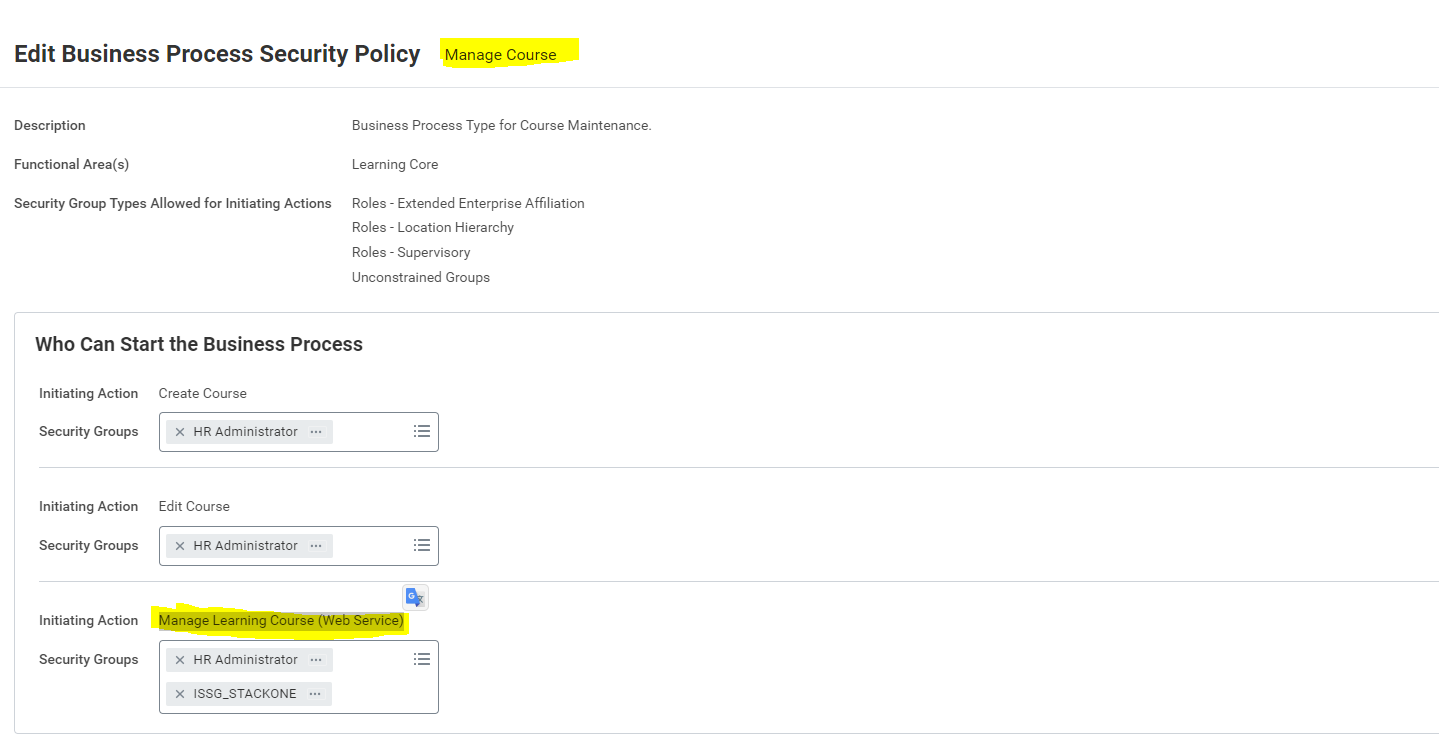
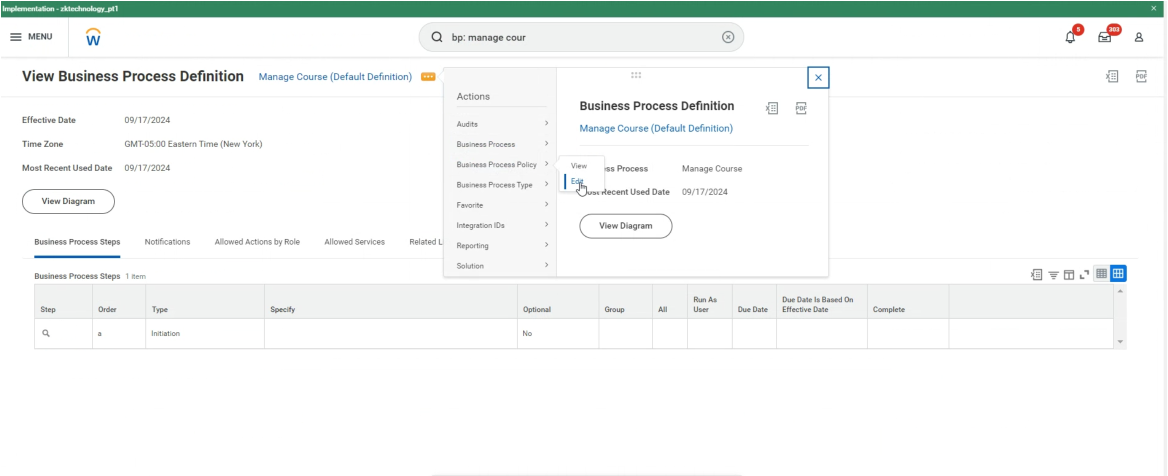 Add the user to the Security Groups for the initiating action `Manage Learning Course (Web Service)`.
Add the user to the Security Groups for the initiating action `Cancel Learning Enrollment (Web Service)` (Check with your content partner to see if this is required).
Add the user to the Security Groups for the initiating action `Manage Extended Enterprise Learner (Web Service)` (If you are using extended enterprise learners).
Add the user to the Security Groups for the initiating action `Manage Learning Course (Web Service)`.
Add the user to the Security Groups for the initiating action `Cancel Learning Enrollment (Web Service)` (Check with your content partner to see if this is required).
Add the user to the Security Groups for the initiating action `Manage Extended Enterprise Learner (Web Service)` (If you are using extended enterprise learners).
 In the Search bar, search for "bp: enroll in content". Click on the matching search result.
Next to the Business Process Definition `Enroll in Content` click the kebab menu and select Business Process Policy > Edit.
Add the user to the Security Groups for the initiating action `Enroll in Content (Web Service)`.
## If Using Media File Blocker to prevent Automatic Course Completion
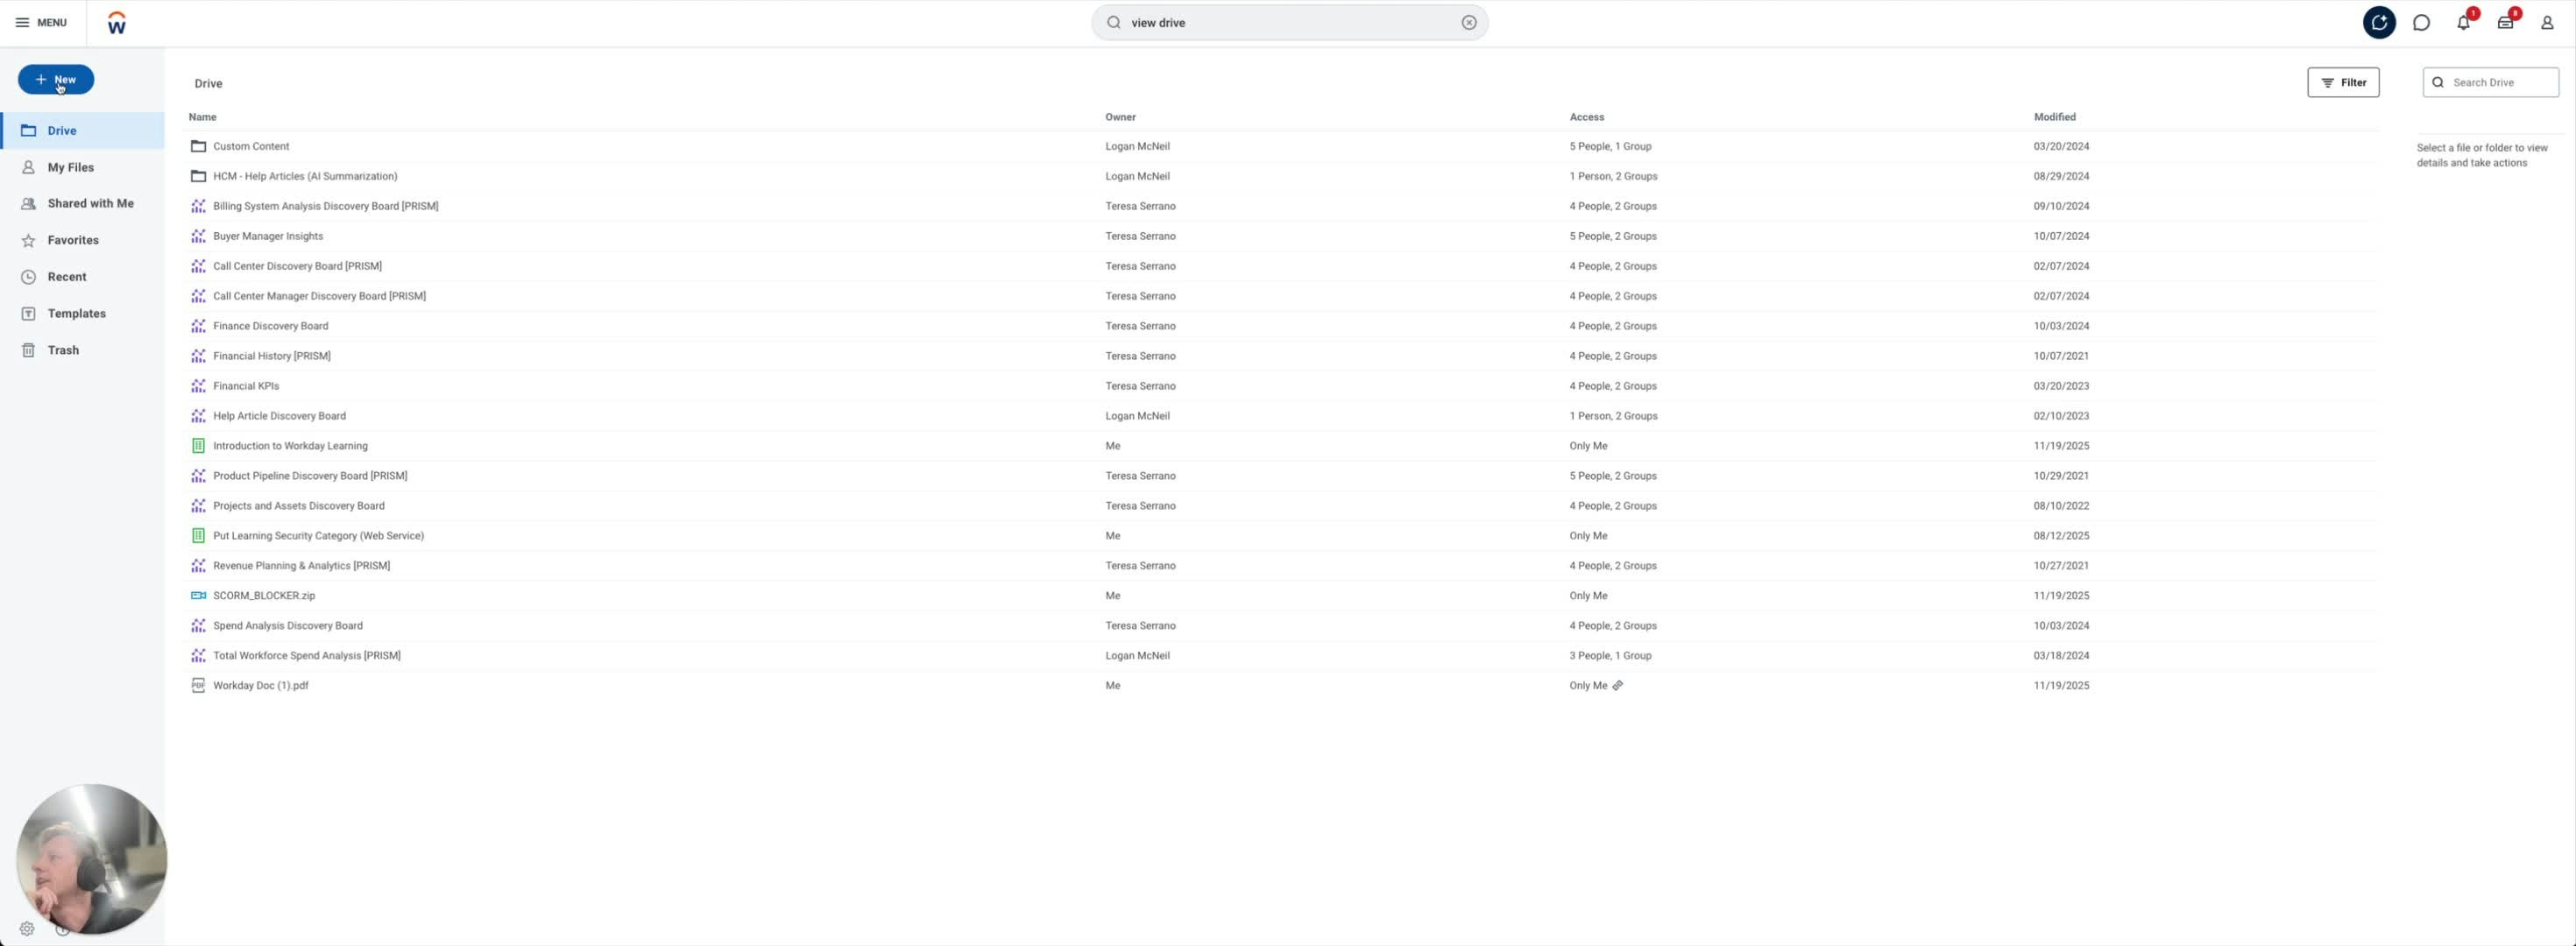
* Open Workday.
* In the search bar, type 'View Drive'.
* Click on 'View Drive' from the search results to navigate to the drive page.
In the Search bar, search for "bp: enroll in content". Click on the matching search result.
Next to the Business Process Definition `Enroll in Content` click the kebab menu and select Business Process Policy > Edit.
Add the user to the Security Groups for the initiating action `Enroll in Content (Web Service)`.
## If Using Media File Blocker to prevent Automatic Course Completion
* Open Workday.
* In the search bar, type 'View Drive'.
* Click on 'View Drive' from the search results to navigate to the drive page.
 [Watch this step](https://loom.com/share/badd4d0b64c349ec8f99e5638e6ea790?t=0)
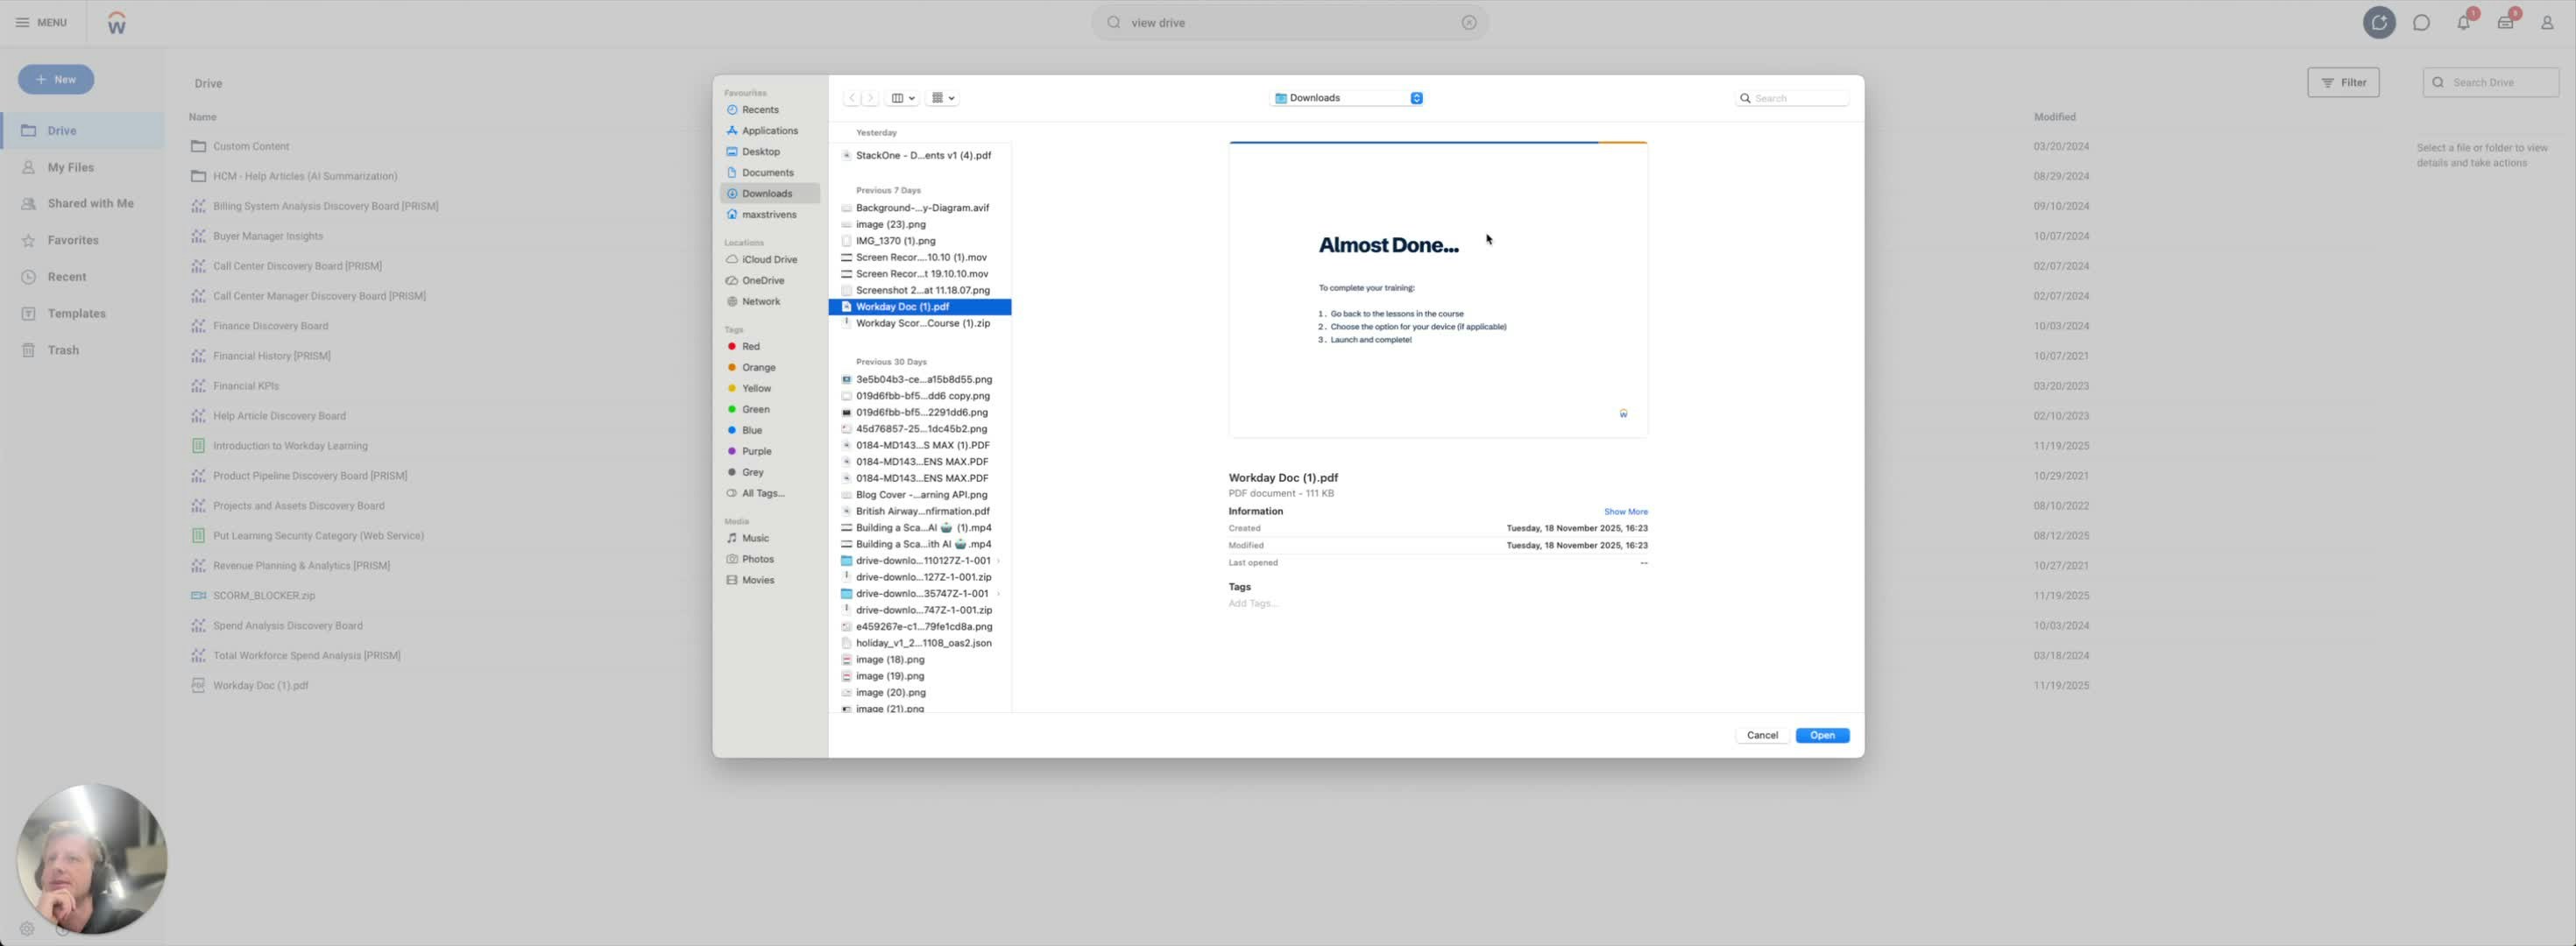
* On the drive page, locate the 'New' button in the top left corner.
* Click on 'New' and then select 'Upload' from the dropdown menu.
[Watch this step](https://loom.com/share/badd4d0b64c349ec8f99e5638e6ea790?t=0)
* On the drive page, locate the 'New' button in the top left corner.
* Click on 'New' and then select 'Upload' from the dropdown menu.
 [Watch this step](https://loom.com/share/badd4d0b64c349ec8f99e5638e6ea790?t=18)
* Choose the file you want to upload (e.g., a PDF).
* Ensure the file is relevant, such as an instructional PDF for users.
[Watch this step](https://loom.com/share/badd4d0b64c349ec8f99e5638e6ea790?t=18)
* Choose the file you want to upload (e.g., a PDF).
* Ensure the file is relevant, such as an instructional PDF for users.
 [Watch this step](https://loom.com/share/badd4d0b64c349ec8f99e5638e6ea790?t=29)
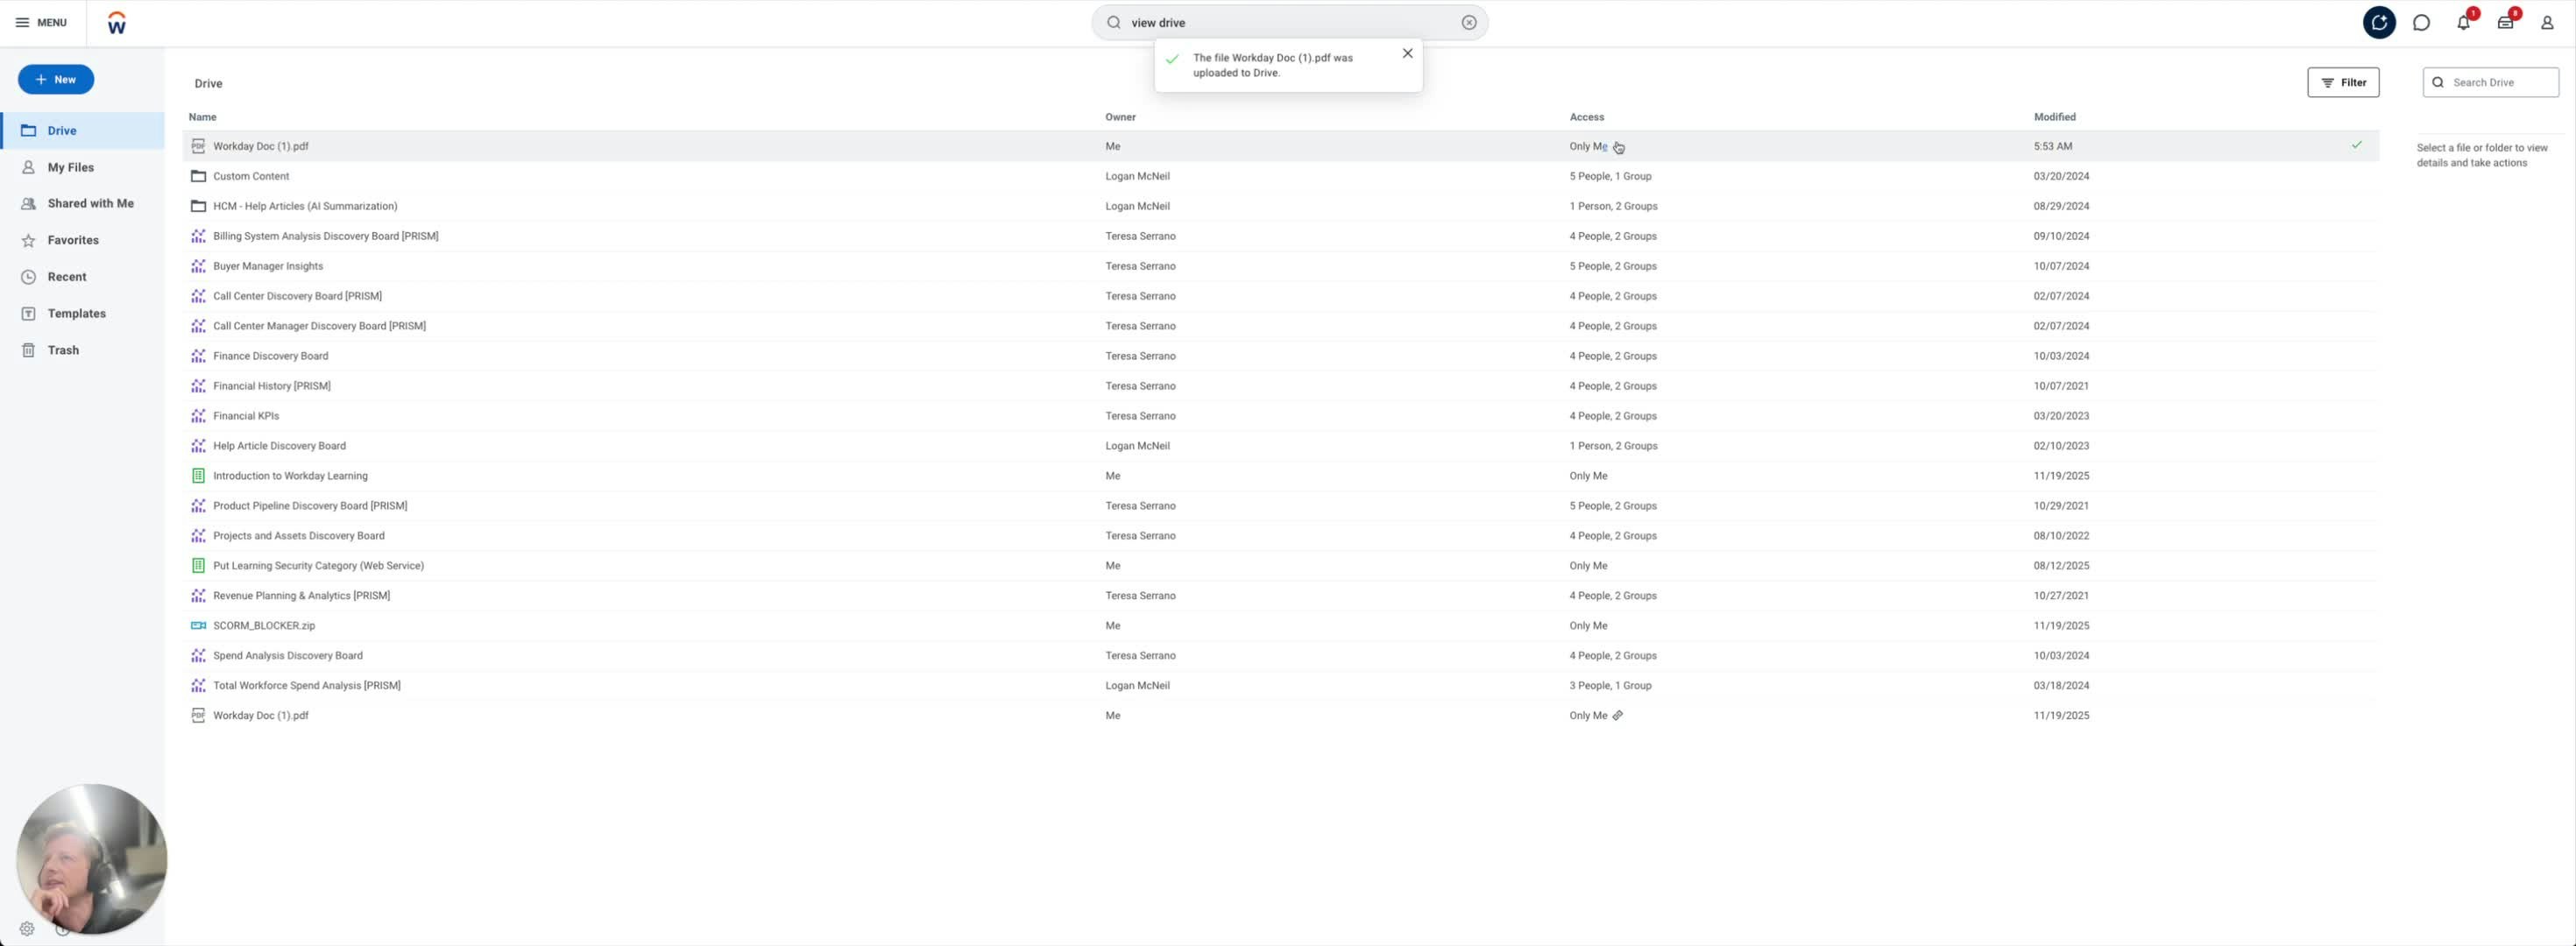
* After selecting the file, confirm the upload.
* Wait for the upload to complete.
[Watch this step](https://loom.com/share/badd4d0b64c349ec8f99e5638e6ea790?t=29)
* After selecting the file, confirm the upload.
* Wait for the upload to complete.
 [Watch this step](https://loom.com/share/badd4d0b64c349ec8f99e5638e6ea790?t=43)
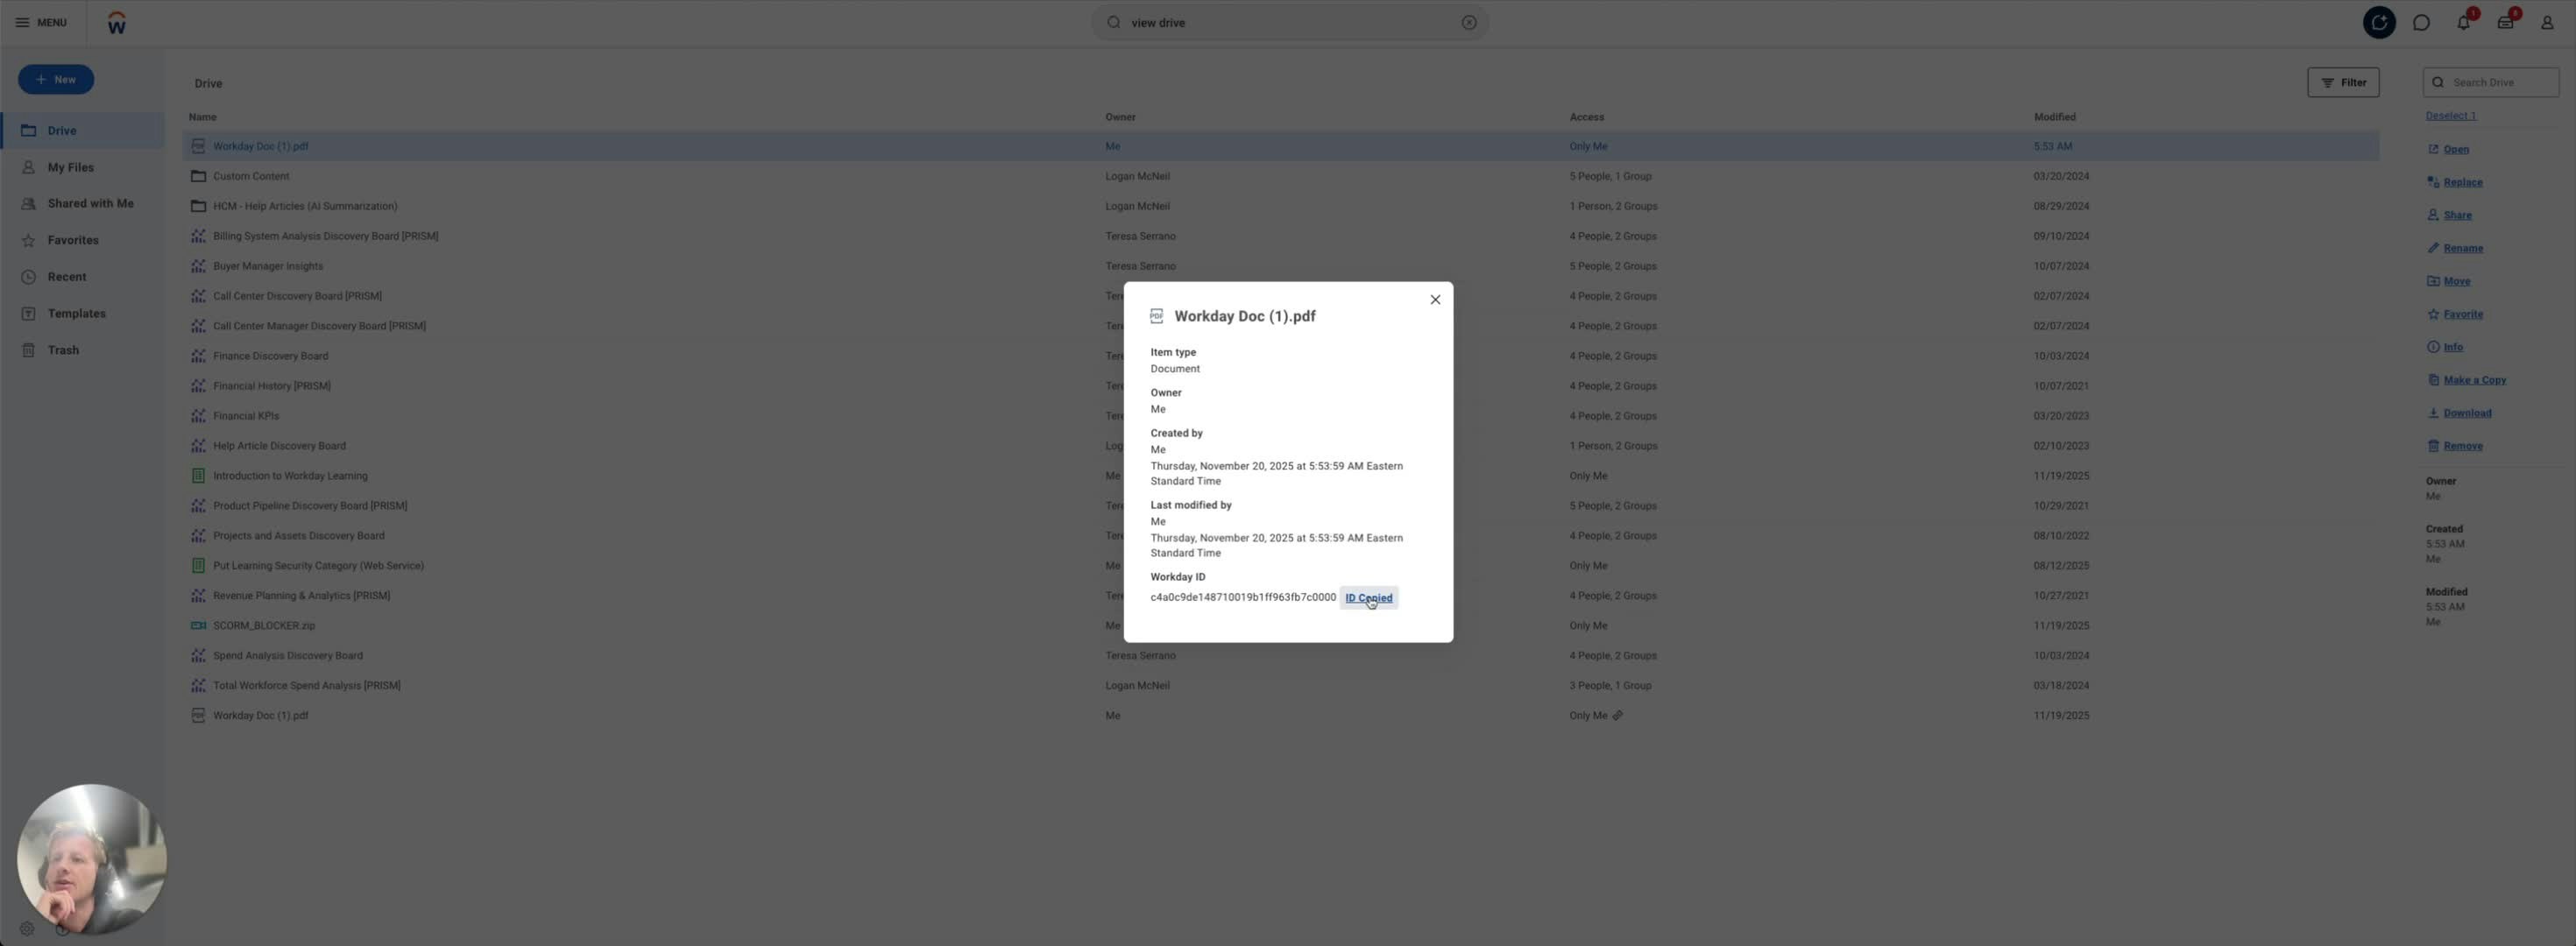
* Click on the uploaded item to view its details.
* Navigate to the 'Info' section to find the Workday ID.
* Copy the Workday ID for future reference.
[Watch this step](https://loom.com/share/badd4d0b64c349ec8f99e5638e6ea790?t=43)
* Click on the uploaded item to view its details.
* Navigate to the 'Info' section to find the Workday ID.
* Copy the Workday ID for future reference.
 [Watch this step](https://loom.com/share/badd4d0b64c349ec8f99e5638e6ea790?t=54)
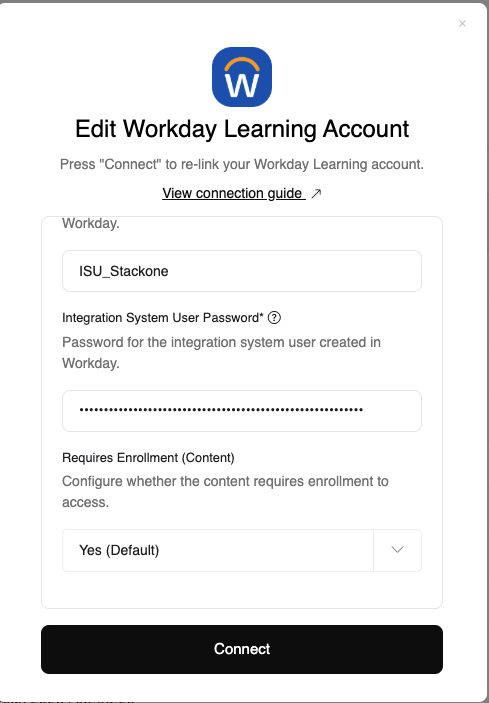
## Linking your Account
You can use the Tenant and System User credentials you created in steps 1 & 2 to link Workday.
Workday offer the option for content to require enrollment before it can be accessed by a user.
You can select whether to turn this on or off via the **Requires Enrollment** field in the account linking step.
By defult this is set to `Require Enrollment: Yes (Default)` which is the Workday default.
You can turn this off by selecting `Require Enrollment: No`, this will allow a user to access content without having to enroll.
[Watch this step](https://loom.com/share/badd4d0b64c349ec8f99e5638e6ea790?t=54)
## Linking your Account
You can use the Tenant and System User credentials you created in steps 1 & 2 to link Workday.
Workday offer the option for content to require enrollment before it can be accessed by a user.
You can select whether to turn this on or off via the **Requires Enrollment** field in the account linking step.
By defult this is set to `Require Enrollment: Yes (Default)` which is the Workday default.
You can turn this off by selecting `Require Enrollment: No`, this will allow a user to access content without having to enroll.
 ## Troubleshooting
If you are having trouble linking an account or creating content initially it may be due to the permissions configuration.
Please check the correct permissions are configured for both PUT and GET of Learning Content and Learning Records.
Workday API reference: [https://doc.workday.com](https://doc.workday.com)
## Troubleshooting
If you are having trouble linking an account or creating content initially it may be due to the permissions configuration.
Please check the correct permissions are configured for both PUT and GET of Learning Content and Learning Records.
Workday API reference: [https://doc.workday.com](https://doc.workday.com)