> ## Documentation Index
> Fetch the complete documentation index at: https://hub.stackone.com/llms.txt
> Use this file to discover all available pages before exploring further.

# Staffology HR

> Follow these steps to connect Staffology HR via the StackOne Hub successfully.

<Warning>
  Ensure you have Admin privileges for your Staffology HR account.
</Warning>

If you've been directed to StackOne to integrate with Staffology HR, the following steps will help you understand the process and any necessary actions to configure a successful integration.

This guidance assumes you have Admin privileges for your Staffology HR account.

## Enable API Access

<Steps>
  <Step title="Login to Staffology HR">
    Login to your Staffology HR account.
  </Step>

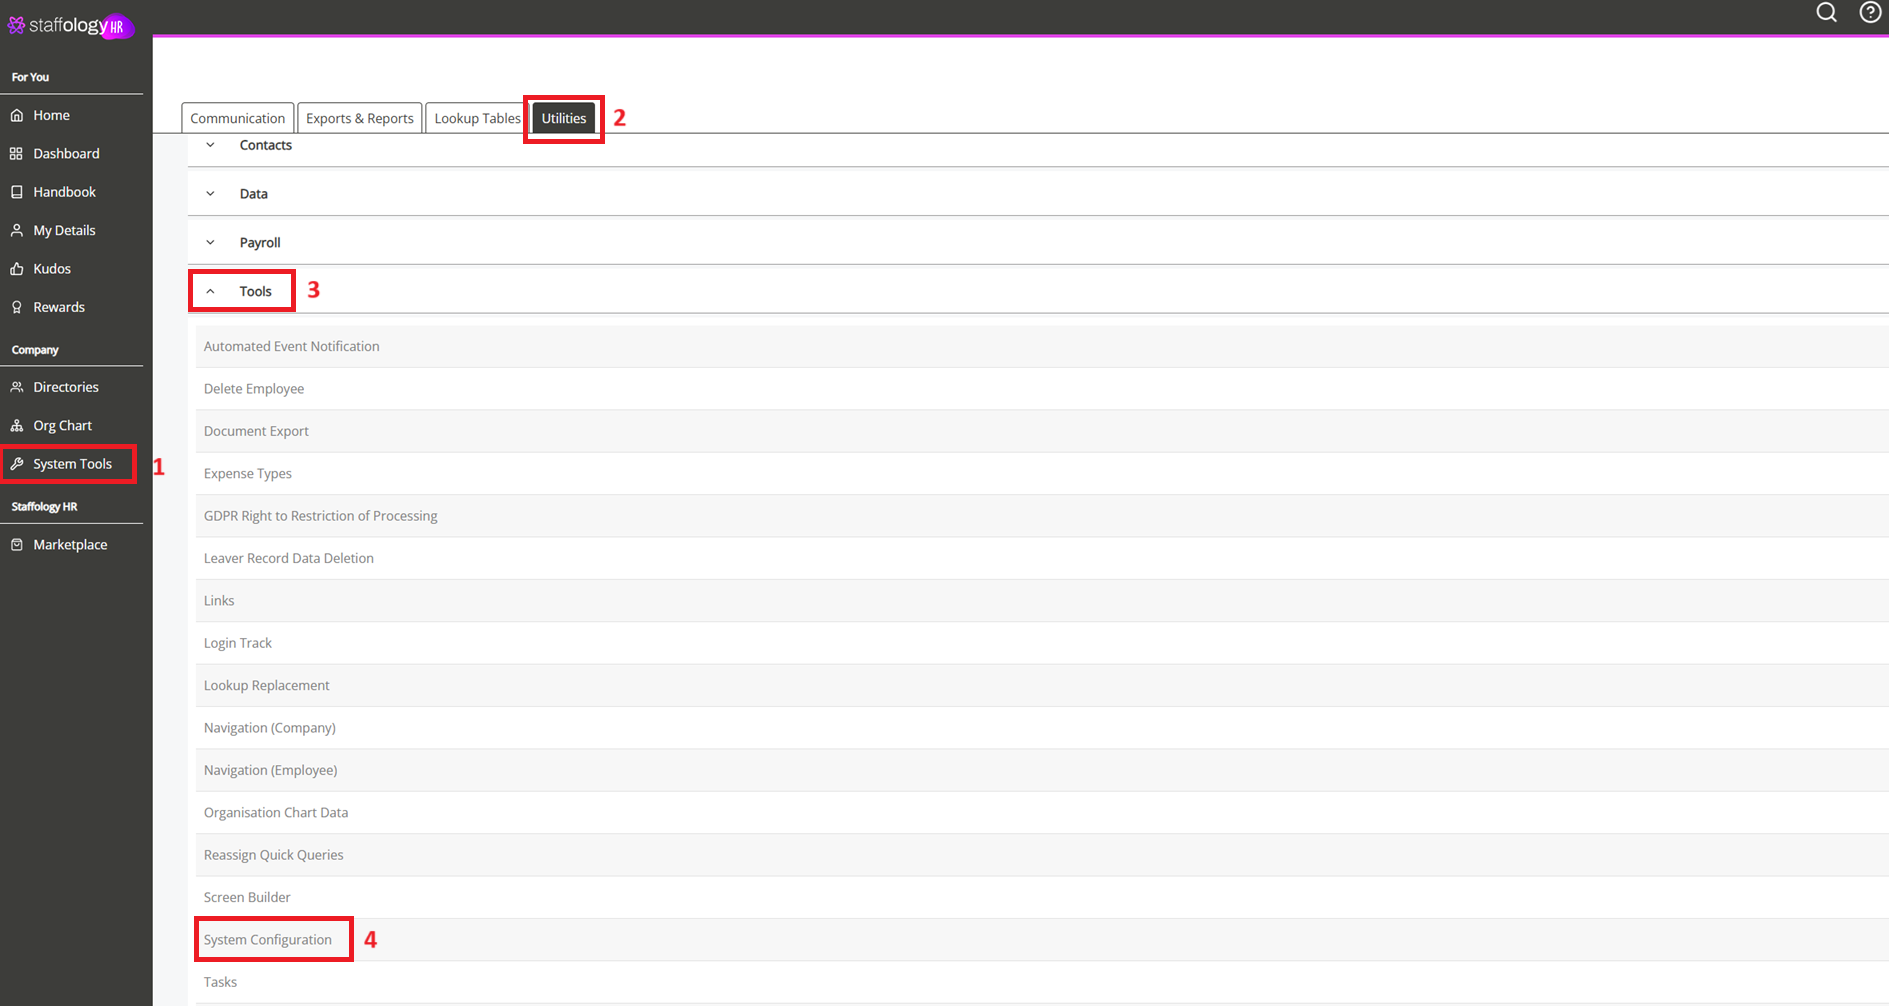
  <Step title="Open System Configuration">
    From the sidebar, navigate to: <strong>System Tools → Utilities → Tools → System Configuration</strong>.

    <Frame>
      <img className="rounded-md" style={{ margin: '0 auto', border: '1px solid #efefef' }} alt="System Configuration" src="https://mintcdn.com/stackone-hub/p-wmkeQfTwqbuimk/images/staffologyhr/image1.png?fit=max&auto=format&n=p-wmkeQfTwqbuimk&q=85&s=be33d3c0065b5120545d364e51478613" width="1889" height="1006" data-path="images/staffologyhr/image1.png" />
    </Frame>
  </Step>

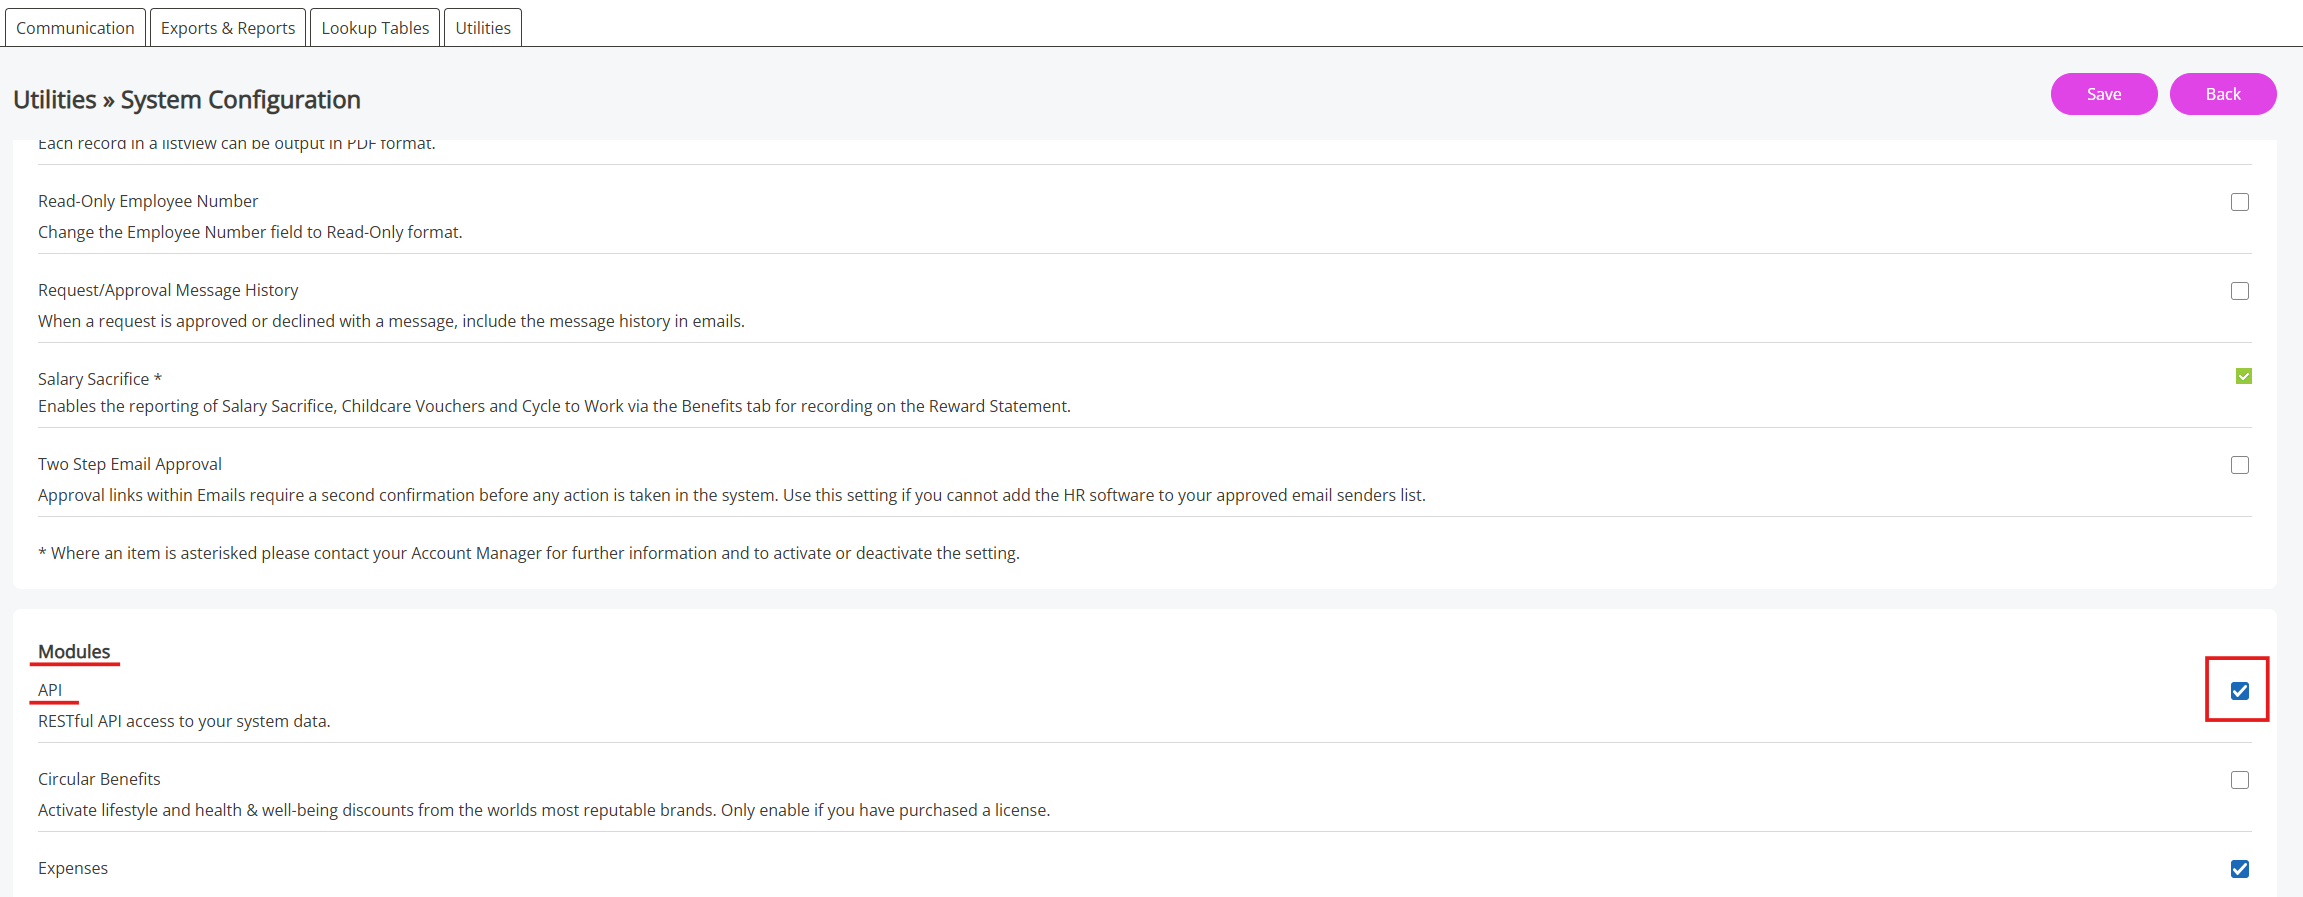
  <Step title="Enable API Access">
    In the <strong>Modules</strong> section, select the <strong>API</strong> checkbox to enable API access.

    <Frame>
      <img className="rounded-md" style={{ margin: '0 auto', border: '1px solid #efefef' }} alt="Enable API Access" src="https://mintcdn.com/stackone-hub/p-wmkeQfTwqbuimk/images/staffologyhr/image2.png?fit=max&auto=format&n=p-wmkeQfTwqbuimk&q=85&s=454493966ac7210a2c9b4a5b8b5d0b8f" width="2303" height="897" data-path="images/staffologyhr/image2.png" />
    </Frame>
  </Step>
</Steps>

## Create an API User and Generate Credentials

<Steps>
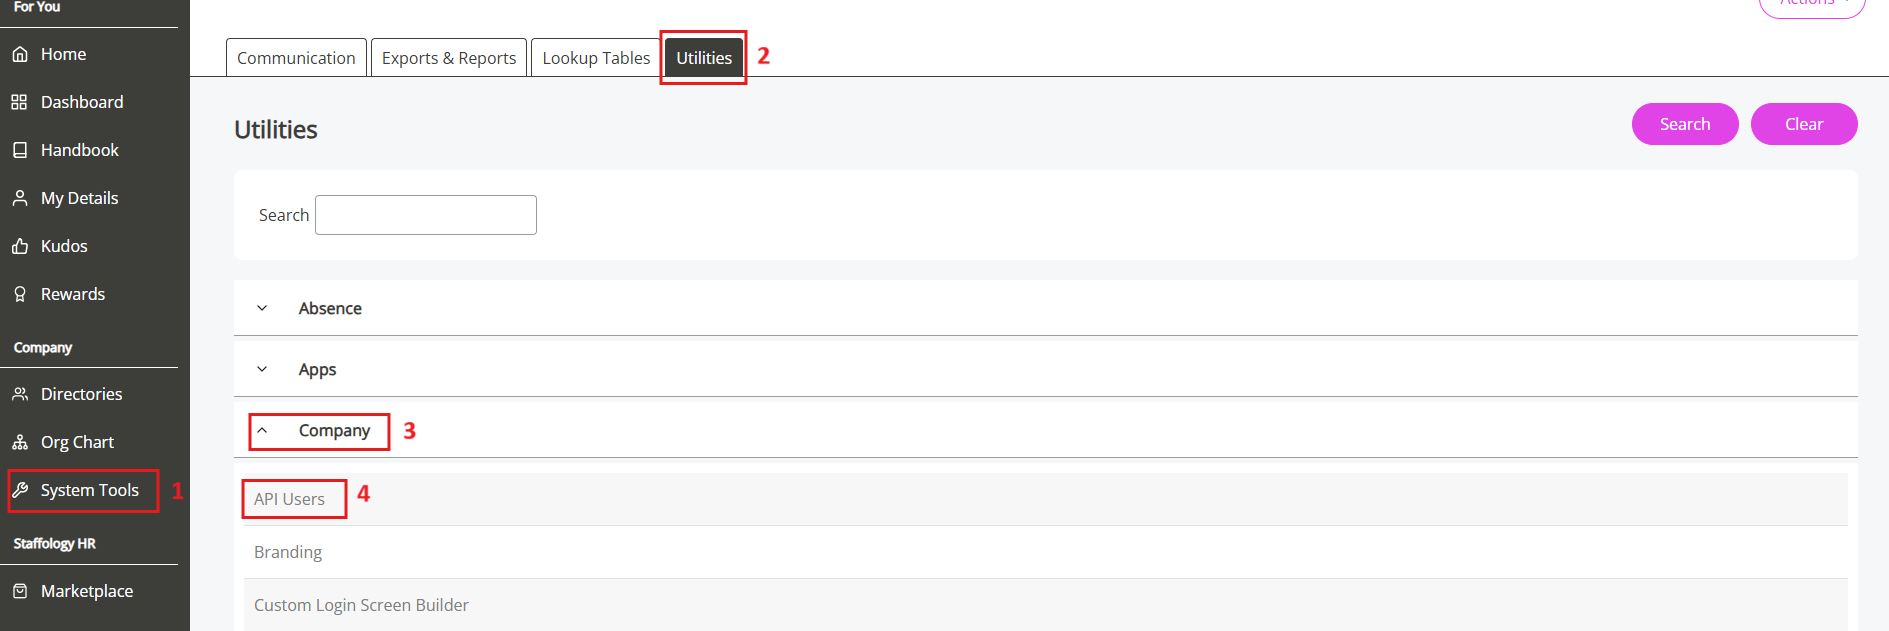
  <Step title="Go to API Users">
    From the sidebar, navigate to: <strong>System Tools → Utilities → Company → API Users</strong>.

    <Frame>
      <img className="rounded-md" style={{ margin: '0 auto', border: '1px solid #efefef' }} alt="API Users" src="https://mintcdn.com/stackone-hub/p-wmkeQfTwqbuimk/images/staffologyhr/image3.png?fit=max&auto=format&n=p-wmkeQfTwqbuimk&q=85&s=58b3625de936ced0199e1ed3ee70181f" width="1889" height="631" data-path="images/staffologyhr/image3.png" />
    </Frame>
  </Step>

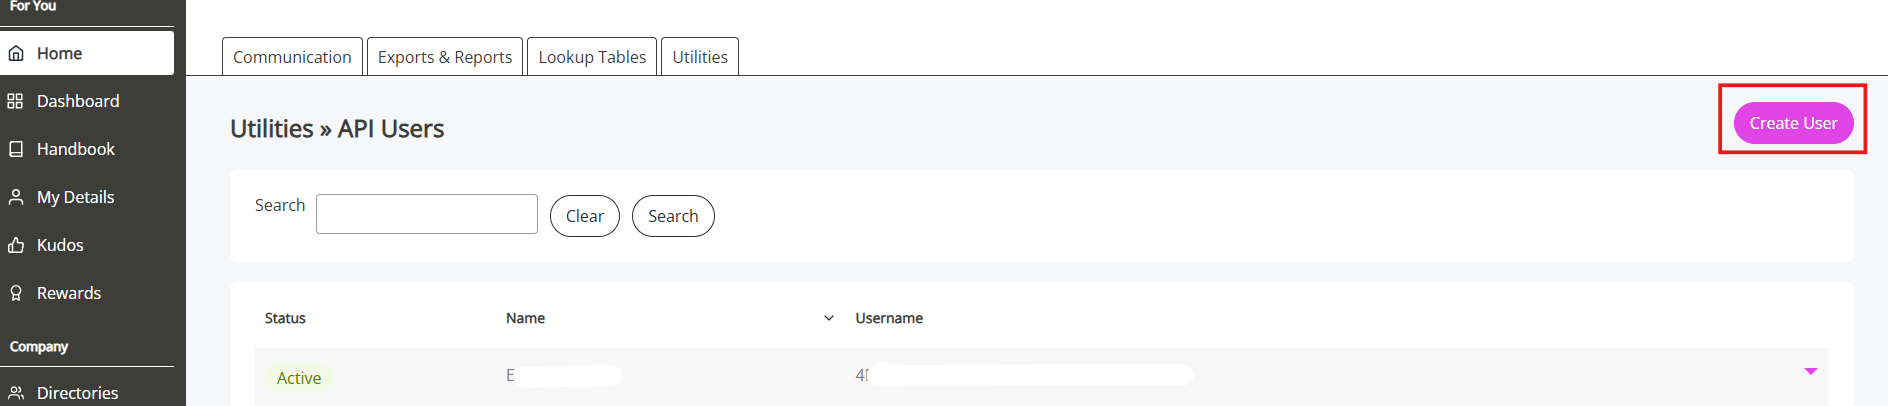
  <Step title="Click Create User">
    On the <strong>API Users</strong> page, click the <strong>Create User</strong>
    button to start creating a new API user.
    <Frame>
      <img className="rounded-md" style={{ margin: "0 auto", border: "1px solid #efefef" }} alt="Click Create User" src="https://mintcdn.com/stackone-hub/p-wmkeQfTwqbuimk/images/staffologyhr/image4.png?fit=max&auto=format&n=p-wmkeQfTwqbuimk&q=85&s=133111a3398d85dc5c4b0e08f11ef379" width="1888" height="406" data-path="images/staffologyhr/image4.png" />
    </Frame>
  </Step>

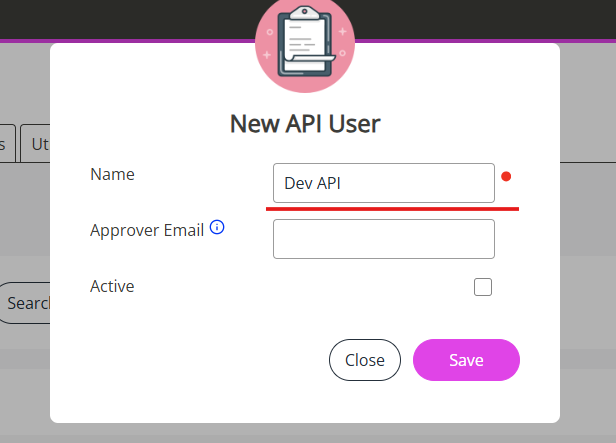
  <Step title="Enter User Details">
    In the <strong>New API User</strong> popup, enter a name for the user that
    relates to the API integration.
    <Frame>
      <img className="rounded-md" style={{ margin: "0 auto", border: "1px solid #efefef" }} alt="Enter User Details" src="https://mintcdn.com/stackone-hub/p-wmkeQfTwqbuimk/images/staffologyhr/image5.png?fit=max&auto=format&n=p-wmkeQfTwqbuimk&q=85&s=cab5c0ef23c16d616791731e426a158d" width="616" height="443" data-path="images/staffologyhr/image5.png" />
    </Frame>
  </Step>

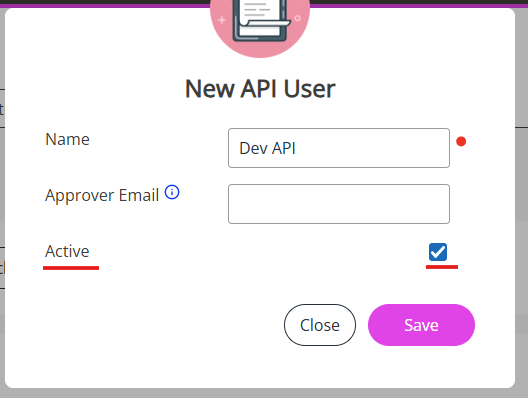
  <Step title="Activate the User">
    Select the <strong>Active</strong> checkbox to enable the user.

    <Frame>
      <img className="rounded-md" style={{ margin: "0 auto", border: "1px solid #efefef" }} alt="Activate User" src="https://mintcdn.com/stackone-hub/p-wmkeQfTwqbuimk/images/staffologyhr/image6.png?fit=max&auto=format&n=p-wmkeQfTwqbuimk&q=85&s=3da72d80ea0417dd33cc806191ba0c61" width="528" height="398" data-path="images/staffologyhr/image6.png" />
    </Frame>
  </Step>

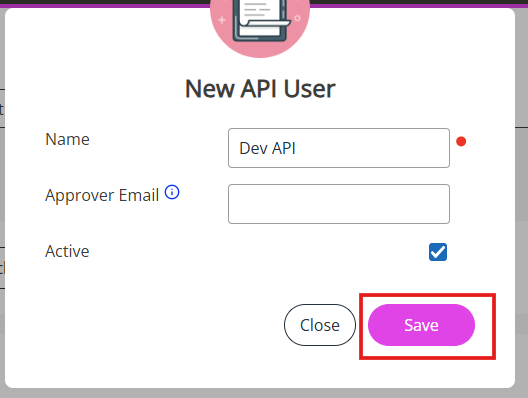
  <Step title="Save the User">
    Click <strong>Save</strong> to create the API user.

    <Frame>
      <img className="rounded-md" style={{ margin: "0 auto", border: "1px solid #efefef" }} alt="Save User" src="https://mintcdn.com/stackone-hub/p-wmkeQfTwqbuimk/images/staffologyhr/image7.png?fit=max&auto=format&n=p-wmkeQfTwqbuimk&q=85&s=1ae70529ef7f94fb09bcccd2d8158863" width="528" height="398" data-path="images/staffologyhr/image7.png" />
    </Frame>
  </Step>

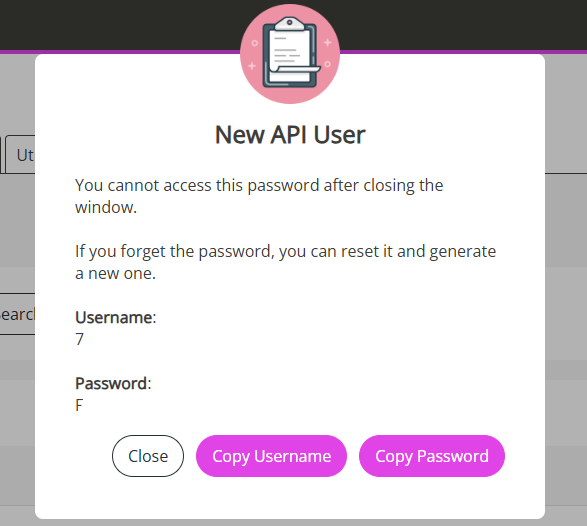
  <Step title="Generate Credentials">
    Saving will generate a <strong>Username</strong> and <strong>Password</strong>
    for the API user.
    <br /> Copy and securely store both credentials.
    <Frame>
      <img className="rounded-md" style={{ margin: "0 auto", border: "1px solid #efefef" }} alt="Generate Credentials" src="https://mintcdn.com/stackone-hub/p-wmkeQfTwqbuimk/images/staffologyhr/image8.png?fit=max&auto=format&n=p-wmkeQfTwqbuimk&q=85&s=5f3b8b754e6753f77169284e7036d482" width="587" height="526" data-path="images/staffologyhr/image8.png" />
    </Frame>
  </Step>
</Steps>

<Note>
  Creating an API user grants full <strong>Set Rights</strong> permissions.
</Note>

## Connecting with StackOne

<Steps>
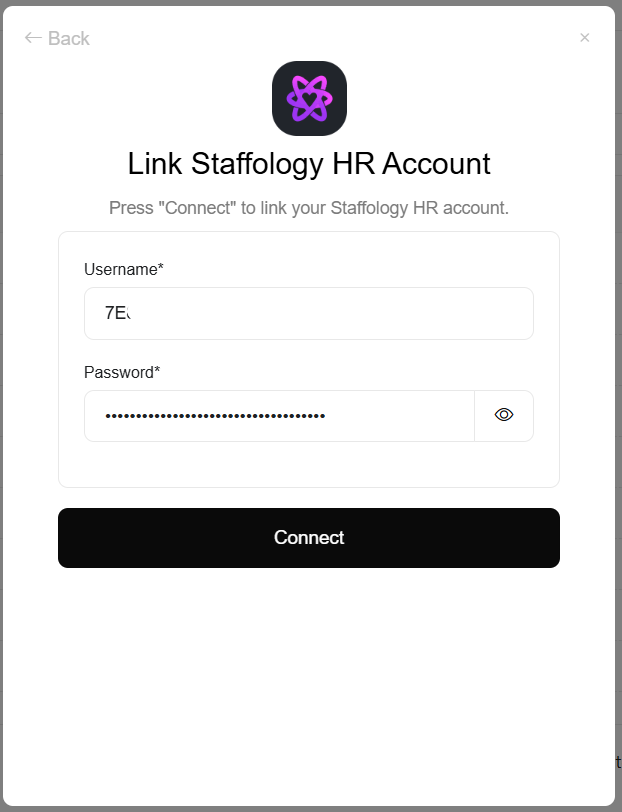
  <Step title="Enter Username & Password">
    Upon reaching the Link Account page, enter the gathered username and
    password and proceed by clicking the `Connect` button.
    <Frame>
      <img className="rounded-md" style={{ margin: "0 auto", border: "1px solid #efefef" }} alt="Link Account" src="https://mintcdn.com/stackone-hub/p-wmkeQfTwqbuimk/images/staffologyhr/image9.png?fit=max&auto=format&n=p-wmkeQfTwqbuimk&q=85&s=fe754159b0fc2d91f15ca3feb357c286" width="622" height="812" data-path="images/staffologyhr/image9.png" />
    </Frame>
  </Step>
</Steps>

## Useful Links

<Card title="API Reference" icon="link" href="https://help.staffology.co.uk/hr/integrations/api-user-create.htm">
  [https://help.staffology.co.uk/hr/integrations/api-user-create.htm](https://help.staffology.co.uk/hr/integrations/api-user-create.htm)
</Card>